


I painted the stairs when we first moved, and they’re definitely showing wear. Plus, I had a little…uhm…accident (Blackberry + paint = Sticky phone that doesn’t work) with some white paint which dripped all the way up the stairs. I have no excuse for the cranberry walls except that I thought it’d be a good idea to use leftover paint we had from the front door. Let’s just chalk it up to a bad pre-home-design-blog-obsession days, mmm k? I think it’s safe to say that it couldn’t really get any worse. I started by painting the risers white, then gathered my supplies for the paper bagging:
- Roll of brown paper (near the painters drop cloth)
- Gallon Elmer’s glue (bought at AC Moore with a 40% off coupon and barely made a dent in it)
- Gallon Water Based Floor Grade Polyurethane (about $40)
- A few cheapo sponge brushes for the poly

Instructions:
- Begin by tearing pieces of brown paper. Rip the straight edges off the roll and tear them into random pieces (I used about 4-6″ pieces for stairs…for a floor you’ll probably wan’t 8-10″ pieces).
- Tear the middle portion of the roll into similar pieces. I used two grocery bags to keep my pieces separates, crumpling each piece into a ball before it went in.
- Mix up a bowl of glue using a 3:1 ratio (3C water to 1C glue).
- Working on the perimeter first (straight edges), drop the paper balls into the glue and squeeze them gently like a sponge.
- Keep dipping and squeezing until the paper is saturated, then flatten it out and squeegee it with your hands. Lay your pieces down as if you were decoupaging, overlapping in areas.
- Be sure to smooth out wrinkles (although some will crop up during the drying process, they will likely disappear later) and air bubbles.
- I did every other stair so we could still use them.
- Once everything is done, allow 24-48 hours for it to dry completely.
- Apply at least 6 coats of water based polyurethane, lightly sanding between each coat if you want (I only sanded between the 5th and the 6th). Follow the guidelines on your poly for re-coating/drying time.

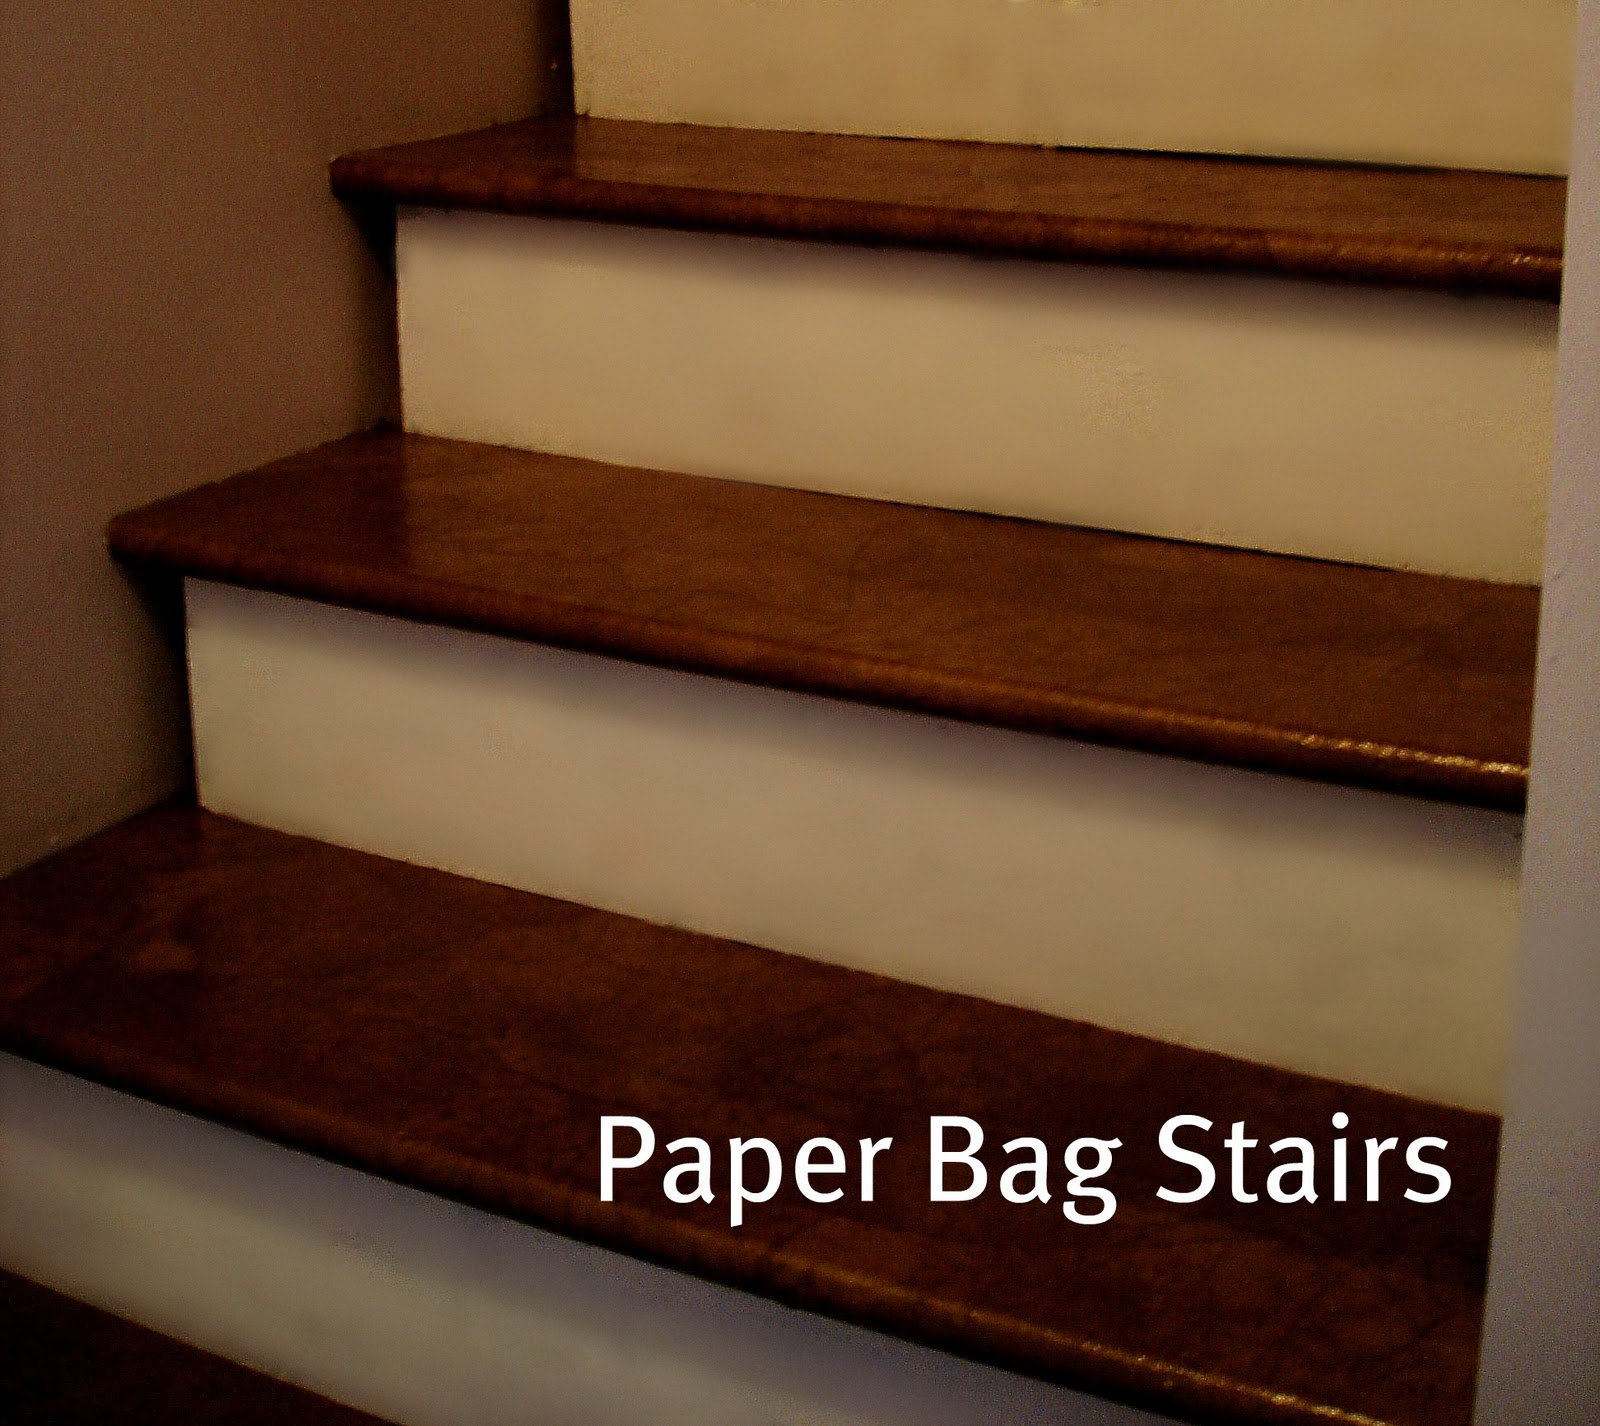
After the stairs were done, I repainted the stairwell with my fav color: Burnished Clay by Behr. It would have been easier to paint before I did the stairs (note to self), but I was able to get it done without too many issues. If this result isn’t a testimony to Behr’s Ultra paint/primer in one, I don’t know what is.

{After}


I love the stairs. I’m very much going to try them soon. I really like how you did the risers as well. I just finished my first paper bag floor in a bedroom. I ended up having to re-paper 3 times due to stupid mistakes. I blogged about it because I thought others might be able to learn from my mistakes. 🙂 http://apurposefulpath.blogspot.com/ Enjoy my adventure. Thank you for sharing yours!
That looks great! What kind of material is that on the stairs prior to treating? Is that plywood? How durable is it? I’m just concerned about what type of material is under my carpeted stairs. Please respond…Great job!!
I just went to a ladies house and I was like oh I love your stairs and she was like I did it with paper bags I was like what and she told me how she did it and now I am going to totally going to do this in my whole house it looks so good and it is not expensive. Now I am excited.
I love this!! I’m going to do this over paneling and I was wondering do u think I could do this over old laminarte tile (all one piece) floor for basement stairs? I would like to do this this weekend. Thanks for ur feedback
Great idea and i cant believe the finish look you have retrieved from a bunch of paper bags. i love it thanks for sharing.
Jim z
Wow!
Ditto with getting rid of carpet. At 70 years old, I ripped up all my wall-to-wall and laid down 99 cent, light birch colored squares of linoleum. Love it with jute rugs.
After decoupaging tins with paper bags….I am itching to graduate to something BIGGER!!!
I did my stairs with stickdown squares, but paper-bagging them is really intriguing me!
Thank you for all expertise!
I am bookmarking your blog and will follow religiously
I love this but I have a couple of questions. How is it holding up under both human and animal traffic? Have you heard of anyone cheating and putting it down over nasty old linoleum? I think I have the hubs just about on board and he has agreed to let me try it out on a section of the basement floor, he didn’t say how.large a section, but we are moving in the right direction.
Thanks!
Vickie
I love what you have done and I am trying very hard to talk my love into doing this. can you tell me who durable the brown paper bag floors are? I have two small dogs
Can I use paint instead of stain before applying the poly layer?
thank you all, very informative
Love this idea. We really HAVE to get rid of the old ugly carpeting on our second floor and our budget is pretty low. I am going to have to consider this as an option. It looks cool!
Your stairs look great!
I remember years ago seeing Katy Bartholomew (a craft/design ‘wizard’ of the times) do an entire floor using brown paper bags. It was something I had put in my files for ‘some day’, and so far I’ve never tried it.
I loved your stairs – we are going to do a concrete basement floor.
Can I add either paint or stain to the brown paper? Should the brown paper be painted or stained before or after it is laid down with the glue all over it?
Mary – we did a few steps we have, and we stained them after it was dry. Then we went back once the stain dried and did polyurethane. I think if you stain or paint first, the glue may not work.
So how is this holding up over time? I’m thinking of doing my stairs with this technique.
I did my steps and I’m thinking of doing my living room and hallway. Do you recommend staining it all at once or can I do the living room one day and the hallway the next? Im just worried about them not matching…(seeking the cut off line..
If I was to add stain would I do so before the polyurethane? I’m doing my living room this weekend…
Yes, I am pretty sure you add the stain before the polyurethane.
xox
Would this be durable enough for a garage floor. Maybe with more poly layers???
The brown paper flooring covering is a great idea. Would like to know how it holds up in 6 months after being walked on.
Couple of questions: We are in the process of doing our dining room/kitchen floors with this. I picked out a lighter color oak stain to use. It was turning out very splotchy looking with big wet spots throughout the floor and lots of wrinkles. Will the wrinkles go away? Or is that suppose to be the look? The stain spots are not as appealing either. Any suggestions would be greatly appreciated… Ty
I didn’t use waterbase poly either and got little brown spots that should have been golden. What I did was put more paper over the brown spots and covered it with 5 coats of glue and let it dry thoroughly. Then I polyed over those spots a few times and when it was dry I polyed over the whole project a few times again. Next time I would use water base and make sure I had a good layer of glue over everything. That would save a lot of time. Thanks for a bright idea!!!
i want to try this in my kitchen, it has lineolim on it and then squares on top of that, do i have to remove these to do this?
Great post. You could make use of your available resources like brown paper to make your stairs look more appealing. Following the given procedure step-by-step could help you become more successful with this project.
Just ripped down 100 year old wallpaper in hallway only to find cracked and dinged plaster walls. Even after patching they look awful…this is the perfect solution. Thx!
I have dark spots on the floor where glue didn’t wrinkle out. I’ve put 3 coats of ply but not water base. How do I repair dark spots so there are nice golden color like rest of floor. Also I stained it a golden oak. Thanks
Hello
I did my stairs n stained them. Then put the poly on but used the one that wasn’t water base. Spots that were not sealed with glue turned into a dark spot. I’ve put 3 coats of poly on. Is there any way ro patch up the dark spots
Thanks jeanette
I started the bpbf and the video said it will bubble up making you think you done something wrong but its fine it will go down as it dries wellllll……..they didnt so now wat do i do n where did i go wrong
Hello,
I have done this type of treatment on tables and walls so far.Now I think that I will do this
to the floor next.Thanks for the idea.
Hi. I saw this blog several weeks ago and am intrigued! Do you know, or have you tried, doing this same thing, in basically the same way, on laminate counter tops? Our kitchen and bathroom are in need of major changes, and until we can do the big things, this might be a great thing to do in the interim. We’ve refinished floors over the years, and we always use water based poly to cover them. I wonder if it would work (several coats) on a counter?
And thoughts about any of the above would be appreciated.
I like floors and the you described everything.
Awesome !!!
I like floors and Interior decoration too.
I love the look so I am trying it on our bathroom counter top. I run into a snag though. Some of the pieces are darker than others and there are fingerish dark spots after I did the poly. So I covered those dark spots with more paper and they looked fine till I polyed them. Whats the scoop? I started a second roll of paper and wondered if it was thinner than the first also could it be the glue was too thin the second time?? Or is it because I used the poly that isnt water based?? Thanks for your help!!
I love how this floor looks! I am wondering if It could be “white-washed” before the poly?? I am considering this technique for my dark basement craft room and don’t want it to be too dark.
I did this on my wall it goes great with primitive stuff which I love love love but I have run into a problem. I put polyurethane on the walls to seal it but it has soaked into the paper and it doesn’t look right. what kind of seal did you use and what kind of paper did you use I used shipping paper…..
how well you think the paperbag on floor would hold up. i need to pull carpet up so BAD.
I have never seen hardwood flooring like this. Amazing! Thanks for sharing your ingenuity!
Very creative work!—Stamped Concrete
OH MY GOSH… my brain is churning. i think i'm going to do this in my craft room. i might incorporate glitter. much to my husband's dismay! hahahah love it!
We did this in our son's room two or so years ago (sort of a cowboy theme). It has held up well. Interesting to think of it on a floor…pretty cool! Here's the link to ours: http://thedominguezfamilyblog.blogspot.com/2009/02/yeehaw-were-done.html
This looks great! I did this to a table top and loved the results too! Love cheap and cheerful solutions like this.
Wow, Rachel, I love seeing how the paper flooring technique did on your stairs- beautiful! What a great transformation.
And I can attest to the durability, even on stairs- we had them on well-used stairs for three years in our old house before we moved and they looked as good as the day we did them. It really is amazing…I never expected that type of wear.
Now I just have to figure out how you were able to see my article, complete your stairs, AND write this post all before I even received my Cottages & Bungalow issues in the mail! 🙂
-Jami
An Oregon Cottage
I have seen this done on walls before too! Looks great…love it on the stairs also!
Freaking awesome!! Never ever would have believed this could be done. I was just saying yesterday that the new half door in the kitchen needed some kind of covering. I will be using this to do the door as soon as I get my hands on some supplies. Thanks for the inspiration!
This is great, I love the look! It might be a neat technique to try on my old table…
Thanks for sharing!
What an AWESOME idea! You did such a GREAT job! I'm totally impressed – and now both my sister and I are just dying to try this — and we both still live at home with our parents . . . I wonder what they would say to their daughters brown papering their floors, walls, ceilings, and anything else they could get to? 😀
Bookmarking this for my basement utility room! Love it!
That is awesome! Never thought of floors, I did our bedroom furniture this summer. Got super sick of all the oddball hand-me-down pieces knowing we could not afford a matching set, so I used this method to all our master bedroom pieces and the end result was pretty good! Love anything that is rockin' what 'ya got with as little money spent as possible. Great job!!! Might have to try this on one of my floors!!
Thank you for responding! And thanks for the tutorial!
I am definitely going to use that technique on our stairs – we have a 4 level split, 3 half flights of stairs – the previous owners put different coloured laminate flooring on each level and left the old (gross) carpet on the stairs. The choice was either tile or more carpet… I hate carpet (we have to dogs….) and tile is expensive…
Thank you for helping find another inexpensive option, I cant wait!
-Courtney
This is just what my disgusting basement stairs need! Thanks you so much for posting I will be saving this for a spring time project!!
craftyswag.blogspot.com
Oh my gosh! I can't wait to do this! I've been putting off recarpeting some pretty ugly stairs because of the cost, but this freakin rocks!
Wow! I was just getting ready to paint some stairs and now am rethinking it. So cool!
D.I.M. Incorporated- As long as you're not using harsh chemicals or leaving it wet for a long time, it should be fine for many years. I treat it the same as hardwood.
I did this in my bathroom and when I sold the house 11 years later it was still my favorite floor. Had to touch up once in front of the shower after about 8 years but I just ripped up what was there, patched it in and polyed over the top…good as new!! Tons os compliments- everyone thought it was leather!
Karen, did you have any issues with the floors during your home appraisal when you sold it? Did they ask you what kind of flooring it was?
I’m about to cover my whole house in paper flooring, but I’m also about to refinance (leaving the existing flooring is not an option due to its condition.) I read that painted concrete is considered “unfinshed” and is listed as “no flooring,” and I’m hoping paper floors wouldn’t fall into the same category.
OH YEAH!!!! What a perfect idea for my UGLY stairs!! Thanks for the great idea. I can't wait to try it.
I love the looks of this on walls and floors and stairs but the only thing I worry about is how well it holds up? I mop and wash down my walls every few months. What do you clean it with?
Barbara- The paper itself should be dry enough to walk on gently (socks maybe?) if left overnight. If you do a coat of poly at night before bed you could walk on it during the day. Just clean it before you put the next coat on. I used a water based fast dry poly called Pro Finisher by Parks and it was dry to the touch in less than an hour. Hope that helps!
@Barbara, My paper bag floor takes a lot of abuse, Between 2 little boys, my husband and I dropping things, my 2 cats and my black lab the floor is really holding up well. The best part is that if it gets scuffed you can just clean it really well and put down more poly!
Omg this is one of my favorite decoupage techniques, I NEVER would have thought to take it a step further and use it on floors. Absolutely stellar job.
I'd do this on my kitchen floor if I knew it would be durable. I cook a lot, and from scratch, so I'm in the kitchen a long time every day. I'd have to close it down for a few days, but maybe I could cook enough ahead that we could live out of the fridge while it dries. I am so tempted.
Lilliedale- just scoped your blog, love the kitchen! So nice to hear that the floors are doing well!
Teri &Nike- I'd love to see your finished projects!! Good luck!
Teri- I use my Kirby to sweep them (P.S. Kirby vacuums are amazing), then I use my swiffer wet jet with a homemade solution (vinegar, water, and mrs. meyers) and a microfiber washable pad. It's the same thing I use on my wood. I'd be hesitant to use a traditional mop because I think they make the floors too wet.
*Squeal*
LOVE THIS! This just finally convinced me to toss our ugly carpet on the stairs and do this! I have the brown paper on hand already …(yes!) and can't wait to see how it turns out. Thank you for the inspiration!
~Nike@ChooseToThrive
I am so changing my mind right now! I was going to do my basement stairs with crate-like painting like Funky Junks, and now, I love this more, because I can get rid of the cheap wood on my steps!!!! What does a girl do?
I did this in my kitchen and I love it!It was so cheap but is so beautiful and durable, I'd recommended it to anyone!
Oh my goodness, I have an ugly set of basement stairs that could REALLY use a face lift, this is perfect!
i love this, it turned out great, and i agree behr with the primer built in is awesome.
This is awesome! It looks fab! I would definitely do it!
Yay! Thanks, Rachael! I can't wait to see how it turns out! I just read your comment about this being the same stuff used on hardwood, so I imagine it's pretty tough. 🙂
I love this effect! My mom and I did this to my floor when I was in highschool. It looked just like leather. Great!
Teri- I did a test board for my stain upstairs and decided the best time to add stain is after the paper is completely dry (before poly-ing). But if you want a less saturated look you could do it while the glue is still wet (it goes on lighter this way). I rubbed it (vs dabbing or sponging) on with a cloth. I would def recommend just putting some paper on a piece of scrap wood and trying different techniques to see what you like best though! I am using Minwax Dark Walnut and it is GORGEOUS so far.
Also…how do you find it cleans? Do you just use water? Or can you use floor cleaner on it? I am seriously WAYYY to freaking exciteda about this. Clearly I need to be in that club with you. LOL 🙂
Dixie Mom- You would definitely need a top coat of something to make everything smooth, but maybe you could use something less permanent than poly. Just a clear coat like Mod Podge or something similar would work.
Oh my gosh – this is freaking brilliant! We are just about to buy our first home, and I think I may have to try this (we also have animals and carpet is problem!) Question – at what point in the process would you add a stain? (Hopefully I haven't just missed that part of your post! 🙂
Oh my gosh, that was so inspiring! I wonder if I can do that on the wall? Do I have to use the poly coat over the top if I do?
Holly and MelissaH-
I have read that it wears like any other poly-ed floor. I put at least 6 coats on those stairs and will probably do 8 on my upstairs. If you use floor grade poly, it is the same product that would be used on hardwood floors. You can use this technique on any smooth surface, although with concrete I'd make sure it was sealed first so that it didn't suck up the glue away from the paper.
But if you do need to repair, just get out your paper and glue and patch it up 🙂
The flooring idea is amazing! I've actually done this technique on walls, but it would have never dawned on me to do it on stairs or the floor. Genius!!!
Can't believe how cool that came out. I was first like, craft paper? Really? Love it!
Wow! That is amazing and such a jaw-dropping after pic with the walls painted too! love it! Off to check out her blog!
This is a neat treatment. One of my talented neighbors did this to her powder room walls!
super cool. When I started reading the tutorial, I thought, no way. But they turned out fabulous. I love the piece-y look.
Love the stairs! About ten years ago, while I lived in Florida, I visited a friend who had done her entire dining room using a brown paper technique. It was stunning!
Wow! What an amazing look. Just wondering about if it would work on concrete basement floors and how durable? I suppose if it stands up to 4 animals then it could stand up to 4 kidlets too, right?
Wow! I love this idea. It's very original! I would definitely do this on my stairs-good job!
Holy cow! That's awesome!
That is BEAUTIFUL!! I wish we were homeowners. There are some really creative ideas that I see out in blog-land that I would love to try & this is definitely one of them!
Thanks for sharing!
~Kalen
Pumpkin Pie Design
I don't have stairs, I do have some very tired berber in the living room that needs replacing. I know what I'll be doing on my vacation! Thanks. Got any good tips for how to keep the cats out? 😉
I never thought about this for stairs. It looks awesome. I will definitely keep this in mind if I ever redo our stairs.
Wow, that looks amazing! I have never heard of this technique…how cool. I want an update after they have had a year of wear & tear, though, please. 🙂
Thanks so much for the positive feedback! I'm actually beginning to tackle the upstairs (with the stain added) and it's turning out great! I will definitely share when I'm done. I will be happy to answer any questions as well. Thanks Jennifer for the feature!
Saw this post on your FB page and had to come by. What an incredibly cool technique!
Great! I am doing this in my son's room this spring. It gives a leather look. Going over and checking out her other projects.
Wow! This is amazing!
I LOVE it! Thank you for featuring her!! I'm her newest follower:-)
I definitely want to do this on my stairs! Thank you so much for the tutorial!