
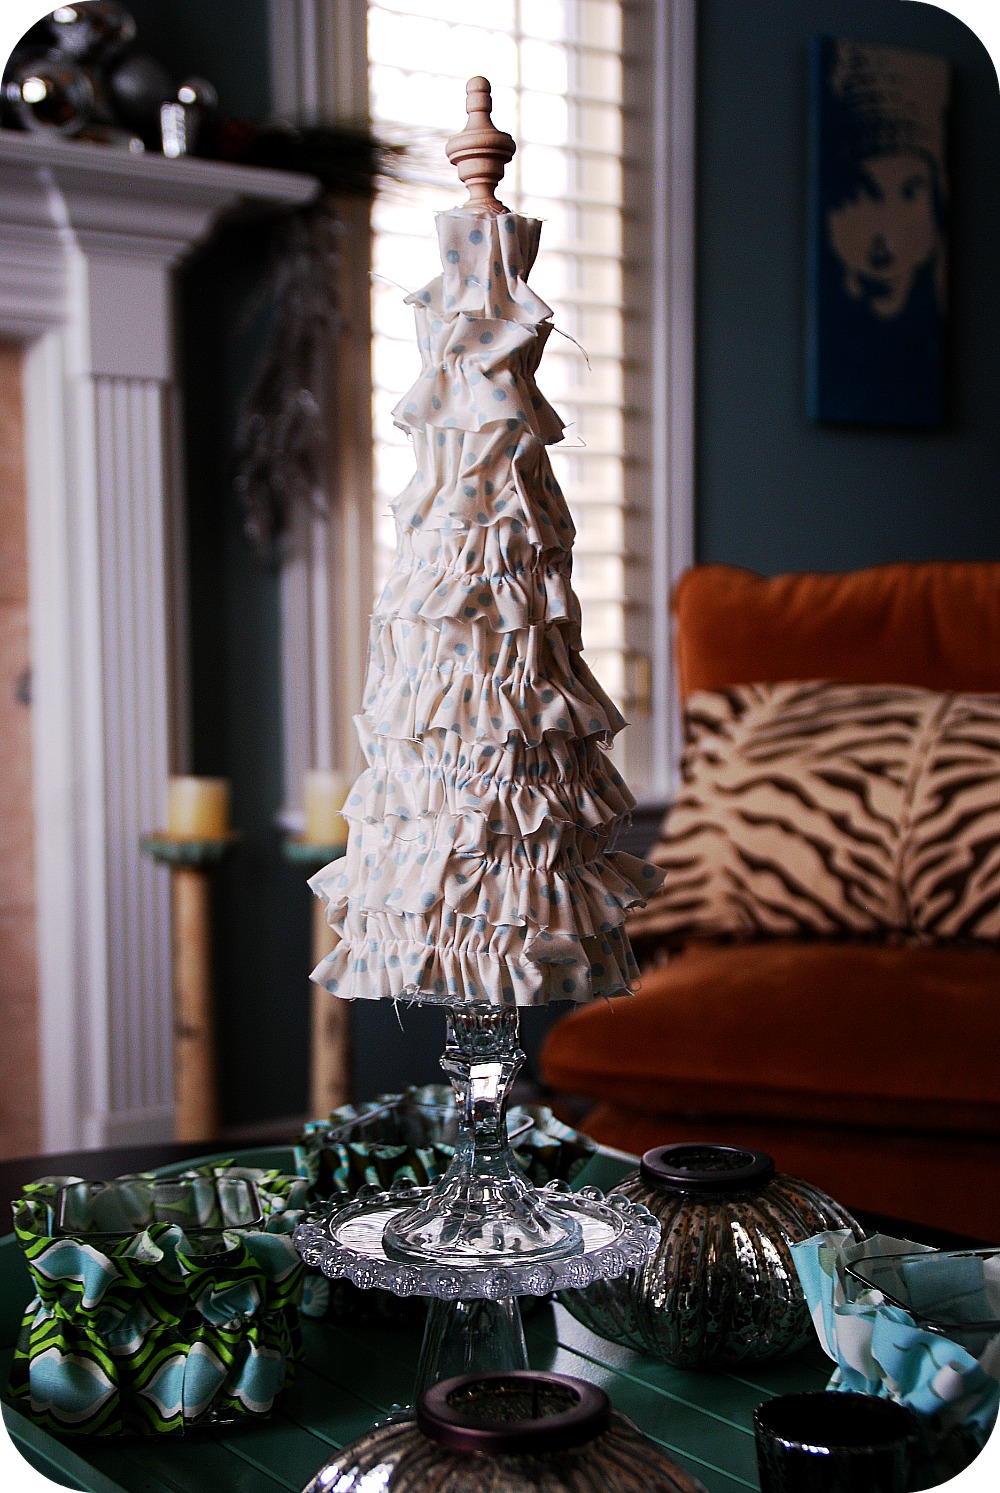
I have had a few requests for a tutorial for the Ruffle Tree I did in my Living Room.
So the other day I made a little Ruffle Tree forest!!
So the other day I made a little Ruffle Tree forest!!
And along the way I stumbled across a few tips, I thought I could share with you:
Ruffle Trees:

Supplies:


- Fabric — Depends on what size cone you use and how ruffly you want your tree to be. For a large cone, a 120″ long by 2″ wide strip of fabric makes a pretty ruffly tree. For a very ruffly tree you would need a 150″ long strip. You can use a fat quarter if you want, just sew the strips together to form one, continuous ribbon on fabric.
- A Syrofoam cone or a sheet of cardstock.
- Hot Glue Gun
- Finial for the top (optional – I found mine at Hobby Lobby)
- Wood bases for bottoms of trees. (also found at Hobby Lobby)
- Paint (optional, for bases and finials). For a beachy look, leave unfinished.
*** Styrofoam is expensive. You can use a sheet of scrapbook paper or cardstock instead. Simply roll the paper up so that one end come to a point. Then I stapled that edge and hot glued the rest of the edge down. Then I traced the bottom of the cone on another sheet of cardstock. I would recommend using cardboard on the bottom because it is sturdier. The last thing is to hot glue the base to the cone.


Here’s what I did:
- Cut out fabric strip. It should be 2 inches wide and the length depends on the size of the cone. One way to figure this out is to take a piece of string and wrap it around the cone, every 2 inches from top to bottom. Then double that total for a slightly ruffled tree. Or triple the length of the measurement for a very ruffly tree.
- You not have a long enough piece of fabric, in that case sew the pieces of fabric together so it makes one, continuous strip.
- Use you biggest setting on your sewing maching and sew a line down the center of the fabric strip.

- Gather up the material.
- Then hot glue one of the edges of the strip to the bottom of the cone, then wrap the fabric along the cone, overlapping each layer until the entire cone is covered. If you are using a styrofoam cone, put pins in the cone to hold the fabric in place as you wrap. If you are using a paper cone, hot glue the bottom edge to the paper and wrap the ruffles along the cone until you reach the top.

- Once the entire cone is covered with fabric, glue the end of the fabric strip to the top of the cone, the same as you did on the bottom.
- Then hot glue the layers of fabric to the styrofoam of paper. If you use a styrofoam cone, hot glue the fabric at each place that you pinned earlier.


- Experiment with the wood bases that you purchased. Hot glue different bases together so all of the bases are different heights.
- Then paint the bases and the finials/wood balls.
- Once the paint is dried, hot glue the finials to the top of each ruffle tree. Do the same thing with the bases.

Now you have a Ruffly Tree.
I love that you can use whatever fabric that you want. I used blue, which matched my decor and I love that it looks Christmas-y, but also fits my home.

***Enjoy***
If you make some, send me the link. I’d love to see them and feature them on the Tatertots and Jello Facebook page.
I hope you are having a great day!
I’m linking up to these fabulous parties – check them out!!

![]()


![]()


![]()


![]()
![]()


So cute!
How to you plan to store them if they are only made with only cardstock? I made some stuff this year that I love and I am terrified as to how to store them safely and in a way that they aren’t a big hot mess next year when I unpack them. I always have trouble with trees anyway and leave a collection on top of the electric fireplace in the room that is now my studio. Not a great look in July but I can’t figure out a safe way… your thoughts would be greatly appreciated. They are super cute- love the addition of the wooden stands -they really take it to the next level.
hey, i really like this idea, and i think i’m going to do something simular! thenks for idea!
Hi Jen,
I absolutely love this project! I would love to link to it on AllFreeChristmasCrafts! If this is something you'd be interested in, feel free to contact me. Just shoot me an e-mail – jlitz (at) primecp (dot) com. Thanks!
Just dropping by to let you know that I linked to this post in a round up today from the Home & Garden channel at Craft Gossip. 🙂 This will appear in the main Craft Gossip RSS feed, on the main home page and can be found directly here
http://homeandgarden.craftgossip.com/25-christmas-tree-crafts/
If you would like a "featured by" button, you can grab one here!
http://homeandgarden.craftgossip.com/grab-a-craft-gossip-button/
Hi Jen….
You have one of the best web-sites I've seen. As a crafter myself, I'm so excited to read your ideas.
I saw your site via a friend on Facebook and I'm sure glad she posted it!
I'm currently working on the fabric trees….
THANK YOU !!!
Gaby 6..^
Very cute indeed!
thats just awesome! i need a sewing machine.
I love this! I am going to try to make this today. I bought two cones a week ago to make topairies and haven't made them because I couldn't get motivated. Now I am! Thanks!
Love them Jen! Just fabulous!
love these!
they make such a statement all grouped together. great color combos too. (as always.)
take care!
kellie
Oh Jen….these are darling!!!
Jen, these are adorable! They're so fun and funky for the season! The white one with turquoise polka dots is my favorite (:
Thanks for your ruffle trees! Here are mine. http://withjoycarey.blogspot.com/2010/12/tis-season.html
Wishing I had seen the rolled paper idea earlier. For next year, right? :)Thanks for all your inspiration. With Joy, Carey
Oh wow! so unique n interesting… loved it…
I did a post on unique christmas trees in my blog – http://inspirationforhome.blogspot.com
And I would definitely say that this is one of the best n unique ideas for a Christmas tree decor…
How on God's green earth did I miss this!? Adorable!
Who else can take something so simple and make it look so cute? Great job.
Hi- Great color combo! We posted some of these on our blog that we tried out….we used glass jars and filled with dollar store ornaments and candy…
http://coffeeatthree.blogspot.com/2010/11/burlap-ruffle-trees.html
Oooh! I love them!
I think I may have just died and gone to crafting heaven.
Can't wait to try this out…..
I love these ruffle trees!! The fabrics are so cute – and I love that you don't use styrofoam either. Thanks for the great idea!!
Totes adorbs! Love them so much.
I love these! Great idea and such a cute look for the holidays!
Those are simply to die for! Another great project for sure!
I love your little trees. So cute! Love how you grouped them and the great fabrics, too!
So cute! Love your little grouping of them on your table. Awesome as always!
So cute!! And the finials make it so whimisical. I love them! Great tutorial!
Great tutorial! Would be wonderful in lace, too, don't you think — for a wonderful "snowy" effect. Thanks for the lovely idea!
These are so adorable! Thanks for the tutorial. =) WISH I sewed more because these would be on my list!
How fuN! Maybe for next year. I have so many projects still on my to do list right now, I just don't think I can fit another one.
I stumbled upon your blog from a friend's blog and was so happy to see your ruffled trees! Just today I posted a tutorial on Almond Trees here: http://littlethingsbringsmiles.blogspot.com/2010/12/almond-tree.html.
I love your ruffled trees and may try it, what a great idea and perfect to give as gifts :)Thanks for a fun colorful, festive project!
I was going to say these are cute, but several others above me already did! Just adorable!
very cute
Oh my sweetness sakes! Those are sooo cute 🙂 If I have some time, I just may make a few. Thanks for the tutorial!
xo- Carmel
I've been meaning to make one of these and your tutorial was so helpful! Thank you!
so cute. i love the different fabrics.
These are beautiful. I love the way they look set up on the tray.
These are soo cute!! I wish I had seen this earlier, but I'm book-marking this for next year!!