
Hi! I’m Stacie with The Three Sweet Peas

 |


I mean, what is a mom to do when you have no place to store backpacks, coats, shoes, sports stuff.. Well, if you are like me, I would move them from one place to another to another.
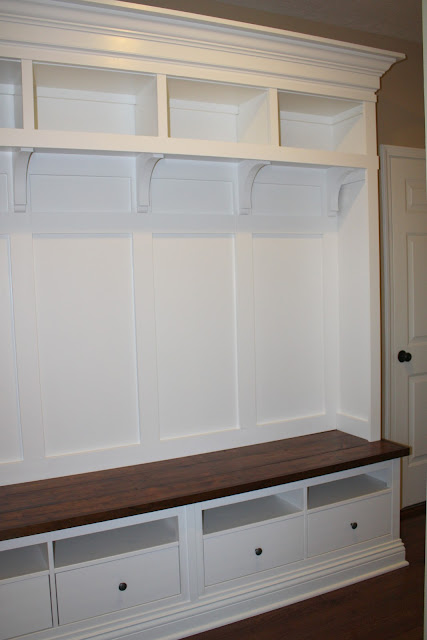
I eventually found a cool antique piece, that made the space work, but ultimately it was still not my idea of a perfect entry way. I wanted a furniture quality locker piece.
One day, while being “Pinspired,” I FOUND a perfect locker system, that would work in my home, and the base unit was from IKEA, of all places. And… so it went, I put my husband to work!
 |
|
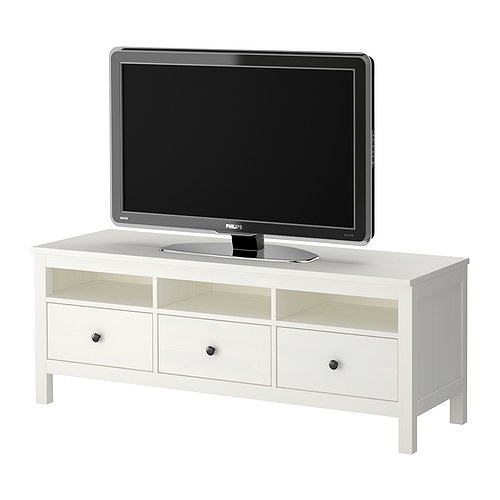
Hemnes Unit Dimensions: Width: 58 5/8 “Depth: 18 1/2 “Height: 22 1/2 “ |
The actual dimensions of our unit is as follows, it will need to be adjusted to fit into your home: {The height of the actual unit is 92″ measured from the floor to the top of the crown molding, from the floor to the first shelf is 66.5″, from the floor to the second shelf is 78.5″ and the total width of the unit is 57″.}
The Lumber List that we used is below with the actual UPC codes and are from the Home Depot and Lowes. The list does not include: Liquid Nails, screws, caulking, paint, and any other miscellaneous tools needed to build. 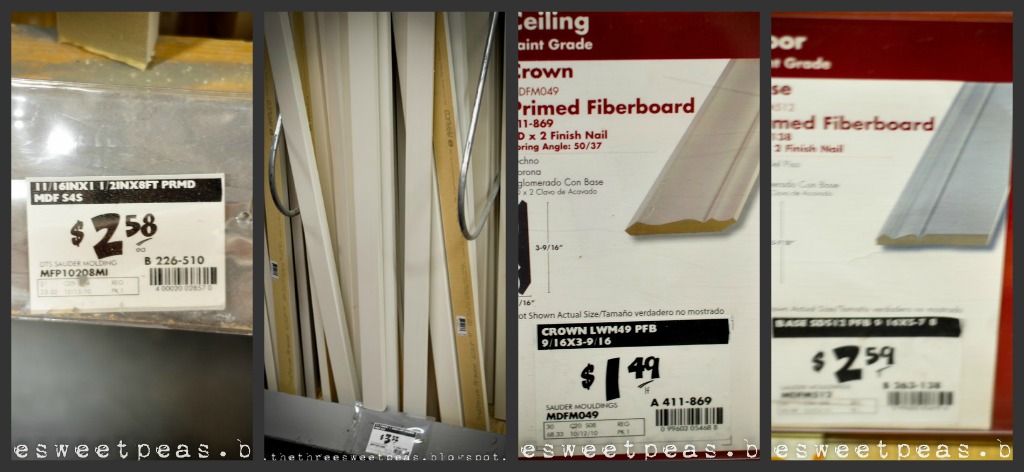

First things first!
- We set out to calculate and figure out what would fit into our entry way space. We found that the three drawer TV unit, Hemnes, from Ikea, fit our space perfectly.
- We purchased the base unit, there was no turning back! I was THRILLED!
- My husband was NOT!While my husband was busy assembling the Hemnes piece, I took the top board of the unit and sanded the wood piece down to the bare wood. It was stained with three coats of Minwaz stain; walnut color, two coats of Ralph Lauren black glaze, and two coats of polyurethane.
- This will need to be done before you can attach it to the furniture piece.

- After the unit is assembled you will place the unit where it will sit permanently in your home. It will need to be attached to the wall either by screws or nails. Locate the studs and attach through the back.

- Add crown molding and cut with a compound miter saw at 33.9 bevel and 31.6 miter for an outside, 90 degree cut.
 |
| Finished Molding |
- You will add finish molding to the fronts, sides, and top of the unit. After all of the moulding is in place get out your caulking gun and start filling in the holes. This is a very long process but necessary for the finished look.
The cabinet was painted Martha Stewart Heavy Cream. The accessories are from Hobby Lobby.
And the finished product:


AND… the PINSPERATION
Thank you Charming Nest!
Having a GRAND GIVEAWAY today!
XOXO
Stacie

Stacie – your lockers are truly beautiful. I have seen them in real life and they are so so pretty!!
I am so excited to introduce you to Stacie.
She is my real life friend and she is also helping me with the TT&J Weekend Wrap Up.
Plus, Stacie is also SO talented and is going to share a monthly tutorial on TT&J!!
Yay!! Here are a few of Stacie’s other fantastic ideas:
")
Stacie has a fun Monday Theme on Mondays — Messy Hair Mondays. Where she takes this:

And transforms it to this with instructions!!

As well as all sorts of other great ideas:
Like this idea for Bow Storage:

And, Stacie is having a fun giveaway today —
be sure to stop by to win something really fun!!
At The Three Sweet Peas!!
xoxo

This post sponsored by PurseBling:


Today, while I was at work, my cousin stole my iphone and tested
to see if it can survive a thirty foot drop, just so she can be
a youtube sensation. My iPad is now broken and she has 83 views.
I know this is totally off topic but I had to share it with someone!
Question: Is the Hemnes 48″ or 58″? I can’t find a 58″ on ikea’s website.
Love the transformation
I was seriously drooling reading this post! I love this so much! Wish my house was bigger! 😀
I love this and it would be fantastic in my rainy, wet, Oregon home. Hinted to Mr Fox… we’ll see 😉
I guess finishing our siding is a tad more important. lol
Shared it to my fb wall… gotta pass on this Grand stuff.
That looks great! Love IKEA and all it has to offer. Thanks for the shout out…and so glad our project inspired you! Erin from {A Charming Nest}
http://www.acharmingnest.com/2011/07/mudroom-storage-reveal.html
Amazing transformation! I love though how it looks so stylish and it still serves it’s purpose.
Wow this looks great! I love getting new ideas for coats & all that stuff that goes along with them!!!! Great job!
OMGoodness!!!! I LOVE LOVE LOVE THIS!!! I will totally be doing this here in the new future, thank you!!!
THIS LOOKS AMAZING, I THINK I COULD DO IT,WANTS IT TO LOOK JUST LIKE YOURS!!!
What an amazing project!!! I wonder if I could do this? Hmmmmmm……………
What an awesome project to share! Great job!
Wow what a great transformation and vision… Love how you added the stain it really makes it look like a catalog furniture piece..
Oh wow! I seriously need an IKEA.
This is VERY cool! I want one lol. 🙂
I love this!!! But just so I’m clear – that is a Hemnes base and the other items listed are for creating the top cubbie/locker areas and moldings?
I’m confused too–I don’t see any instructions for the top locker part of the piece. It just magically appears in the tutorial. Is it a separate IKEA product?
Check out this site…it gives instruction on how to do the top…
http://www.acharmingnest.com/2011/07/mudroom-storage-reveal.html
that link no longer takes you to anything but a list of vendors…do you have a revised link?
How I wish I had space in my house for an awesome project like this! I love really functional projects that are beautiful like this!
Great work!
Jamie
All I have to say is WOW!!!!!!!!!!!!!!!!!!!!!!! Love it,love it,love it. Brownie points for the hubby. 🙂
This is exactly what I need for our new front entranceway. Thanks so much!
I LOVE the look of this project! The stained piece really adds some nice character. 🙂
Wow, now this is a very cool project. I love the use of the vintage door knobs inside of the entry locker. Thanks for sharing.
Smiles, Paula
Absolutely fabulous! My hubs isn’t really handy, but maybe my father in law could do something similar! I absolutely love it!
Genious! I loves me some IKEA! I have the entertainment center that is in the Hemnes line. I might have to dash off to IKEA and get dh busy building.
BTW, doing giveaways on my blog all week!
Darn it. I spelled genius wrong.