
Jen is my bloggy bestie. We run The CSI Project together, Crafterminds, and we are doing a web show together in the fall. Yet I have never guest posted on her blog. I wanted to have the perfect project before I posted here. Well that day of perfection will never come.
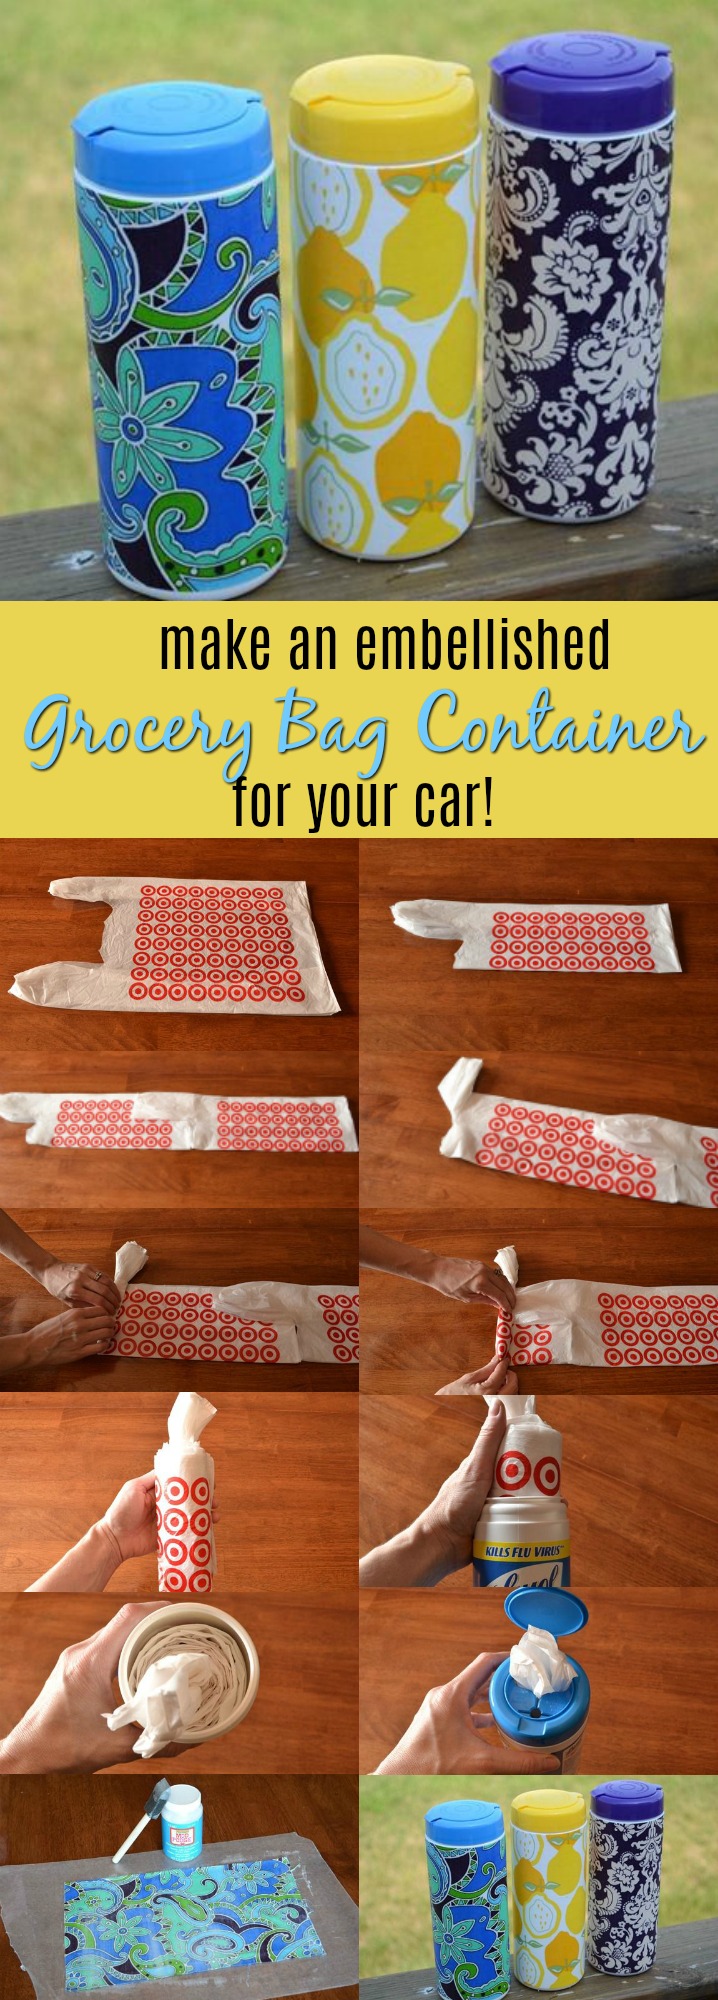
These are perfect to throw in a beach bag for wet suits. They are also wonderful to have in your car for summer road trips. Whatever you reuse plastic bags for having a container full of them looks a heck of a lot better than stuffed in a drawer. Plus they are so much more portable this way.

I figured out how to fold them so that they are interconnected and one bag comes out at a time but pulls the next one out a little.
Supplies:
12 plastic grocery bags (I used Target ones)
coordinating fabric
Empty wipe container
Fabric Mod Podge
Foam brush
Spray adhesive
scissors or rotary cutter
quilting ruler
1. Grab a dozen bags and flatten them out pushing all the air out.

2. Fold them in half again pressing all the air out.

3. Overlap the handles onto the top of the previous bag. Do this for all 11 bags lining them all up into one big row.

4. Fold the first bag’s handle upward. This will be your middle and the first bag you pull out of the container. All the other bags will be connected to this first one.

5. Now tightly roll up your bags tucking in the new handles as you roll.


6. After you roll up 12 bags you are ready to insert them into your wipes container.


7. Tuck the first bag’s handles through the top. Now you are done.

9. After it is dry cut it to size. For one of the Lysol wipes containers I cut mine 7 1/8” x 10 3/8”. Then glue it in place. I use a spray adhesive because it is quick and easy. Overlap the pieces one over another. Adorable and practical!


Here are some more summer fun ideas if you want to come to my house for a little bit:
Have you seen her signature “Roadkill Rescue” projects?
And you have probably seen Beckie’s “Countdown” Kisses Boards, she’s made different ones for several holidays. So cute!
And have you seen her Purple Board and Batten Bathroom?
Plus Beckie Runs Another fun site — Knock Off Decor. The girl is busy!!
You will love following along with Beckie as she scoops things up from the side of the road and transforms them into treasures at Infarrantly Creative!!







During your initial consultation (which should be free), ypur personal injury attorney will listen to
the facts and circumstances surrounding your accident.
to a study, most victims who sustained whiplash injuries will recover after a few weeks.
So, hire California personal injury lawyer timely to ensre that you
and your loved one can be adequately compensated for the damages that you have
experienced.
thank you for your tutorial ! 🙂
Wow – I love the embellished grocery container. I think you are a genius!!!! Thank you so much! Cody
Cool ideas & bite size , I tend to loose interest fast!
Is it just me…I can’t get all the air out of the bags to roll them perfectly. The smallest amount of air left in the sack creates troublesome bubbles that take up too much room. Any fixes because I love this concept.
I tried doing this and after I put it in the canister and pulled the 1st one out, the next bag’s handle came out to so I had to stick it back down.
Such great ideas, I’m glad I saw this today..
Great idea. All my wipe canisters are still full, sooooo I found an old water bottle that no one wanted anymore ( I have a zillion of these from over the years) and used that. It works perfectly! I did not decorate it but left it clear so I could see what was in there and how full it was! Thanks for the tip!
I found that if when you begin to roll up the handles of the next bag you stop and push the air out again and continue to do so with each following bag it’s really helpful!
the only problem I found is the air in the bags as I roll them. Makes it hard to get a good roll..
I found that if when you begin to roll up the handles of the next bag you stop and push the air out again and continue to do so with each following bag it’s really helpful!
How about poking a little tiny hole in the bubble to let the air out?
Most of these bags already have a small split and aren’t air tight, so one more little hole shouldn’t make a difference!
Thanks for the tip!
I absolutely LOVE this project. I can’t wait to try some. I featured your project on my blog at http://whittskitsfabricscrafts.blogspot.com/2013/04/mining-monday-fabric-scrap-project-ideas.html and put a link directly back here.
Thanks so much!
Carrie
What size container do you need? 🙂
Great and fun ideas. Thanks for sharing. 🙂
What a great idea…. Think ill cover a container in my favorite child print and give them to my girls to carry in their diaper bags to put dirty diapers in before they toss them in the trash can…. Love it!!!
That is amazing, I am over having bags filled with bags. so thank you heaps
Cant wait to try…tho I think I’m gonna need more than 12 bags (24 perhaps)…my contanier is a large Sani Hands Container.
Loved this,can’t wait to try. Thanks
I think the rolled bags idea is wonderful. i usually roll min into triangles but this way you can have them in the car. good for my grandchildren
I did a similar rendition thanks to your idea! Mine go longways and are in a Pampers Wipes container! I do have to laugh, my husband thought I had totally gone off the deep end flattening and rolling our old grocery bags!
Can u please tell me how to do that in a Pampers Wipes container?? 🙂 I can’t seem to figure it out, Im not understanding the longways part…
I would like to know how to do this with a huggies wipes container!
These are cool ideas. I should make and share it to my friends this coming summer.
Love this idea…Thx
Totally love this…already rolled up all my bags!!
I love your grocery bag idea! So pretty and definitely very useful!!
This is so awsome. FINALLY I don’t have a drawer/cabinet full of bags, or one bag stuffed full of a million other bags. This is so much nicer, more organized, and aesthetically pleasing!
Thank you for this post! What a great idea. I have dogs and we like to save grocery bags for their…well, you know… This would come in extremely helpful.
I loved this. I had a ton of extra bags so I pulled them all out, got them together and ended up with 9 rolls of these. When the roll on the container runs out I have 8 more ready in the drawer. It helps to put them in gallon zipper bags.
Thanks for this great idea. I just finish doing it and it works great. Now I am off to start decorating my decanter. This one will be for my kitchen. Next I am going to work on one for my car.
Stuff it with old newspaper and some unused coffee beans. That will take the scent out of any plastic. You have to let it sit several days, so be patient.
I developed a method to reuse / recycle both a 105 count Clorox Wipes container in addition to a 32oz Dannon Yogurt container. This technique creates a sub-irrigated planter / pot. I’ve been testing this with good success:
http://albopepper.com/albo-stein.html
im so confused on step 3? please help asap!!
I am confused on this step as well…it looks like the bags are halved, and then two sets of them are put together to overlap each other? The instructions make it sound like you have to do that with all of the bags..
Aha. Just reread..oops. It is just the FIRST bag where the handle is rolled up…duh for me! 🙂
Great ideas!! Thanks
This is a great idea! How do you get rid of the Lysol smell in the container? I recycle all my old grocery bags and we use our when we go to the lake. We sometimes use old grocery bags to place fish in when we go fishing. Do not need the smell of Lysol on our fish. Thanks
Run them through the dishwasher.
Sorry don’t have a dishwasher. I have tried to wash the container by hand but does not get rid of the Lysol smell. I was thinking of using vinegar to get rid of the smell.
I’ve read plenty of “how-to” lists for getting rid of odors and baking soda is mentioned a lot. That might work!
What a great idea! I am going to try it.
Finally! Someone who thinks just like me! I already have a large decorated container (Recycled from my sister’s home.). I just needed to figure out how to get my stack of plastic bags into it. Thank you so much!
Saw this on Pinterest, it’s GENIUS! Can’t wait to try it!
Saw this on Pinterest and wanted you to know I am making my own plastic bag container today. It may or may not be as pretty as yours, but the bags will be contained. Thanks for sharing.
Thanks for this. I’ll be doing this tomorrow!
Although I LOVE Mod Podge, may I suggest an even easier way to do that decorating part? Use shelving paper. It’s already sticky and comes in so many cute designs!
I found some contact paper at Dollar Tree!!! They has several designs and there is plenty paper on the roll to make several containers! I can’t wait to make these.
ADOREI SUA IDEIA! MUITO PRATICA E ECOLOGICA! PARABENS!!!
I just discovered your post through Pinterest, and had to give it a try. I didn’t have any wipes containers and my plastic bags were all mismatched. I used a plastic one gallon ice cream tub and cut a circular hole about 1-1/2 inch across in the middle. The bags popped out like tissues out of a tissue box! Now I’m wondering if this can be set up for my friends who recycle bags in their retail stores. Yes, it takes a little folding and prepping, but it can all be done in front of the TV. I stacked the bags on a coffee table and just pulled the next one forward from the bottom of the pile as I rolled them up. What fun!
what wonderfully clever ideas!
These are some of the greatest ideas I have ever seen…besides my little sister’s ideas. I am so in love with the bag containers. You just don’t know. Thank you so much!!!!
Lots of great ideas! Not sure how practical the grocery bag container is without being a crafter myself…but with the step by step directions I might just have to buy the supplies and give it a try!
I’ve always been concerned about the *Don’t reuse this container. But this is a cool project.
I saw this on pinterest and tried it tonight! Amazing! Thank you so much!
This didn’t prove successful for me, but it is a brilliant idea! In my case, the plastic bags took a little too much effort to pull out of the wipes container. I tried rolling them up twice, once in a looser way and the second time much tighter, and neither worked very well! Again, though, it’s a great idea and I’m glad I tried it! Thanks!
Great idea – I have a lil one in diapers – and I just use these baggies to wrap the diapers in – saves on space – gonna try for sure – question is – with the bigger cleaning containers – about how many bags do you think you can fit in there???? I’m looking for mass storage of these things lol – we go thru a lot of diapers and I use a lot of cleaning containers up!!!
I do estate sales for a living and we use recycled grocery bags for our customers’ purchases, this may just change my life. We are forever carting around bags stuffed with bags, this will be so much neater if I can find the time to do it. THANK YOU!
P.S. I have the same shower curtain in a different color 🙂
I just did the embellished grocery bag container project, I use the grocery bags as trash bags for my bathroom garbage cans, I didn’t have scrap fabric or mod podge… I used pretty contact paper to decorate to the container, thanks for the great idea 🙂
who the heck has time for this? LOL.
Obviously me!
I am having difficulty pulling the first bag out they all get jammed together and nothing comes out.
I’m so glad I found this! I made it this weekend, and now I’m obsessed with this idea and shared this idea with 3 friends! I have cleared a huge space for all my bags!
Maddie, I tried folding (tucking) the next bag just less than 3/4 from the end rather than the handle. Give it a try!
Love the repurposed wipes container!. See how my repurposed wipes container turned out at: http://organized31.blogspot.com/2012/07/clorox-or-lysol-wipes-container-to.html
Love these ideas!!! Really like that purple bathroom too :))
Love your web site. What a Great Idea for the grocery bags. Thanks so much for sharing. Can’t wait to try.
Beckie, your tips are awesome!
Wow! all your tips are awesome! Thank you.
Found you through pinterest. What a BOSS idea. Trust me, I’m working on this right now. Thanks for sharing.
love the bag idea! I’m going to give it a try.
I found this on pinterest and instantly fell in love with the idea of the rolls of grocery bags. I love how they take up so much less space all rolled up! I did a post about this on my blog, because it was just too awesome not to share. Thanks for the inspiration!
I love the purple shower curtain. Where did you find it???
Bed Bath & Beyond.
Love how you folded the bags so they are continuously pulled out. Brilliant. Thanks for sharing.
What a great organization tip! Thank you! I didn’t have any of those Lysol tubes, but I cut a slit in the lid of a sleeve of tennis balls and it worked well. One for the car and one for my hubby’s shop.
Thanks!
Where oh where did you get the yellow pear fabric? It is gorgeous.
Great ideas!
I absolutely love this idea. I am big into crafting and re-using old things but had never seen this done before. I added it to my roundup of clever users for old things (full credit to you & your blog of course!) Thx again for the fun idea. I am doing this tonight.
New Uses for Old Things
http://www.skinnyscoop.com/list/cathleenking/new-uses-for-old-things
Awesome ideas.
loved all your crafts , the gro. bag I think was the best
This is an amazing idea of how to organize the clutter of stashed plastic bags!! love it 🙂
I loved the idea of using plastic containers for keeping supermarket bags. So clever! Regards and best wishes!
I just do it.Thank you, this idea help me a lot :))
I miss target.
You are awesome!
Awesome!!! Will give it a try.
Wow so smart! I am going to try this one!
I love this idea. I hate having bags of bags hanging around my door handles. And I could always use one of those in my car.
Thanks for the awesome re-purpose! Always looking for a way to reuse!
Brilliant!!!!!!
How cool! Thanks for sharing this reuse tool 🙂
you are a true re-purposer. very clever.
Loving all that I am seeing here!
This is so brilliant! thanks for sharing! (:
love this, however, I spent my whole evening re-rolling bags because I kept trying out the pulling bit LOL. Also I made it for DH and he didn’t want it pretty and decorated just have ‘BAGS’ written on it in sharpie.
that plastic bag idea is really cute.
Love, love the plastic bag idea!
I love your ideas especially the wipe holder for the plastic bag. Definitely going to do this. Thanks.
Love your ideas! Thanks!
Cute idea! I shared on my blog today 🙂
http://blog.shopdirtylaundry.com/posts/2011/11/4/36-the-dirty.html
I love this idea. Thank you for sharing.
I read this this morning and am now the very elated owner of a baggie container upstairs, a baggie container downstairs, and a baggie container in my purse for dog walks… instead of one massive kitchen drawer stuffed to the brim with noisy crumpled plastic. I linked to you from my blog so my friends can all learn this amazing “life-hack.” You’re my new hero – thank you for sharing!
Just love this idea! I have a ton of plastic bags cluttering up the bottom shelf in my kitchen cupboard! Will be a rainy day project!!
Brilliant!
What a great idea! Can't wait til my wipes container is empty!!!
Hi! Not sure how many links I clicked on to eventually lead me to this site, but this an AWESOME idea! I just finished rolling up some Target bags into a Method container. I'm sure it will be a little harder, given the asymmetrical shape of the container, but I'm excited about the beautiful lime green cap color. Thanks for the great idea!
That IS such a great idea!
sooooo cute! and perfect for baby diapers too!
What a great idea, I just saved one of these canisters thinking there had to be something I could do with it!!
What a really good idea, love it!
This is awesome! Good job Beckie – going to feature. 😀
Nice idea! I do the flag fold with my bags and put them in an empty kleenex box.
LOVE this idea! It's perfect to contain messes from the kiddos!
Alyssa
sweetsewnstitches.com
Great idea!! And I always have those empty containers!! I use those wipes for EVERYTHING!!!
This is seriously an AWESOME idea! Love it.
Great idea! Nice work figuring out how to make the bags come out correctly like that-impressive!
Vanessa
genius!! thanks for sharing!
smiles~beth
Brilliant! My bags are tied into a cute little not and then strewn about in the door pockets of the car. I must make one for myself…cute and very practical. Thanks for the great idea!
This is an AWESOME idea! Thanks for sharing the way to fold the bags! I never would've figured that out!
Stop yourself! R U kidding me? I just finished up a bottle of clorox wipes 2 days ago and thought "you know, I can use this for something…hmmmm. I'll hold onto it until I figure something out." Well, here it is. No more thought on my part. Thanks!!
Awesome idea…definitely have to get this in the works.
Perfect timing… I just finished up a container of clorex wipes this morning… I'm off to make this!!
How clever! Love this simple, useful idea. Off to pin it! 😉 Have a great day!
Honestly Girl! You are amazing. Every time I see a project that is completely genius I scroll to the bottom and it is Beckie – no joke. I want one for my car, at work, under the kitchen sink, in each bathroom. Love it! Function and Style.
What a wonderful project! I love when useful stuff can be pretty, too.
I love this project! I have been using an old wipes container to store these bags in my car, but this is way prettier! 🙂
Genius! LOVE it! Will be making one tonight!!
That is an awesome idea! I'm kind of sad that I just threw away one of those containers a few days ago! I guess I will have to wait till we empty another one:)
I'm a new follower and just wanted to thank you for this idea! Not only am I going to put one in both MY car and my husband's (we have a dog AND a baby so these will come in handy), but I'm doing this in my house instead of the half of the drawer that has them thrown in there! Thanks for such a cute little tip. I plan on working on it today … even if I don't get the pretty part done, at least the function will be finished!
Love the idea. I don't have a huge stash of plastic bags anymore. I use them frequently, but I also use the cloth grocery bags when I remember!
Has anyone noticed how thin the plastic bags are now?
Blessings,
Lorilee
What a great idea!! I have several of those containers…unfortunately they still have the wipes in them. I guess I will have to just start disinfecting every square inch of the house until one is used up!! 😉
Brilliant idea, Beckie! I will definitely be stashed my wipes containers when they are empty now.
I'm constantly looking for a stray bag so I can pick up all the trash that seems to constantly accumulate in our vehicles. This is perfect (and so cute). And luckily, I think one of the trash items kicking around in one vehicle right now is an empty wipe container. Serendipitous!
How brilliant is this? I think it's the perfect thing for everyone to have in their car. Thanks for sharing.
Genius!!!!
Omgosh that is super cute! Love your new header too!