{House of Smith’s and Hanging Roses!}
J–heeelloooooooo! My fellow, lovely Tatertoter-ers!
It’s Shelley from House of Smiths,

and
I’m totally thrilled to be guest posting on such a GREAT blog today!
Don’t you just LOVE Jen! She totally inspires me with all her crazy crafty-ness!
I just love her fun, fresh ideas!
Jen is the one who inspired me to make THIS lovely creation for my girly twin room makeover!
Jen and I live in the same city and I had the pleasure of meeting her not too long ago, when we decided to do a vinyl/chandelier swap!
(and YES, everyone… if you were wondering… she IS as pretty and skinny and tall, as she looks on her blog… no fair!!! lol)
She was in need of some of my vinyl for her daughters new pink Chinese inspired room, and I was in need of a new chandelier (specifically the old one that USED to be over her kitchen table… lol)
So SWAP, we did!
And now this is what I have…….. introducing my…
“Thanks to Jen, chandelier re-do”… reveal!
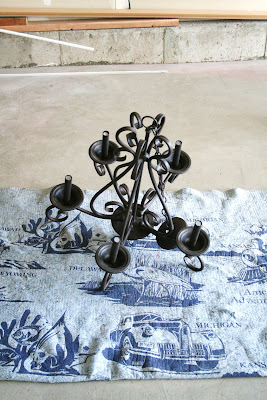
Before
After
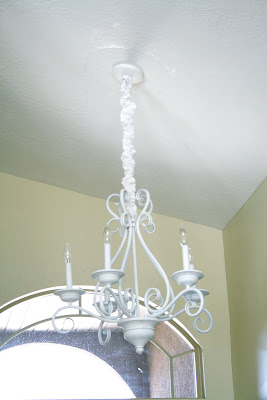
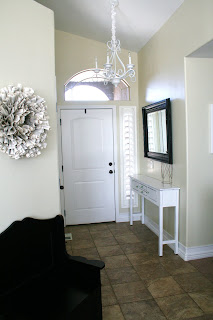
I LOVE this guy! You can go HERE to see my Chandelier Re-do project.
Thanks Jen!
Okay… moving on to my crafty project I’m going to share with you.
{Hanging Roses}

I was browsing blogs a couple weeks back and found a post about these great hand made crepe paper roses. The second I saw them I KNEW what I was gonna do!
I have had these Styrofoam ball forms for a while now, and thought I would do cute flowers all over them, and hang them in the twins’ room. But sadly, the flower idea was pretty expensive.
Especially because I wanted to do three of them.
SO I thought this was a great, thrifty alternative!
And I LOVE how they turned out!

Here’s what you’ll need:
* Styrofoam ball forms
* Crepe paper streamers in whatever colors you choose
* LOTS of hot glue sticks and a glue gun
* a roll of tape
and
* a measuring stick
I measured my crepe paper strips at 24 inches, and ripped a BUNCH at that length, so I wouldn’t have to keep stopping, to rip more

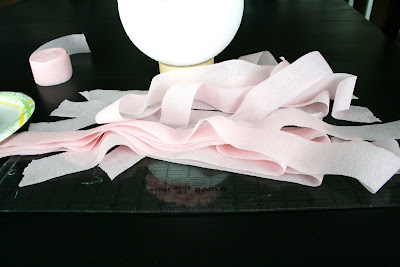
Once that was done… and my glue gun was nice and hot, I started in on my flower makin’!
First I crumpled the strips up, to make them softer and more fabric looking…
Then I straighted them out….

And began to roll. Start small… and then get a little looser. Like a real rose.
About 4 or 5 turns in, I would put a dot of glue on the end, by my thumb, to keep this part from unraveling. I did this periodically through each flower at a couple turns, to make sure that the flower didn’t just fall apart, once I was done.


If you can see here. I would wind the paper around the middle base roll, and twist at the same time. So it looked MORE like a rose and LESS like a cinnamon roll.
This is SO easy! But a little time consuming. Be patient with the first few flowers. It takes a couple to get it down. But once you do… you’ll fly through them!


Here’s the end of the flower. I would just gather the end piece of crepe paper and then add a dab of glue to the outside of the flower, itself, and stick it on the edge.

Set it down… and let the glue do it’s magic!
So fun, right!?

Seriously, you CAN’T mess these up! I had some flowers that I was like “Ew.. that looks awful” and some that I LOVED and thought looked like the REAL thing! And now that the whole thing is together… you can’t tell one from the other!
After I had a few flowers done, I would start putting them on the ball.

I noticed that there were some with longer stems than others. Which made them a little more difficult to sit flat and nice on the ball form. So to avoid this I just ripped off the bottom!
Easy-peezy!


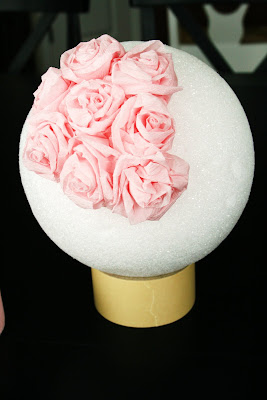
A little puddle of hot glue on the ball, lightly press the flower on… and you’re good to go!
I used a roll of tape to help keep my ball from rolling around on the table. It was a LIFE SAVER!
Make sure not to put the flowers TOO close together. Or they’ll start to look crowded.

This is how it will look about a quarter of the way finished!
So fun! CHEAP and Easy!
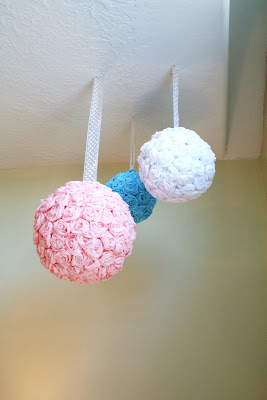
After they were all done, I had Cason help me hang them up.
I used some sheer, wired polkadot white ribbon, from Michaels craft store, and just some sewing push pins to adhere the ribbon to the ball.
Cason took two small nails, with heads and nailed them in the ceiling.
Wa-la! One corner of the room down!
Tips:
* You’re fingers WILL get burned. Work carefully. lol
* The Styrofoam balls are strangely expensive!? One reader told me, it was because they are made from petroleum… so make sure you find a coupon from your local craft store, before you buy.
* I found the pink and white crepe paper at Walmart for cheap!
The more “baby” blue color was harder to come by. I found it at Zurchers or Party city. They have LOTS of colors.
* Keep in mind the amount of crepe paper on the rolls you buy. There is NOTHING more annoying than running out of supplies in the middle of a project… I KNOW. It happened with the white AND the blue! Crepe paper is cheap! buy more than you’ll THINK you need.
* I used two whole rolls of pink from Walmart (150 ft each)
* One and a half rolls of white
* And 2 rolls of blue (only because it came with less in each package at Zurchers, about 80ft.)
And there ya go! I hope you enjoyed my little tutorial!
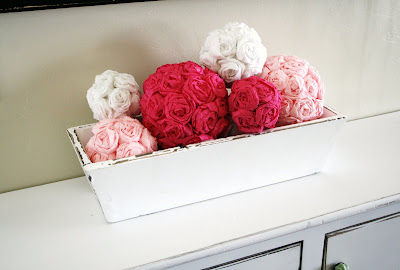
I have also made some smaller versions of these hanging rose ball forms and put them in an antique-y, distressed looking trough for decor for spring! (one of my readers suggestions, thanks!)
I just think they are so fun to have around!
Stop by the House of Smith’s blog and check out some of my other fun crafts and simple home remodeling ideas! We still have a LONG way to go, but we’re just…
Takin’ it one space at a time!
Thanks everybody and Thanks Jen!!! Hope you’re having a FABULOUS time on your “secret” getaway!
****
Shelley — thanks so much for helping me out! Shelley is just the sweetest. Go over to her blog and see her style!!!
Have a great day!
XOXO


Love the styrofoam roses! Just sent it to my friend for her Tiffany"s theme bridal shower.
i found the balls at dollar tree!
oooooooooooohhh my gosh, I looooove this, wow, did I mention that this is amazing???
These are gorgeous!! Thanks for sharing.
Love this! I have so much crepe paper leftover from birthday parties…this is perfect!
~ Sarah
i wish i had a girl in my house besides myself to appreciate something like this! although i think you could make something less girly but similar for boys!
Love the crepe paper kissing balls…I do enough of those with fresh and silk flowers for weddings to know they can cost a fortune – even wholesale! What a creative alternative, I think they look really pretty.
these are so pretty, I think I'm going to make a few to hang at my best friends baby shower next month! thanks for the awesome tutorial
Those are pretty! I love em. 🙂
Way to go, Shelley…LOVE your awesome creations!
Those are ADORABLE! Thanks for the great tutorial! We are moving this weekend and I'm looking for ways to decorate DD's room. These will be perfect in the cute white tray I just picked up for cheap at a garage sale! THANK YOU!
Love the lamp and the rose blossoms…totally cute!
Hope your having a blast at the beach!
love the chandelier. It looks perfect in its new home.
these are so cute! the mini versions would be perfect for centerpieces at a wedding!
Those are beautiful! Gonna make some myself. 🙂
Those are so cute! I don't have girls, so I think the hanging ones are out for me. But I did just pick up an old white planter that would look SUPER cute with some of the smaller ones in it! And you are right, syrofoam is really expensive! I found that out this week when I went to buy some cone shaped ones for a craft project!
Wow Something I need to try…
Just letting you know it is Round Robin time again this month.. on Friday.. HOpe you stop by.
Those are gorgeous! I wish I had the patience to make some!
Those are awesome!!
wow, these are simply beautiful!! ♥
Go Shelley! You rock!
These are beautiful! They would be perfect in my girls' room!!!