My kids are out for Summer this week — and I can’t wait for summer party!

What screams summer more than a Red and White Party??
I love large Buffalo check. And I thought it would be fun to try to make a DIY painted Buffalo Check fabric for a little End-0f-School Party!!

Here’s how I made the decorations with ScotchBlue™ Painter’s Tape — and it’s easy: You can do it, too, on just about any surface. I’ll show you how I made the painted bunting, tablecloth, tray and even a wreath!
To create the Red and White Buffalo Check fabric for all of the projects, I used duckcloth, red paint, and ScotchBlue™ Painter’s Tape with locking edges.

How-to: Painted Fabric Bunting and Runner, Wreath and Painted chalkboard labels
Supplies:
Paint (1 quart)
Roller and brushes
Ribbon for bunting (3 yards)
Fabric to paint (2 yards)
Here’s what I did:
Runner

To make the painted Buffalo Check material, I took a 2-yard length of white duckcloth. I like duckcloth because it is thick enough that the paint doesn’t seep through when painting on it. I laid the duckcloth out on my floor and then taped the ScotchBlue™ Painter’s Tape on the fabric. The scotch tape was 2 inches wide, so I spaced the tape out with 2 inches between each of the stripes. (Tip: just place a short piece of tape on each side of the “spaces” between each piece of tape as a temporary spacer — it’s easier and faster than measuring.)

Then I painted the cloth with a foam roller and red latex paint. I also added some fabric medium to the mix to make the fabric softer and wash better.
Once I finished the vertical lines, I peeled up the tape and then taped down another row of vertical lines of tape. And since houndstooth has two rows of stripes, one of which is lighter than the other, I added 20% of glaze paint to the red paint for the vertical lines. That makes these lines a little lighter and gives the overall fabric a little oomph.

I painted those lines and then Ella helped me peel the tape off of the fabric. The ScotchBlue™ Painter’s Tape is really amazing. The lines were flawless as we peeled them off.
Bunting
I then made the bunting and runner for the party. I created a template on a piece of cardstock for the bunting. Each pennant was 8 inches long by 4 inches wide. I traced the pennants on the painted fabric, cut them out and then paired each pennant with a white piece of duckcloth. I sewed the painted fabric pennant to each white pennant, right sides in, leaving the top open. Then I flipped the material right side out and then sewed a ribbon at the top, connecting each of the pennants together.


To create the runner, I cut out a piece of the painted fabric that was 24 inches wide by 60 inches long. And then I paired that piece of material with a plain white piece of duckcloth. I pinned the two pieces of fabric together, with the right sides in. And then I sewed it together, leaving a small gap in one of the sides. I flipped the fabric right side out through the gap and then hand-stitched the gap closed. The last thing I did was I sewed around the edges of the runner to give the runner a more finished look.
Chalkboard Labels
To create the chalkboard labels on the red tin containers and the glass containers, I taped off the label size on each container with ScotchBlue™ Painter’s Tape and then I painted the inside area with chalkboard paint. I painted each area three times with the chalkboard paint and then peeled off the ScotchBlue Painter’s Tape to reveal handy chalkboard labels – perfect for entertaining!!

That’s what the chalkboard labels look like. And I love that I can change up the words on each label for different parties and occasions.
Polka-dot Tray

I also found a way to use ScotchBlue Painter’s Tape to make a polka dot tray. What I did was I took a 2 foot length of tape, then paired it with another 2 foot length of tape, sticky sides together. Then I punched out some round circles down the length. Then I peeled the two sections of tape apart and stuck them to the tray. I stenciled red paint on the circles and made a polka dot tray with them. The dots didn’t turn out perfectly, but I touched them up with a very fine bristled brush.

Wreath
I also made a wreath with the rest of the painted fabric. All I did was cut the fabric into strips and wrap them around a wreath form. I added a little yellow bow to match my door.

Putting It All Together
Then I created the red and white party. I love the red and white of the painted fabric along with the yellow of my front door. Red and Yellow are so pretty together!

I also taped off some areas on some tins and buckets for chalkboard labels for the party. I added about 3 layers of chalkboard paint to the bins and buckets. It’s an easy way to make some labels for party bins.


We had such a fun time at our Red and White Summer Party!


I just love painting fabric. This was such a fun party to create.
Let me know if you paint any fabric – I would love to see YOUR ideas!
Have a great week!
xoxo

*****
You can join the ScotchBlue community on:
Facebook, Pinterest, and Twitter


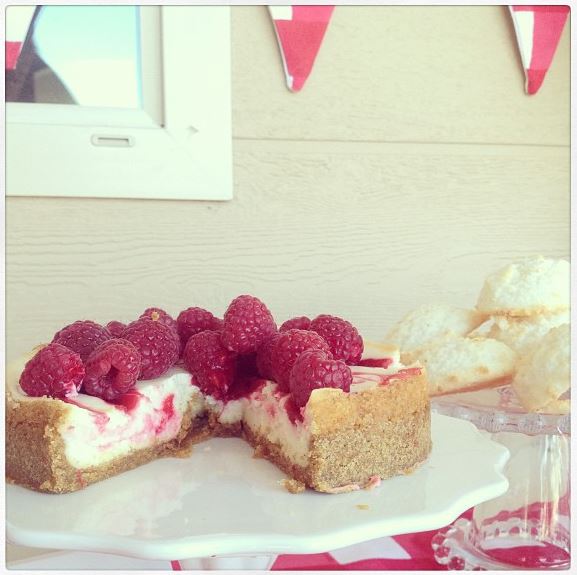
this looks amazing! I would have never thought to put chalkboard paint right onto the containers like that. It looks like it would be a fun party (and that cheesecake is calling out to me too)
This party table turned out adorable! I especially love the painted circles on the tray. What a good idea to punch out the tape. I’m going to try that! Thanks!
Great idea for a theme party! Love the idea of using painters tape to customize fabric to fit the party. I’m going to show my daughter this – it’s going to open up a whole new world for her. 😉
I love this party Jen! It is so gorgeous and the red & white is fabulous! You are so creative with everything that you made with that tape! Angie xo
This is a great idea. It really could be for any occasion but what a great time to celebrate the end of a school year. I have not thought about using painters tape on fabric to do lines. That is wonderful.
Thanks for sharing.
Love this table setting and all the DIY projects! Perfect for summer!
Wow, is what I thought looking at each photo. This is so inspiring and I love every, single detail. Yes, the red and yellow looks fabulous together and is so summery. Your ideas are brilliant. Thanks for sharing and the fabulous pics!
Love decorating with red and white! Where did you find your plain white tray? I’d love to find one!
Beautiful! Simple beautiful!
Oh my goodness this is amazing! I love it! Such creative ideas. I will be borrowing some of these ideas for my July 4th party! Thanks Jen!
Oh my gosh! This is TOO cute!!! What a fun way to kick off summer! You have some lucky kiddos.
Oh thanks Shelly!! You are so sweet. I am so excited for Summer and spending time with my kiddos.
Have a wonderful week!!
xoxoxoxo