Aloooooooha! I’m Charlie, from Attempting Aloha and I’m visiting you today from the sunny island of Oahu! Wait!! Don’t leave because you’re jealous!! Can’t we still be friends? I promise not to brag about heading to the beach weekly or about doing yardwork and getting tanlines too much… 😉 Truly, I mostly just stay inside and work on our home renovations anyway (my hubs is in residency, so most of it gets done all by my lonesome). But if I find a contest for whitest legs on the island, I’m entering (only if food or cash is involved, of course)! As Jen is the queen of all things subway art, I asked her if I could share one of my subway art clocks with you wonderful peeps. And she said Yes! And then I fainted. But I’m back. And here I am chilling with 11,000++++ of the coolest people on the planet. Can I say ALOOOOOHA and Mahalo to Jen for just being so dang wonderful?! Back to business. Oh, but here’s what I look like in case you’re the kind who likes to know who you’re dealing with:

And here’s my blog:

OK, so I’ve done a few clock make-overs during my 5 months of blogging (see my header…). And one was a subway art one for my daughter’s teacher as a Christmas gift. For that one I used a holiday clock I’d found at Walgreen’s for just over $3. They were a little more complicated since they’re wider than a standard 8.5″x11″ piece of paper, so I searched for a clock that would be easily accessible across the country and also had a face smaller than 8.5″. Enter Wal-mart. Yes, folks, they truly do have everything. And chances are, there’s probably one near you or that ships to you. So here’s the clock I chose:

Yep, he’s a pretty boring little fellah, but he was the size I needed, and the prize ($4) was awesome enough! I chose black, so I could show you how easy it is to spray paint them, but it also comes in white and red, and spray paint comes in a huge range of colors! Here we go! Step 1) Take your clock apart. You’ll need a small screwdriver to remove the 7 screws in the back. Then the frame comes off, and the glass comes out.

Step 2) If you’re going to spray paint your frame, be sure to cover up the hands. I just used a paper towel and taped it down. I’m classy like that. 😉 I did one coat of spray primer and one coat of spray paint. Worked great! I also chose to use a black acrylic craft paint to paint the red second hand black. It felt a little high-school-gym-ish with the one red hand…

Step 3) Later, when you slip the new clock face on, the little tail end of the second hand will be a problem if left as is, so I simply clipped mine right down with a pair of scissors!

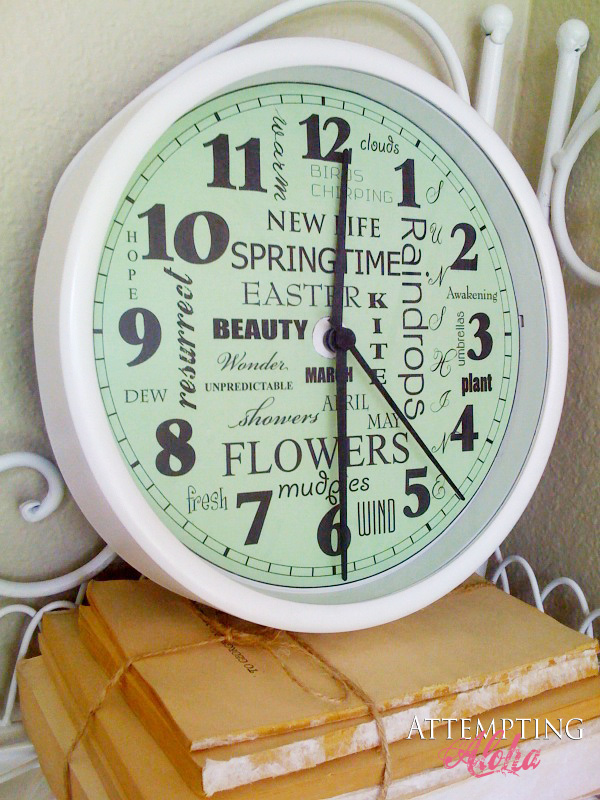
Step 4) Download and print the clock face. Sscroll to the bottom of this post for the actual downloads. This spring version is available in pink, blue, and green. Be sure your print options don’t say anything like, “fit to print margins” as that will shrink the clock face, and it won’t fit properly. It should fit just right. Then you’ll cut it out right along the outside black circle and then cut out the small black center circle as well. Then go to your kindergartener’s school supply stash and bust out the glue sticks!! Purple is preferred but optional. 😉 Push all three hands together (Ehhh…that would be hands on the clock. Sorry if that was confusing for all of you out there with three actual hands…and might I add that you are the envy of every mother with more than two children…) and slip your new clock face over them. My pic was taken before I painted the red hand, but you get the picture, right?


Be sure to push out the bubbles like in that last pic. Step 5) There are a couple tricks to putting your clock back together. First, I recommend putting a battery in, so you can make sure the clock hands are working properly. Tilt it up like it’s hanging on the wall and watch it go around at least a full minute. I had somehow bumped my hour hand loose, so when I tilted it up, it immediately flopped down to 6:00. It just took a little bit of tweaking. I just pushed down on that one hand and set it until it was firm on there.

Then put your glass back on, and you’re in business!

Here are the faces available to download for free! I’ve made them in green, pink, and blue. Simply click on the down arrow underneath the image to download in pdf format. Such a fun way to add personality to something so functional! And it took less than 15 minutes! I think I’ll be making them for summer, 4th of July, fall, Halloween, Thanksgiving, winter, Christmas, and Valentine’s Day. Stop by my blog if you’re looking for a quick way to change up your home for the seasons or holidays! We love tourists any time of year. 😉 Aloha, and thanks again to Jen for letting me chill over here today! Charlie


I LOVE clocks thank you so much for sharing this 🙂 it´s awesome 🙂
I really appreciated the clock tutorial! I didn't use Charlie's cute download, but I DID use her technique (my clock face is the Death Star from Star Wars…you can see it here on my blog). I was particularly grateful for her tip about where to get a cheap clock that came apart.
you totally read my mind! we have a naked spot in our kitchen that really needs a creative clock. i've had little luck at the second hand stores (strangely enough), so i decided to make my own.
thanks for the lovely and creative idea!
Wow, you are amazing, super talented and generous! Thank you for the download. How beautiful!
Super cute! Love, love, love it.
Thank you for the fun idea and printable!
Such a creative idea! This was really nice tutorial. Thanks!
Homeowner Insurance
That's really awesome ! I am sitting here in my office in Sydney and I simply can't wait to go home and make this one !!!!
Thanks so much for sharing this one ! Very generous of you !
~Rupa
I love this idea.
Jen~thanks for showcasing such awesome projects and bloggers. I am headed over to visit her blog.
Ruth
ok seriously, that is one of the cutest things I have seen yet. WTG on such a creative idea, I'm lovin' it! (and I don't mean McD's either 😉
Hi, Jen and Charlie. 🙂 This was a really good tutorial, and it looks like Charlie has many more neat projects on her blog. Off to check it out. 🙂
That is AWESOME!!! Love it.