Tatertots and Jello

COLORFUL HAPPY HOME -- Daily DIY, Decor, Craft and Recipe Tutorial

  • My Home
    • 1905 Cottage
    • Daybreak House
  • DIY
    • DIY Projects and Ideas
    • Organizing
    • Tutorials
    • Printables
  • Decor
    • Spring Projects
    • Summer Projects
    • Fall Projects
  • Crafts
    • Kids Crafts
    • Painting Projects
    • Paper Projects
    • Sewing
    • Wreaths
  • Holidays
    • Valentines Day
    • Easter
    • Halloween
    • Thanksgiving
    • Christmas
    • HAPPY Holidays Series!
  • Recipes

Explore

  • my home
  • diy
  • decor
  • crafts
  • holiday
  • printables
  • recipes

Connect

Home » crafts » Make a Beachy Rosette Button Necklace {tutorial}

crafts, summer projects, tutorial · June 2, 2011

Make a Beachy Rosette Button Necklace {tutorial}

Tatertots & Jello is a participant in the Amazon Services LLC Associates Program, an affiliate advertising program designed to provide a means for sites to earn advertising fees by advertising and linking to amazon.com.


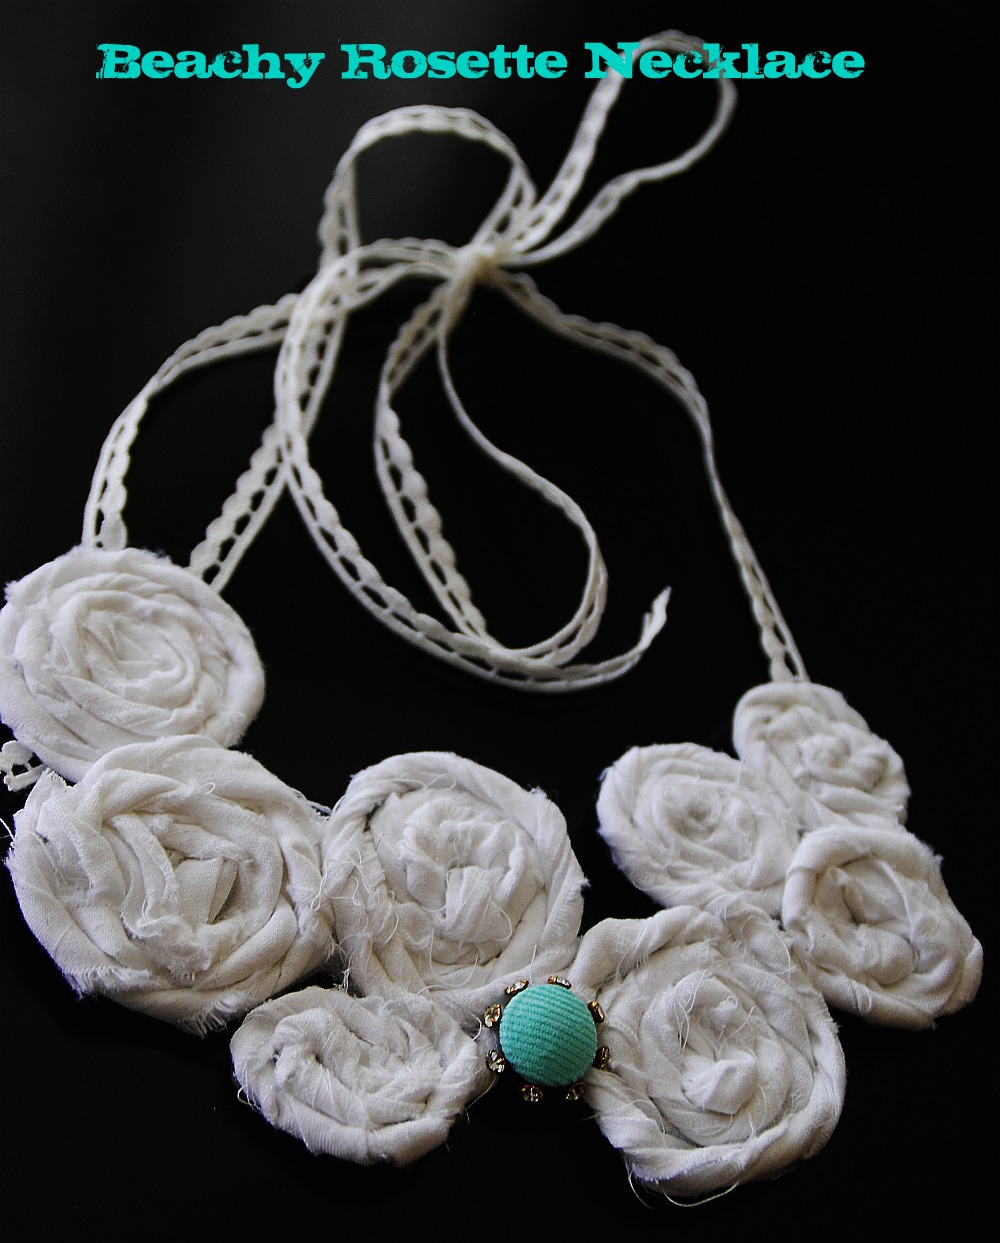
Here’s my Summer Necklace #2.
I have loved seeing all of those pretty Rosette necklaces around, I really wanted to make one for summer. So I took some of the material left over from my Flirty Summer Button Necklace #1 and made some rosettes.
{I have a Rosette Tutorial here if you want to learn how to make the rosettes.}
Beachy Rosette Button Necklace

Supplies:

http://1.bp.blogspot.com/-o0vp9CsHUe0/TeMbL7hRQMI/AAAAAAAAQ-I/qnSyv4c1Eew/s1600/dollar+store+flour+sack.jpg
Fabric – I used more of the Dollar Store Fabric Sacking
Felt for the backing
Ribbon
Scrapbook brad
A button
Glue and glue gun, or fabric glue
{This is also a very simple necklace to make}
  • First I cut out a half circle bib
  • Then I made the rosettes.
  • Once the rosettes were made I glued arranged them on the bib. And I added the button. Mine is a scrapbook brad inside of a rhinestone button I found at an antique store. I loved the aqua color of the button with the antique rhinestones. 
SO beachy and pretty!!! 
  • The last thing that I did was measure out two lengths of ribbon to tie the necklace together. I added extra so the stings would hang down and showcase the ribbon.

And now I have a Beachy Summer Rosette Necklace, perfect for a summer bonfire or BBQ!! 
xoxoxo
PS — I made my first slipcover. 
 And I am SO happy with how it turned out!! I shared a sneak peek on my TT&J facebook page. The full tutorial is coming up soon!! 
And speaking of my TT&J facebook page. I love to share tutorials and feature people there. We just hit 10,000 members and to celebrate I am throwing a fantastical giveaway. It will be coming up this weekend!!! 
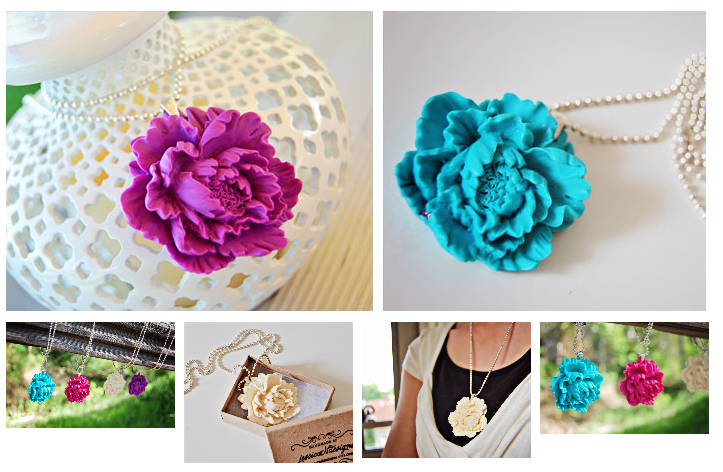
PPS — Check out the fun Groopdealz today. I am picking up a few of these for gifts. $11 Peony Necklace from JessicaNDesigns – 4 Colors to Choose from ($19 Value)


Posted By: Jen · In: crafts, summer projects, tutorial

Guest Project — Father’s Day "Tee-rrific" Gift Idea! {and free printable}
Guest Project — Throw a Rustic Wedding & make a DIY Tree Cupcake Stand {tutorial}

You’ll Also Love

DIY Gingerbread Christmas Wreath
make a dog playhouse out of a box. all the instructionsMake an Adorable DIY Dog Playhouse Out of a Box!
Warm and Cozy Hygge Christmas Gift Boxes

Comments

  1. CrafterBerly says

    June 14, 2011 at 4:22 PM

    Very cute!

  2. nest of posies says

    June 4, 2011 at 12:11 AM

    jen, you are so pretty! i think aqua looks gorgeous on you!!!

    i can't wait to see your chevron chair & everything else you've been up too!

    love ya, sweet jen.

    xo
    kellie

  3. Katherines Corner says

    June 3, 2011 at 7:00 PM

    Love it! Well done. Big Hugs and happy Friday!

  4. Kelli @ RTSM says

    June 3, 2011 at 4:23 PM

    So cute! I love how simply and elegant it is!

  5. Lesley says

    June 3, 2011 at 1:16 AM

    Yay! I love this white / beachy look. So soft and pretty. Totally making one of these! ♥

  6. Amanda @ Serenity Now says

    June 2, 2011 at 6:37 PM

    Adorable! I love the little bit 'o bling you added. I think you must be one of the best accessorized girls around! 🙂

  7. Simone @ Doberman's by the Sea says

    June 2, 2011 at 3:48 PM

    the aqua button is so pretty and gives it that umph factor.

  8. Leanne says

    June 2, 2011 at 2:13 PM

    I love making these rosettes, but I never made them into a necklace. THanks for some more wonderful inspiration. I love the solid white with a little bit of color. So pretty!

  9. lauren@warmandfuzzy says

    June 2, 2011 at 1:41 PM

    I love this! I have some yellow fabric lying around I may have to whip something up before our trip at the end of the month…have to run out and get some buttons though..so cute thanks for the tutorials 🙂

  10. Team Courneya says

    June 2, 2011 at 1:24 PM

    This is too cute + I'm definitely going to have to make a few for the summer. So creative, yet simple! Thanks for sharing. -Kelsey

    http://www.teamcourneya.blogspot.com

  11. AndreaLeigh says

    June 2, 2011 at 12:36 PM

    I love this Jenn! It is gorgeous!

    I have a favor to ask you. 🙂 Not sure if you have been able to catch up on my blog recently, but we're moving into a new home and I desperately need help with paint colors. Would you be willing to help me? I can pay you for your time! 😉

  12. Lindsay says

    June 2, 2011 at 12:33 PM

    YOU are adorable JEN! I LOVE the necklace!! 🙂

  13. Alli says

    June 2, 2011 at 12:03 PM

    Thanks for the FYI about the Peony necklaces – just bought one!! LOVE LOVE LOVE!!

  14. Laura Elizabeth Fredlund says

    June 2, 2011 at 11:29 AM

    Wow, great job! Your necklace is so beautiful. I've never been the one to create such lovely things.
    P.S. Your giveaway necklaces are so ME! :)can't wait to enter

  15. Tracey says

    June 2, 2011 at 10:08 AM

    You made it seem so easy to make that great necklace… I may have to give it a try….I love that you use flour sack towels from the dollar store!! A great thrifty tip!

  16. Janet says

    June 2, 2011 at 7:01 AM

    How clever is this! LOVE IT, it's GORG! 🙂

    http://www.iheartmygluegun.com

Hi! I'm Jen Hadfield. I'm a mom of 5 restoring an 1891 home in the heart of Salt Lake City. I love being creative and sharing simple ideas to make your life easier and more beautiful!

Receive the Latest Crafts, DIY, Recipes and More in your INBOX!

Follow us on Pinterest! It's awesome!

Top Posts & Pages

Spruce up Your Outdoor Space with a DIY Recirculating Fountain! (tutorial)
A New Deck in Under 30 Minutes!
Copycat Panera Spinach and Artichoke Egg Soufflés - SO good!
12 Must-Have Items to Pack on an Alaskan Cruise!
DIY Secret: How to Print on Post-It Notes (and Free Printable Template)
Mother's Day Cup Holder Gift Basket


Popular Posts

  • Spruce up Your Outdoor Space with a DIY Recirculating Fountain! (tutorial)
    Spruce up Your Outdoor Space with a DIY Recirculating Fountain! (tutorial)
  • A New Deck in Under 30 Minutes!
    A New Deck in Under 30 Minutes!
  • Copycat Panera Spinach and Artichoke Egg Soufflés - SO good!
    Copycat Panera Spinach and Artichoke Egg Soufflés - SO good!
  • 12 Must-Have Items to Pack on an Alaskan Cruise!
    12 Must-Have Items to Pack on an Alaskan Cruise!
  • DIY Secret: How to Print on Post-It Notes (and Free Printable Template)
    DIY Secret: How to Print on Post-It Notes (and Free Printable Template)
  • Mother's Day Cup Holder Gift Basket
    Mother's Day Cup Holder Gift Basket
  • The BEST Fresh Strawberry Cream Cheese Cake Recipe!
    The BEST Fresh Strawberry Cream Cheese Cake Recipe!

As seen in


Amazon Affiliate

Tatertots & Jello is a participant in the Amazon Services LLC Associates Program, an affiliate advertising program designed to provide a means for sites to earn advertising fees by advertising and linking to amazon.com.
  • About Me
  • Advertising
  • Get Featured

Copyright © 2025 Tatertots and Jello · Privacy
This site is a place for positive discussion and ideas. Negative talk, comments that disparage others, and similar are not welcome and may be removed.