I was window shopping at one of my favorite stores the other day – J Crew.
I love their relaxed, classic style!
I stumbled across a really simple, but elegant necklace and noticed that the beads were threaded onto the chain. I loved the look of it. I took this picture with my phone, and unfortunately it’s a little blurry. I wasn’t able to find the same necklace on their website either…

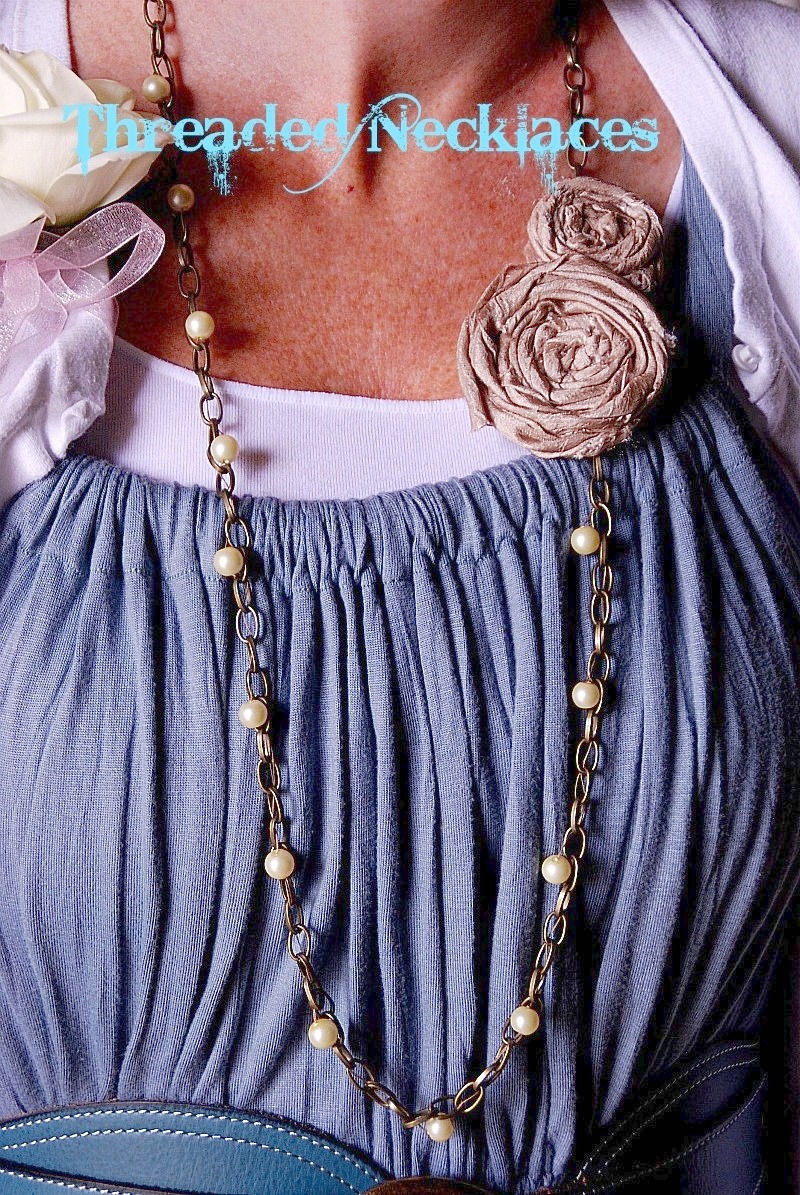
{sorry – I took this picture with my iphone so the picture quality isn’t the greatest}I decided to go home and try making something similar. Of course I had to change it up a little – lol! Here’s what I came up with. I also made another necklace with the same technique, but using kind of seaside-ish colors. And I threw in a beaded rosette for fun too.

Threaded Rosette Necklace Tutorial
(15 minute project)
(15 minute project)
This is a super easy project and I think it would make an awesome birthday gift too.
So if you want to make one, here’s what I did:

-
Chain (found in the jewelry section of your craft supply store)
-
Clasps
-
Round beads. I used 8mm.
-
Embroidery Thread or Beading Thread.
-
Needle
-
Fabric for the rosette – 1 inch wide by approx. 30 inch in length.
-
Fabric glue
-
Hot glue or super glue

-
The first thing to do is measure out how long you want your necklace to be. Mine was 24 inches long.
Then measure your thread twice that length. I double threaded the needle so the thread was very strong. -
Now measure down about 6 inches from one end of the chain and make a knot in the thread to one of the links in the chain there.
-
Thread on a bead and then interweave the needle through a few of the links. I threaded a bead about every 5-6 links. But you can add as many beads or as little as you want. On the blue necklace, I threaded a few beads next to each other and then wove the thread through another 5-6 links and then added a few more beads…
-
Be sure to hold the one end of chain tight while threading the thread through the links. You want the thread to be the same length as the chain, so there is no gathering of the chain, or excess thread hanging down when you are done.
-
Do this all the way down the length of chain until you get about 6 inches from the other end. Pull the thread tight, so there is no gaps in the thread. Then make a knot at the other end of the necklace. I also put a dab of super glue on each knot to make sure it was secure.
-
Now you can attach your clasp, or if the necklace is long enough to fit over your head, just attach the links at each end together!

-
Now you make your rosette (optional). I have a rosette tutorial you can reference if you want. Cut a length of fabric. 1 inch wide by about 24-30 inches in length, depending on how big you want your rosette to be.
-
Fold the fabric in half, width-wise and make a knot. Then roll the fabric and glue it with fabric glue as you roll, in a circular motion.
-
You can also thread some beads on the rosette to match the beads on your necklace is you want, at this point.

-
Once you have the rosette finished, glue it onto a piece of felt.

-
Once the glue ha dried, cut around the felt and glue the felt with the rosettes onto one side at the top of the necklace. I used hot glue to attach the rosettes to the necklace. And then I glued another strip of felt over the chain to make it more comfortable to wear.

And that is it!
Now you have a pretty, threaded rosette necklace to wear this Summer.
Enjoy!!


Super fast and super simple!
xoxo
Have a Fantastic Tuesday!!! PS —

xoxo
Have a Fantastic Tuesday!!! PS —
I’m a new host in the International Delight BlogFrog forum — a great place to post questions, recipes, fashion and meet new friends.
Every month my friend Beckie Farrant from Infarrantly Creative and I will be hosting a chat about communicating in marriage.
We are more than just craft and DIY bloggers. We are passionate about marriage. Together we have over 34 years of marriage experience…yes we were babies when we wed. LOL!
We would love for you to join us and share your tips and tricks to creating a marriage that sustains the long haul.
Please join us TODAY
Time: 10:00 AM MST/12:00 noon EST
We will be giving away some date night gift packages and some books on marriage as well!


An excellent understanding of ale layering is definitely a major factor of earning an adaptable cabinet.
is pleased to announce that it has begun to receive the Spring 2013 Collection from Orthaheel.
7yEC2rYvH http://uggboots.webpaper.co/
Thanks
Great tutorial! I love how your necklaces turned out. I gave it a shot this week and made a bracelet and necklace:
http://mixedupfilesofrnb.blogspot.com/2011/07/jcrew-inspired-necklace-and-bracelet.html
I have no idea how you did it in 15 minutes, though. It took me hours.
Thanks for the inspiration! I'm pleased with how it turned out!
http://www.casagentis.com/2011/06/craftypants-fun-funky-necklace.html
I LOVE this! I wish I would have seen this sooner–my cousin's wedding is in 2 days and this would have been a perfect accessory, and no time to shop between now and then… oh, well… I'll make 'em for next time! =)
Love this. You always amaze me.
Ruth
So gorgeous!
This is so elegant! I love the addition of the rosette.
Awesome tutorial! Your necklace is gorgeous! I am going to have to head to Hobby Lobby this afternoon to p/u some supplies to give this a try.
Love this! Definitely going to give this a try:)
What a quick & easy project. Looks beautiful!
so pretty and thanks for giving a tutorial. I've been looking for new, long necklaces for my summer dresses and this is a great solution!
So beautiful! Love the neutral one especially!
I really like the idea of the threaded necklace. That's way faster than attaching each pearl individually! Great tutorial, as always!
This is tooo cute!! Love it!!
I love how this project looks and that it is so easy to make! Beautiful!
So pretty! Making this NOW!!
i'm LOVING that necklace.. that is amazing! i use to make jewelry but i've stopped recently. i think it's time to dig up the old stock of beads & create my own gems like yours! xox
d.a.r.l.i.n.g.
thanks for sharing! =) I love J Crew too but I dont love the prices! Im going to head to the store and start making myself one of these right now!
Great tutorial! I keep forgetting some of these stores for inspiration. I'm going to try this one at home tonight….if those predicted tornadoes don't roll through! 🙂
You have my address right? You can just send it on to me. 'Kthanks. 🙂
love love love these necklaces!!!
Love your blog! Just passed along the Kreativ Blogger Award to you 🙂
http://danimariedesigns.blogspot.com/2011/05/two-new-awards-thank-you.html
These are so cute, I think the blue is my favorite!
Kelli @ loveoursimplelife.blogspot.com
Jen you always make the cutest jewelry! I love that you added the rosettes to it too:)
Brilliant, Jen! I can't decide which one is my fave. I need to start a file on Christmas gift ideas, and start making them EARLY this year. That's my problem–I have good intentions, but I never save enough time to follow through. 😉
SO pretty – thanks for sharing. I mIGHT be able to pull it off
SO CUTE Jen, LOVE IT 🙂
Very creative! I L-O-V-E J.Crew, one of my fav places to shop. You did a fantastic job 🙂
Love this! I will definitely be trying this out!
This is so pretty!!
I love this! I'm thinking it will make great end-of-year teacher friend presents … with a ring/clip at the bottom for our mandatory ID badges… I'm always looking for a non-ugly and easy to make option! 🙂 THanks for sharing!
so pretty!!!!!
Way to go Jen!!! These turned out gorgeous!
M.L.