I knew exactly what I wanted to share with you for this month’s #LowesCreator project! You might have noticed in my past Christmas tree posts that I LOVE doing Christmas tree bases that are a little out of the ordinary!
![flocked-gold-and-white-tree-[1]](https://tatertotsandjello.com/wp-content/uploads/2013/11/flocked-gold-and-white-tree-1.jpg)
I don’t want to do tree skirts anymore because they get messed up with the kids and the spaniel! It’s also hard to find a container big enough for a large tree and isn’t, um, appearance-challenged.
(Check out the end of the post for some other ideas I’ve done in the past for non-tree-skirt tree bases!)
![gold-and-white-christmas-decorating-1[1]](https://tatertotsandjello.com/wp-content/uploads/2013/11/gold-and-white-christmas-decorating-11.jpg)
Here’s how to make one customized for YOUR tree!
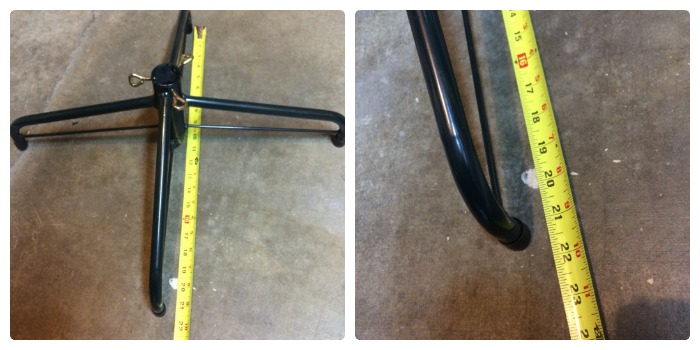
Hopefully you already have your tree! First, measure the stand and decide how big you want/need your crate to be.
Then go get your supplies. I bought:
- 10 8′ lengths of 1×3-inch pine. I should only need 8, but I like to have extra in case I mess up, and at $1.22 a board I felt OK with the extra expense
- 1 8′ lengths of 2×2-inch pine — although I bought two just in case
- if you build it like I did you will need 96 screws for the crate alone, so plan ahead. For the crate you can use 1 1/4-inch or 1 1/2-inch screws. Buy the premium screws; don’t settle for the chela ones. The nicer ones will save you time and money (even if it’s just money you haven’t had to put in the swear jar).
Choose good pieces of wood. Remember to look from all angles for warping.
Once back home, make a quick sketch to confirm your measurements and start cutting.
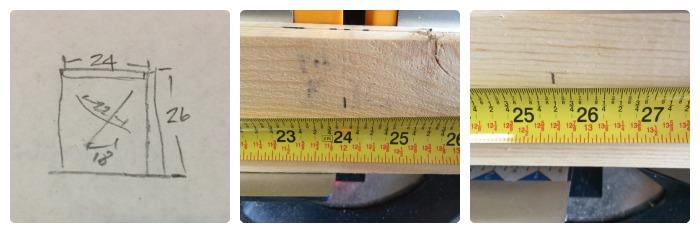
If you choose do to a crate about the size of mine, you’ll need 12 24-inch boards and 12 25.5-inch boards. Adjust these measurements (and the ones below) for the size you need.
Remember to trim the first end of each board before you measure. Even though you’re going for a somewhat rough look it will still look better if you’ve trimmed the ends from the rough mill finish.
Let’s start with the 24-inch boards. Your miter saw is probably big enough to cut two at a time (bonus!) so it can go twice as fast. Grab the first pair of 8′ 1×3 boards and trim off the rough ends. Line the ends up well and grab a measuring tape. Mark 24″ and make your first cut.
Move one of the two boards to the side. Save the other board and use it as your “master” 24″ measurement. Sure, you can use the measuring tape, but since you don’t need your cuts to be perfect, this can save a little time. Make sure the ends are square again, use one of the two previous pieces to mark a 24″ length, and cut again. Repeat one more time for the first pair of boards, then do all four cuts again on a second pair of boards.
When you’re done you’ll have 12 24-inch boards.
Now, repeat the same set of cuts to create 12 25.5-inch boards.
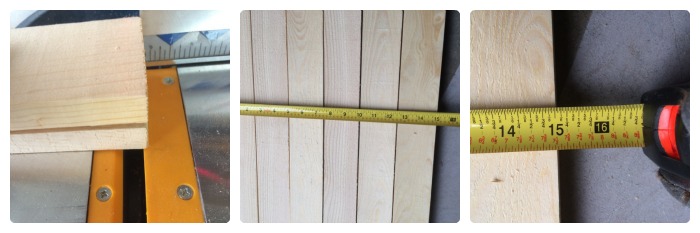
Lay six of your 24-inch boards out on your worktable (or garage floor) and measure the height of the six side by side. Mine was about 15″. That tells us how long the 2x2s need to be. Grab your 2×2 and cut off the rough end. Then cut four 15-inch lengths of the 2×2.
Now we’re ready to put it together.
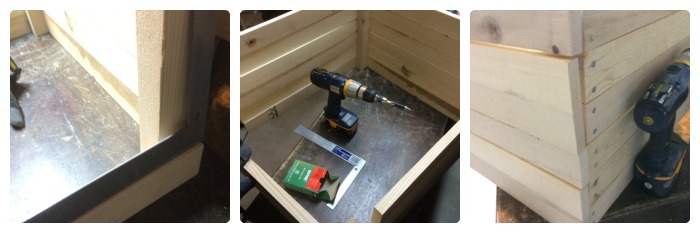
Lay six of your 24-inch pieces side by side, with the sides you want to face outward facing up. In other words, if there’s a knot, or a mill stamp, or something you don’t want to see, make sure it faces down. Now we’ll slide two of the 2x2s under each end. Don’t worry about lining them both up evenly right now — just worry about one end. Try to make the 2×2 line up fairly evenly underneath one end of the side-by-side boards. (You can use a carpenter’s square to make sure you’re getting everything square.) If you can, try to have the 2×2 even with the longest board.
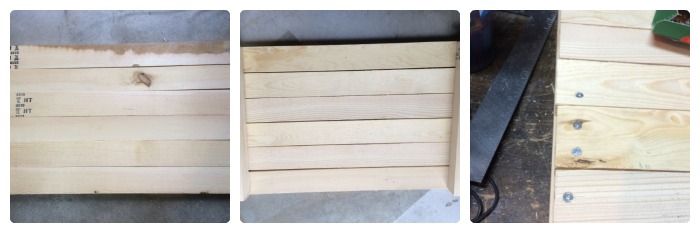
Put two screws in the end of each board, estimating to put the roughly halfway in the 2×2. Don’t get too close to the ends of the 1×3 boards or they can split fairly easily.
Once you’ve finished attaching the board along one end of the side, do the same on the other end. Again, try to have the 2×2 even with the longest of the boards. Yes, we tried to cut them all the same, but they never end up that way! And since this is a rough crate, we aren’t too worried about it.
Use the same steps to create an identical 24″ side. (The longer of the two pairs.)
Now grab one of the sides, and six 25.5-inch boards. The first board is the most difficult. To make your life easier, you might want to estimate about where you will want the screws, and “start” two screws in the end of each board. Since you’ll be holding the board up it will be easier if you don’t have to start the screw too!
Set the first board up at the bottom of one of the sides you created, perpendicular, of course, and lined up with the bottom. Use a square if you have one to make sure you’re putting it together straight. Put that board in and then work your way to the top. When you get about halfway up, check to see if you’ll need to space out the boards a bit or not.
Then then grab the other 24″ side and attach it in a similar way on the other end of the 25.5″ side. Slide the other 24-inch side in and then screw it in similarly. (You may want to start the screws again). You will likely find that you need to space the boards out a bit, or push them in to make sure it all lines up reasonably well.
There’s no bottom for the crate since it’s just made to fit around the tree stand.
Now you’re done with the crate! I, of course, spray-painted mine gold!

Bonus: raise the tree base to make it a little taller (and more stable than sitting on carpet)
I also made a platform for my tree — and I’ll show you how I made mine with scraps. But you can raise your tree by setting it on books, boards, bricks, or anything stable.
I just measured some MDF scraps that would fit inside the crate and put them on top of cut 2x4s to raise the tree base high enough so the bottom branches just barely clear the top of the crate. Your measurements will vary based on the size of your crate, base, and tree.
One tip: I used large drill bits to cut holes for the feet of the base to keep it from sliding around (see pictures).
Now it’s time for you to build your own!
![gold-advent-calendar-and-holiday-decor[1]](https://tatertotsandjello.com/wp-content/uploads/2014/12/gold-advent-calendar-and-holiday-decor1.jpg)
* * * * *
And check out these other non-traditional tree bases:
![sunburst-mirror-tree-at-tatertots-and-jello-[1]](https://tatertotsandjello.com/wp-content/uploads/2014/12/sunburst-mirror-tree-at-tatertots-and-jello-1.jpg)
Sunburst mirror Christmas tree
![Tatertots-and-jello-Michaels-tree[1]](https://tatertotsandjello.com/wp-content/uploads/2014/12/Tatertots-and-jello-Michaels-tree1.jpg)
Winter White Family Photo Christmas Tree
![christmas-advent-tree-red-and-white-christmas-tree-at-tatertots-and-jello[1]](https://tatertotsandjello.com/wp-content/uploads/2014/12/christmas-advent-tree-red-and-white-christmas-tree-at-tatertots-and-jello1.jpg)
… and this year’s 12 Days of Christmas tree – note the soft baskets underneath!
* * * * *
Don’t miss Lowe’s awesome holiday guides – great for holiday decor inspiration!
Check out
You can also follow Lowe’s on Facebook for more great ideas and sign up for their FREE Creative Ideas Magazine with TONS of great DIY ideas and instructions!!
xoxo

Materials for this post were provided by Lowe’s; however, the project and content are all mine. See my disclosures.


This seems SO much better thank straightening the tree skirt every time my cat plays around with the ornaments he knocks off the tree!
What a wonderful way to display a beautiful tree! Love this idea!
Love this! SO pretty! Great job Jen!
You always amaze me!
I love it Jen! Thanks for the tutorial, my daughter was wanting something similar for her tree. I LOVE your Christmas family room!!
LOVE this Jen! So pretty, will you make me one?!
All the ideas! You’ve inspired me to try something different for my tree!