Tatertots and Jello

COLORFUL HAPPY HOME -- Daily DIY, Decor, Craft and Recipe Tutorial

  • My Home
    • 1905 Cottage
    • Daybreak House
  • DIY
    • DIY Projects and Ideas
    • Organizing
    • Tutorials
    • Printables
  • Decor
    • Spring Projects
    • Summer Projects
    • Fall Projects
  • Crafts
    • Kids Crafts
    • Painting Projects
    • Paper Projects
    • Sewing
    • Wreaths
  • Holidays
    • Valentines Day
    • Easter
    • Halloween
    • Thanksgiving
    • Christmas
    • HAPPY Holidays Series!
  • Recipes

Explore

  • my home
  • diy
  • decor
  • crafts
  • holiday
  • printables
  • recipes

Connect

Home » diy » DIY Wood Shim Dresser Tutorial!!

diy, guest tutorials, tutorial, upcycle · March 10, 2014

DIY Wood Shim Dresser Tutorial!!

Tatertots & Jello is a participant in the Amazon Services LLC Associates Program, an affiliate advertising program designed to provide a means for sites to earn advertising fees by advertising and linking to amazon.com.
140
140Shares

I’m Holly from My Sister’s Suitcase, and I am thrilled to be a member of Jen’s contributor team this year! I can’t wait to share some of my home decor and DIY ideas with all of you over the next few months.

One thing you should know about me… when it comes to home decor, I have West Elm taste on a thrift store budget! I have been drooling over some of the gorgeous pieces in the West Elm catalog recently, and I’m really loving the look of different colors of stained wood mixed together. I definitely can’t afford the thousand dollar price tag, so I decided to update my own dresser. For less than $40, I am obsessed with my new wood shim dresser!

I actually did the first dresser makeover almost 2 years ago, when I painted it, added decorative metal sheeting and new hardware. This is what it looked like:
After two years, I was ready for a change. I wanted something with more warmth, texture and modern lines. I still liked the paint colors, so I decided to update the drawer fronts. I don’t have a ton of tools, so I didn’t want to worry about cutting all of that wood. Wood shims were the perfect solution!
I got a pack of 40 wood shims at my local home improvement store, for less than $5. I decided to buy two packs for this project, because some of the shims aren’t in the best condition and I wanted to make sure I had enough!
I also picked up small cans of Minwax wood stain in some of their new colors. These stains are gorgeous!
The colors I used are Classic Grey, Honey, Weathered Oak, and Espresso. The Weathered Oak ended up being my favorite because of the color variation and natural look it gave me. I started by sorting through the wood shims and giving them a light sanding to smooth out the rough spots. Then, I laid out all of the dresser drawers on my work surface and started creating a pattern on each drawer front. (This was done at night so please excuse the pictures!)

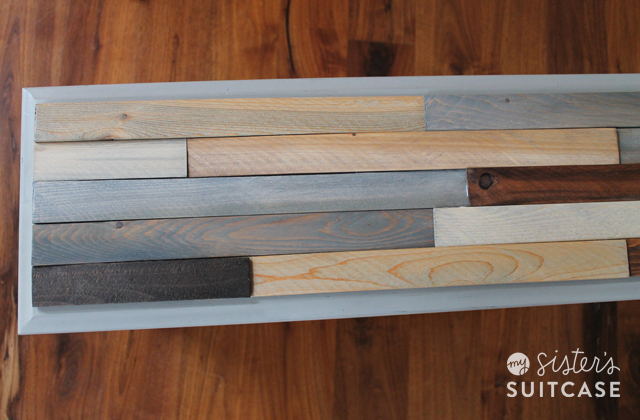
I marked the shims with a pencil so I would know where I needed to cut each one. An easy way to do it is to cut about 12 of the shims in half, and then you can add 2 of those halves to one full-length shim to create one row of your pattern. On alternating rows, I slightly overlapped 2 full-length shims. Just keep playing with it until you like the look, and make sure all of the shims are laying as flat as possible.

When you are ready to stain, start with one color at a time, and take the pieces you want to stain in that color off of each drawer. When you are staining the wood shims, brush the stain on with a natural bristle brush (the cheap ones work great for this!) and then let the color sit on there for 2-5 minutes. The longer you leave it, the more the stain will penetrate. Wipe off all excess stain and then place those pieces back into your pattern on the drawer front. Continue doing this for each stain color until every drawer is complete!

I let them dry overnight, and this is what they looked like in the morning. All ready to be glued on!

Here is the hardest part. I’m not gonna lie…. getting them adhered to the drawers was kind of tricky at times, but after my first drawer it got easier 🙂 I used this Power Grab adhesive to stick the wood shims to the dresser drawers.

This stuff is pretty powerful once adhered! But it is repositionable for 15-20 minutes, so you have to make sure they are in place and weighted down if necessary for at least that amount of time. I used heavy cans from my pantry to keep some of the shims in place.

I put a nice sized glob of the construction adhesive in a few spots on the back of each shim. Make sure you have enough at each end, and some in the middle. You have to get a feel for it because you don’t want it squishing out the ends either!

I glued them on, one shim at a time so I could keep the pattern in tact. Here is one of the drawers when I was done gluing:

One secret… I did have to use some hot glue on a few of the pieces that weren’t staying flat.  It worked well to keep them in place until the adhesive was dry. When all the drawers were done, I let them dry for about an hour just to make sure everything was secure, and then I put them back in the dresser to see the final result.

The bottom of the dresser still had the old-school curvy detailing that I didn’t love, so I took a piece of thin plywood, stained it, cut it to fit the width of the dresser and attached it to the bottom.

That’s it! It sounds more complicated than it actually was, and I finished this entire project in less than 24 hours. It is like I have a brand new piece of furniture in my room and I love it!!

Even my husband gave me props on this project!
If you like this project, make sure to check out My Sister’s Suitcase today for another easy home decor idea.
metallic curtains
I’m showing you how to update plain curtains with pattern and metallic accents. See you next month!

************
Thanks Holly! That dresser turned out amazing! And, it really looks like a more expensive piece too. I love it. My Sister’s Suitcase is full of awesome ideas like this one. Here are a few recent projects of theirs that I love: 
printable-tag-for-pinch-proof-punch
If you’re still looking for a last minute St. Patrick’s Day Idea, I love these Free Pinch Proof Punch Printables they created! 
diy copper frame tutorial
I love the way she took an old frame, and gave it a more updated look with this DIY Copper Frame Tutorial. In the same post, they share how you can change any photo to a B&W Engineering print too! 
geometric heart wall art
This Geometric Heart Wall Treatment she created for Valentine’s Day is so fun I could see it hanging up year round! 
Make sure to follow My Sister’s Suitcase. 
google plusyoutubeinstagram
I am so happy to have My Sister’s Suitcase as one of my contributors for this year – they are one of my very favorite blogs! I can’t wait to see the other projects they have to share throughout the year! 
xoxo
jen signature

140
140Shares

Posted By: Jen · In: diy, guest tutorials, tutorial, upcycle

Great Ideas — 20 St. Patrick’s Day DIY Projects!
Two Free Easter/Spring Banners – in FIVE different colors!

You’ll Also Love

DIY Halloween Bat Mantel Ideas
make a dog playhouse out of a box. all the instructionsMake an Adorable DIY Dog Playhouse Out of a Box!
Make a DIY Marble Kitchen Pedestal

Comments

  1. Circa1972 says

    May 22, 2014 at 3:16 AM

    Looks great. Is it hard to open now that it doesn’t have any hardware?

  2. Nicole Ownby says

    April 14, 2014 at 9:08 AM

    I was just obsessing over the West Elm dresser- knowing that I couldn’t afford it! You have solved my problem! Thanks for posting! I can’t wait to try this.

  3. Johnnie says

    March 24, 2014 at 10:31 AM

    I’m in love with this dresser!

  4. Crystal says

    March 10, 2014 at 10:29 PM

    I love, love, love the dresser!!! What a creative way to dress it up and it is so unique. I love it!!

  5. Mallory @ Classy Clutter says

    March 10, 2014 at 7:00 PM

    How cool is that!? Love this!!!

  6. Jamielyn@iheartnaptime says

    March 10, 2014 at 5:46 PM

    This is so fun! Love your creativity!

    xo

  7. Desiree @ The36thAvenue says

    March 10, 2014 at 12:52 PM

    This is seriously GENIUS! Loving it 🙂

  8. Amy@theidearoom says

    March 10, 2014 at 11:15 AM

    Very creative! Looks beautiful!

  9. Ashley @ Cherished Bliss says

    March 10, 2014 at 11:01 AM

    This is fabulous ladies! : )

  10. Angie@Echoes of Laughter says

    March 10, 2014 at 11:00 AM

    This is an amazing project! Love all of the colours and textures together!

  11. Jen says

    March 10, 2014 at 9:46 AM

    This is such a great makeover. I love the way it turned out!

    xoxo

Hi! I'm Jen Hadfield. I'm a mom of 5 restoring an 1891 home in the heart of Salt Lake City. I love being creative and sharing simple ideas to make your life easier and more beautiful!

Receive the Latest Crafts, DIY, Recipes and More in your INBOX!

Follow us on Pinterest! It's awesome!

Top Posts & Pages

Spruce up Your Outdoor Space with a DIY Recirculating Fountain! (tutorial)
A New Deck in Under 30 Minutes!
Copycat Panera Spinach and Artichoke Egg Soufflés - SO good!
12 Must-Have Items to Pack on an Alaskan Cruise!
DIY Secret: How to Print on Post-It Notes (and Free Printable Template)
Mother's Day Cup Holder Gift Basket


Popular Posts

  • Spruce up Your Outdoor Space with a DIY Recirculating Fountain! (tutorial)
    Spruce up Your Outdoor Space with a DIY Recirculating Fountain! (tutorial)
  • A New Deck in Under 30 Minutes!
    A New Deck in Under 30 Minutes!
  • Copycat Panera Spinach and Artichoke Egg Soufflés - SO good!
    Copycat Panera Spinach and Artichoke Egg Soufflés - SO good!
  • 12 Must-Have Items to Pack on an Alaskan Cruise!
    12 Must-Have Items to Pack on an Alaskan Cruise!
  • DIY Secret: How to Print on Post-It Notes (and Free Printable Template)
    DIY Secret: How to Print on Post-It Notes (and Free Printable Template)
  • Mother's Day Cup Holder Gift Basket
    Mother's Day Cup Holder Gift Basket
  • The BEST Fresh Strawberry Cream Cheese Cake Recipe!
    The BEST Fresh Strawberry Cream Cheese Cake Recipe!

As seen in


Amazon Affiliate

Tatertots & Jello is a participant in the Amazon Services LLC Associates Program, an affiliate advertising program designed to provide a means for sites to earn advertising fees by advertising and linking to amazon.com.
  • About Me
  • Advertising
  • Get Featured

Copyright © 2025 Tatertots and Jello · Privacy
This site is a place for positive discussion and ideas. Negative talk, comments that disparage others, and similar are not welcome and may be removed.

140