Can you believe that next week is THANKGIVING???
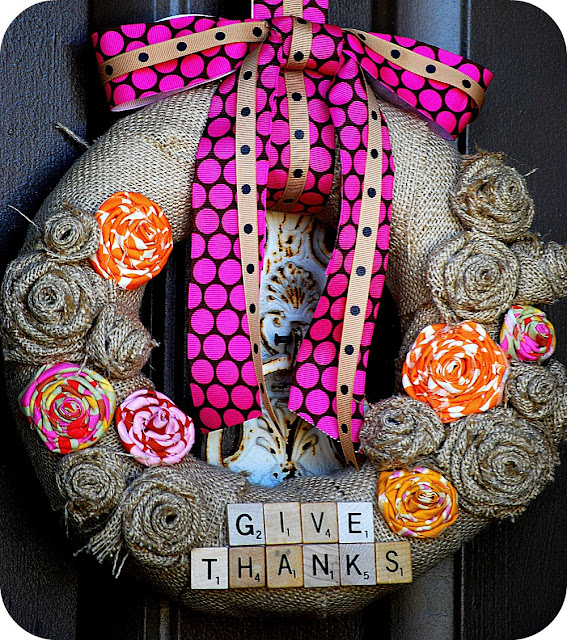
Gah – where did the time go??There is so much to DO! If you have an hour to spare, here’s a little wreath that will add a little Thanksgiving cheer to your front door:
{Click on the Read More button for the full tutorial}
Here’s what you need:
- A wreath form
- Burlap — a 36″ square piece should do
- A few fabric scraps
- Some Scrabble tiles**
- Hot glue and gun
- Two types of coordinating ribbon
**Here’s a fun tip — if you want to make one of these and don’t want to destroy your Scrabble game, you can buy “lots” of Scrabble pieces on ebay or etsy. Or, if you contact Hasbro, you can order a complete replacement set of tiles. It was around $6 for 100 pieces last year.
Here’s what you do:
- Cut two pieces of burlap about 4 inches in width by 36 inches in length. Or, if you have a long piece of burlap you can use a 72 inch strip. Hot glue one end of the strip to the back of the wreath. Then wrap the burlap around your wreath. My wreath form was 12 inches wide, so if you are using a bigger form, you will need a longer piece of burlap.
- Once the form is wrapped in burlap, set it aside. Now you will make some rolled flowers. I made 18 flowers in different sizes. For each flower, you will need a strip of material about 1 inch in width by either 32 inches, 24 inches or 18 inches, depending on how wide you want the flower to be. Fold the material in half width-wise and then roll it tightly about 8 times. Then add a dab of hot glue and twist the material around the rolled center, adding glue as you roll. The flower will continue to get bigger until you reach the end of the material. Then add some hot glue to the back and glue down the end of the material underneath the flower. For more in-depth instruction, check out my Rolled Flower Tutorial.
- Now that you have the flowers made, lay out the scrabble pieces to whatever saying you want to display on your wreath. Then hot glue the tiles onto a piece of paper. Then cut out the tiles, trimming very close to the edges so no paper is showing.
- Hot glue the Scrabble tiles to the wreath.
- Now lay out the rolled flowers on the wreath. Once you are happy with the placement. Hot glue the flowers to the burlap wreath.
- Cut the two coordinating ribbon for the top of the wreath. Make a loop of ribbon for the top of the wreath to hang on the door or wall. Then cut another length of the two ribbon and make a bow. Attach the bow at the top of the wreath to the loop.
- Hang up and enjoy your new wreath!
**Here’s another fun idea — use Scrabble Holders and letters to spell out your family’s names at the table!

Thanks to Amy at Living Locurto for letting me share this wreath on her blog a few days ago. Check out all of her fun printables. She also just came up with these adorable free
that I am going to use this year.
xoxo

PS — Only 2 more hours til WWU!! See you then!!
This post brought to you by


I can't even describe how beautiful and original this is, and I can't wait to share it with my readers. Linking to you… 🙂
Tonya Lee
About.com Guide to Budget Decorating
http://www.budgetdecorating.about.com
That is such an adorable wreath Jen! Too too cute. Would look so cute on my front door just wish I had the time to make it!!! You should come link up to Made with Love Monday at Sew Chatty this week!
http://sewchatty.blogspot.com
Looks great. I don't think mine would look as nice though ;o) And no, I can't believe Thanksgiving is right around the corner! Crazy…
Gosh Jen, every single one of your wreathes is to die for! I love this one too. So much so that I think I am actually motivated enough to go out and buy the stuff to make it!
Love your guts!
Super cute, as usual!! I just love everything you do!
Thanks for featuring me on your FB page!
Have a great weekend!
Jenn
I made a wreath like yours the other day and had so much fun doing it. Thanks for the great ideas Jen!
I LOVE LOVE LOVE THIS!!!!!
Well how cute is that?!? I'm still itchy from my LAST burlap wreath though 😉
Amazing!! I just love it!! 🙂 You are so crafty! Must share on my FB Page!
Fabulous as always! I love it!
I just bought burlap for the first time. Crazy thought… I know! But I bought it to make up my Thanksgiving table and I am going to cut up a fall table cloth I bought on clearance at Wal-Mart to layer somehow with the burlap. We'll see how it turns out. But I bought a ton of extra brown burlap and then bought some green so make some decorations/wreaths for Christmas.
Jen,
I posted this a couple a days ago…saw it on your FB page….my followers loved it! Im makin my "knockoff" one right now! would love for you to check it out on Monday! 😉
Andrea
keepinitthriftyandrea.blogspot.com
I heart this, so much. 🙂 It's going on the to do list…maybe for Christmas.
rosyredbuttons.blogspot.com
Absolutely gorgeous! The colours, the textures….everything..just fabulous! I also think you could use these colours for Spring. Angie xo
What an adorable wreath! It's just lovely! 🙂