I finally made an Easter project. I don’t know what my problem has been lately. I didn’t make anything for St. Patrick’s Day, but I’ve finally got my Easter groove on. I also got my Easter boxes out today and decorated – yay!
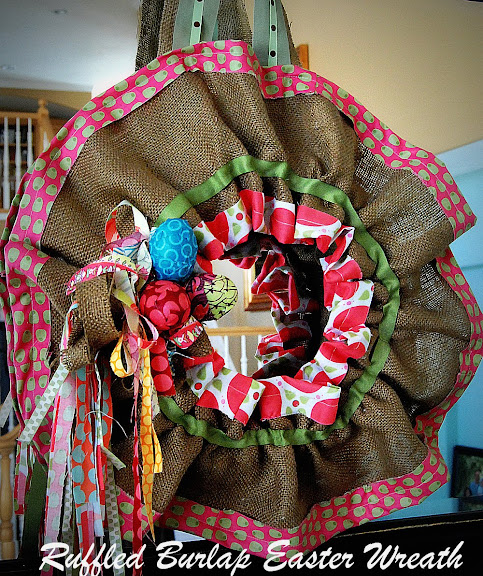
This was a really quick and easy wreath to make. I think the total time was around 1 hour — including decoupaging the eggs (but not drying time).
If you want to make one, here’s what you need:
Wreath form: I used a 14 inch form.
Burlap — one 3 inch wide by 4 foot long strip, plus one 8 inch wide by 6 foot long section.
Fabric scraps
Glue gun and glue sticks
Sewing machine — or you could use hot glue
Mod podge
3 plastic Easter eggs
Ribbon
First I took the wreath form and wrapped the thinner strip of burlap around the form, covering the entire form. I hot glued the edges down. Then I took some fabric scraps and covered each of the edges of the larger piece of burlap with material down each side — 3 inches in width — I folded the fabric in two and butted the edge of the burlap against the fold of the material.{I sewed the fabric onto the burlap, but you could hot glue the material on also.}
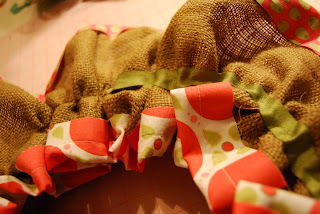
The next thing I did was sew a really wide stitch down in between the two sides, about 1/3 of the way closer to one side and 3/4 away from the other side. I backstitched on the beginning of the stitch and then left the stitches open at the other end. Then I gathered the burlap up by pulling on the exposed thread at the open end of the burlap section. I pulled it very slowly and carefully so the thread wouldn’t break. Burlap is hard to ruffle because it is so heavy, but if you are careful you can do it.
If you don’t have a machine, you can ruffle the burlap by hot gluing folds together and creating the same look. If you want to do this, hot glue the ends of the burlap together — creating a circle. Then lay the circle on top of your wreath form. Hot glue one section on first, then take the opposite side of the circle and hot glue it onto the opposite side of the wreath form. Do this at all four points of the form. There will be a lot of fabric left over between. Then carefully make folds in the burlap between each of the glued sections, until it looks ruffled.
Once you have ruffled your burlap material by pulling on the thread, take it and measure it next to the wreath form. Make sure it is about the same size. Then hot glue the ends of the material together, making sure the seam is to the back side of the material. Then hot glue the material onto the wreath form. The take some ribbon and hot glue it onto the ruffled burlap to cover up the stitching.
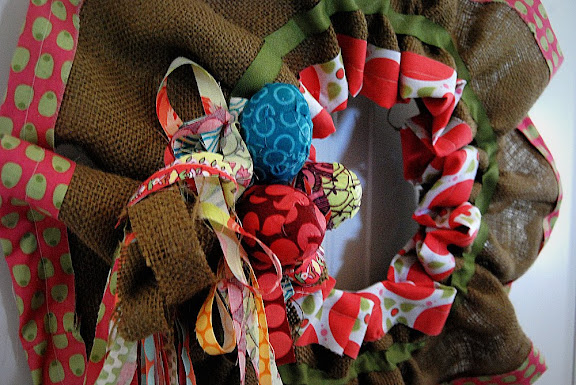
After that is done, take some fabric straps and cut them into very thin ribbons of material. Take half of the strips, tie them in the center with some string or one of the strips of material and hot glue that onto the form, making sure that some of the strips hang on both sides off the wreath. Then take the other strips of material, and make it into a ball and glue that ball on top of the long strips. It should look messy. Then take some burlap scraps and glue that on top of the fabric ball.
Now decoupage some strips of material onto your plastic eggs. I cut my material into 1 inch by 3 inch section and then I put a layer on the back of the material and smoothed it onto the egg. Then I took the next strip and smoothed it overlapping the previous strip. Do this until the egg is covered. Then add a coat of decoupaging medium over the whole egg. Let the egg dry on wax paper. Do this with all three eggs. I used different material on each egg for more color.
Once the eggs have dried, hot glue them on top of the burlap and fabric ball.
Then add some ribbon to the back of the wreath and hang it up.
I have another rufflier burlap project coming up later in the week. Plus, another Easter project!
And, if you would like a chance to win a beautiful, custom soldered necklace, click HERE.
I am linking this up to:
XOXO











Very cute wreath…love the scrappy bow!
This is an adorable wreath – you continue to amaze me with all of your creative talent! I just love seeing what you will come up with next. Thanks for linking up to Be Inspired today!
Chelsea
My mind just went racing looking at your wreaths and the many things that could be done with this.
Jen…you and burlap are a match made in heaven? How do you think this stuff up? You rock my world!
Girlfriend, where do you store all of these wreaths? Fantastic! You just keep creating beauty :). Love it.
How adorable! Very original and funky, I love it!
I love your blog. I am passing you the Sunshine Award.
Jenn
That is so stinkin cute. I love it. I love things that are a little quirky.
Cheri
So creative project!!!
Hugs
Charo
! I am really lovin' your burlap projects! So CuTe!! 🙂
free internet jobs
Love it Jen! You are such a creative one.
I love, love, love this!!
SO cute!!!! Gonna have to try that one!! I need a little one to go in front of my mirror in the foyer.
So cute Jen! You do love your burlap 🙂 I was wondering where your Easter projects were! Lol!
Hope you're having a terrific Tuesday!
This is so cute! Happy Spring day to you!
This is so super cute!
Adorable!
adorable Jen, you inspired me to make a wreath for my front door but it isn't as elaborate
FAB, Jen!!! You have such a knack for taking neat, unique, fun patterns and colors and combining them into something brilliant. 🙂
That is awesome!! I am really lovin' your burlap projects! So CuTe!! 🙂
That is ridiculously cute! Thanks for such great, easy-to-follow intructions, too – I might just have to try this!
That is so cute!
so cute you are the burlap queen 🙂
That is so darling…I need someone to trade me cute wreaths for cookies!!!
So. darn. cute!
Jen, your wreaths are always so much fun and so unique! I love it! I posted about this on my blog: sweetcharli.blogspot.com
Sooo cute, Jen! You are just so creative. I especially love how the eggs turned out, and the brightly colored fabrics with the burlap. Fun!
Blessings!
-Sarah
That is seriously fabulous!! I love the fabric color choices and that you used burlap. Love it!!!
Lovely simply lovely, I will have to add this to my want-to-do-list. And bump it up it is almost Easter.
Jen you just amaze me with your creative talents. This is really gorgeous and full of welcoming warmth and color. Love it!
Happy Spring! ~Melissa 🙂
Wow that is absolutely Beautiful!!!!
I made a wreath and posted it on my blog today. I linked to you because you were my inspiration for making a wreath:O) Of course:O)
Simply beautiful!!! {as usual!}
Have a delightful day!
Jenn
Jen, the wreath turned out perfect! I love it!
I love your wreath! It's the cutest one I've seen!
Wow, wow, wow!!!
Can I just rub up against you and get some of your creative-ness????
lol.
You just impress me EVERY time you do a project!
This is so cute, and original!
Love it! I'm sure it will be EVERYWHERE!
Shelley
too fun! darling, love it!
hmmmm……….I bet I could spot your house by the cute wreath that always seem to hang on the front door! LOL 😉
This is really pretty, Jen! I love the colorful ribbons you used. I should have picked up the wreath form I saw at the dollar store this weekend.
Adorable! I love the bright colors in contrast to the burlap.
– Michele
this is adorable. Love it
Pam
This is so darling! It almost looks like an Easter bonnet! Very cute!
Wow – that is so pretty. I love it!! 🙂
Jen that is so cute! I love it. You are so good at thinking these things up. So very creative. I really think you should do a book. It would be a runaway best seller!! xxoo
Very cute! I haven't tried to ruffle anything before, but all the instructions seem pretty easy! I guess I never really needed ruffles with three little boys:) Your wreath turned out so cute! I love the decoupaged eggs too!
Super Cute! I have some burlap just calling my name and it might be saying, make a wreath!
That is just adorable. I love burlap and can't wait to make one of these.
Jen…you have a way of making everything look easy! So very cute!
That's uber-cute! I love it! How do you come up with this stuff?
ITS DARN RIGHT ADORABLE! I so want one! I don't have a sewing machine… boo!!! I JUST LOVE IT, WAY WAY WAY TO GO JEN! I can't sleep so I am up and on the comp. at 4:30 in the morning… this is a first. HA! Have good day, JGG