Tatertots and Jello

COLORFUL HAPPY HOME -- Daily DIY, Decor, Craft and Recipe Tutorial

  • My Home
    • 1905 Cottage
    • Daybreak House
  • DIY
    • DIY Projects and Ideas
    • Organizing
    • Tutorials
    • Printables
  • Decor
    • Spring Projects
    • Summer Projects
    • Fall Projects
  • Crafts
    • Kids Crafts
    • Painting Projects
    • Paper Projects
    • Sewing
    • Wreaths
  • Holidays
    • Valentines Day
    • Easter
    • Halloween
    • Thanksgiving
    • Christmas
    • HAPPY Holidays Series!
  • Recipes

Explore

  • my home
  • diy
  • decor
  • crafts
  • holiday
  • printables
  • recipes

Connect

Home » crafts » Guest Project — Quick, No-Sew Headband Idea

crafts, fashion, sewing projects · July 21, 2010

Guest Project — Quick, No-Sew Headband Idea

Tatertots & Jello is a participant in the Amazon Services LLC Associates Program, an affiliate advertising program designed to provide a means for sites to earn advertising fees by advertising and linking to amazon.com.
http://3.bp.blogspot.com/_bZNGMOswGCE/TEZDIeEtrJI/AAAAAAAAMkQ/rjzCBj7UTe4/s1600/headband13.jpg

 Hi! I’m Mique from 30days and when Jen put out the call for willing people to guest post, I jumped on it. I have been an admirer of Tatertots and Jello and even got Jen to post for my Funner in the Summer series. In real life I’m a stay at home mom to 3 crazy kids and when I have down time I post my ideas and those that I’ve found online at 30days.

Today I wanted to share a quick, no sew headband idea. What could be better when you’re feeling kinda frumpy than a little hair accessory? And it’s super fast.

To get started, you will need the following:

(forgive the pics, we’re in the middle of having flooring put in and paint done in my house- which is exciting- but doesn’t create great areas for tutorial backdrops 😉

less than 1/2 yd of felt

scrap of fabric

buttons

needle

embroidery thread

headband

glue gun

scissors

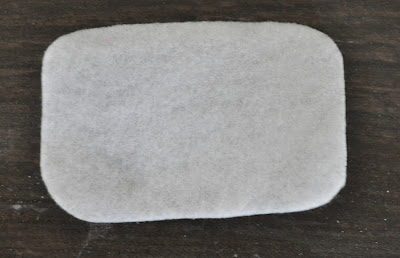
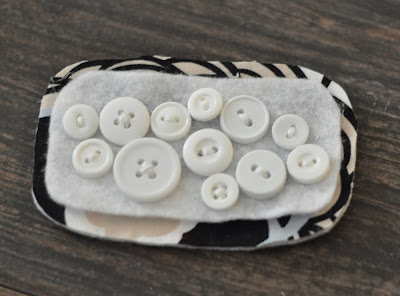
To start off, I cut a 2″ by 1 1/2″ rectangle with my felt.

Using my scissors I rounded the corners.

I just “eyeballed” it.

So it looks like so:

http://1.bp.blogspot.com/_bZNGMOswGCE/TEZEJ9_VwoI/AAAAAAAAMlo/Zgg8qPXkLy8/s1600/headband2.jpg

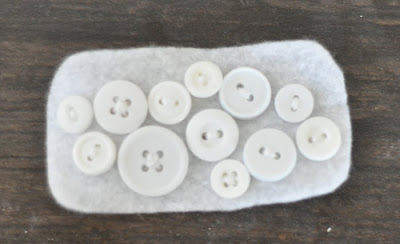
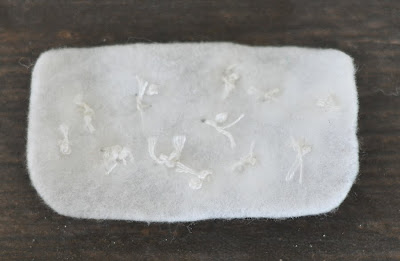
Next I placed a button on the felt

and sewed in on with my needle and thread.

If you want, you could use your glue gun

for this part too. I just like the look with the thread.

http://4.bp.blogspot.com/_bZNGMOswGCE/TEZEJYgK9oI/AAAAAAAAMlg/fI98YQ-kmz4/s1600/headband3.jpg 

Arrange your buttons all mish mashed

and however you want.

Continue to stitch them on.

http://4.bp.blogspot.com/_bZNGMOswGCE/TEZEJPJzdEI/AAAAAAAAMlY/qwub_8HYmu8/s1600/headband4.jpg

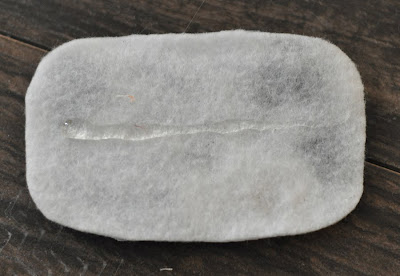
This is what the back looked like

when I was done:

http://4.bp.blogspot.com/_bZNGMOswGCE/TEZEIqa9RfI/AAAAAAAAMlQ/zhbz8kS0i9I/s1600/headband5.jpg

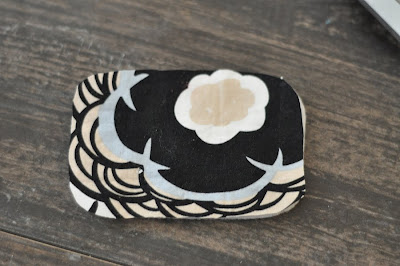
I cut a slightly larger piece of white

felt and then laid my scrap fabric

on it and cut it out.

http://2.bp.blogspot.com/_bZNGMOswGCE/TEZDs_9qHGI/AAAAAAAAMlI/MNThZnOTivI/s1600/headband6.jpg

And then I just glue gunned it in place.

You could sew it with your sewing machine too.

http://4.bp.blogspot.com/_bZNGMOswGCE/TEZDsrDBmPI/AAAAAAAAMlA/XQRC-HTT-aQ/s1600/headband7.jpg

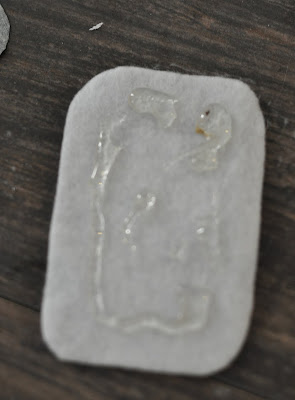
Next I put glue on my original felt

(with the buttons) and glued it to the second, bigger piece.

http://4.bp.blogspot.com/_bZNGMOswGCE/TEZDsLVXvnI/AAAAAAAAMk4/QiOxF_hKG-o/s1600/headband8.jpg

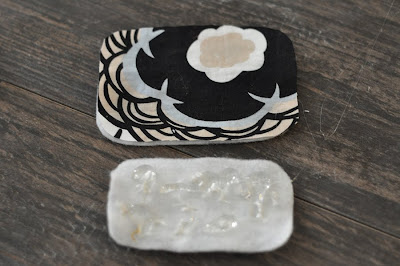
And this is how it looked:

http://4.bp.blogspot.com/_bZNGMOswGCE/TEZDrqBp-UI/AAAAAAAAMkw/k6WkkKS5l80/s1600/headband9.jpg

Then I made a line with glue

on the back:

http://2.bp.blogspot.com/_bZNGMOswGCE/TEZDrBNV0HI/AAAAAAAAMko/wUMAcP4NkCs/s1600/headband10.jpg

And placed my headband on it

making sure to kind of wrap the ends ups it.

You could also use an elastic headband.

The plastic ones work better for my daughter

so that’s what I used.

http://1.bp.blogspot.com/_bZNGMOswGCE/TEZDJLPE4sI/AAAAAAAAMkg/0o0xowFmwHk/s1600/headband11.jpg

Next I made another line of glue

and covered that line with one

more square of white felt.

It just makes it look finished.
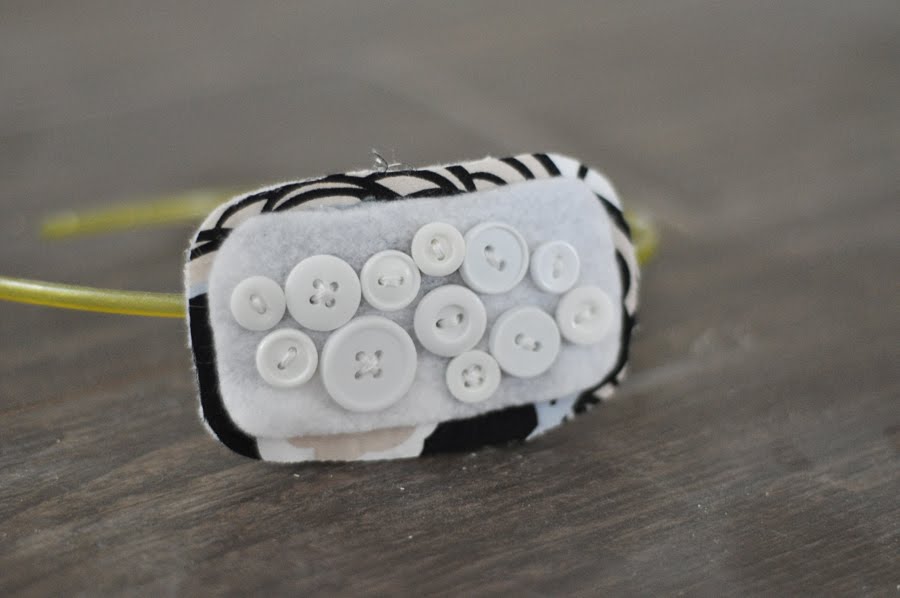
http://4.bp.blogspot.com/_bZNGMOswGCE/TEZDI9fE1YI/AAAAAAAAMkY/sCRyFs_QKkw/s1600/headband12.jpg

And you’re done:

http://3.bp.blogspot.com/_bZNGMOswGCE/TEZDIeEtrJI/AAAAAAAAMkQ/rjzCBj7UTe4/s1600/headband13.jpg

Easy peasy. And cute to boot. 😉

http://3.bp.blogspot.com/_bZNGMOswGCE/TEZDHjmEIEI/AAAAAAAAMkA/FmstSjgYpTc/s1600/headband15.jpghttp://1.bp.blogspot.com/_bZNGMOswGCE/TEZDIMU0yLI/AAAAAAAAMkI/J7pnE7g9kK4/s1600/headband14.jpg

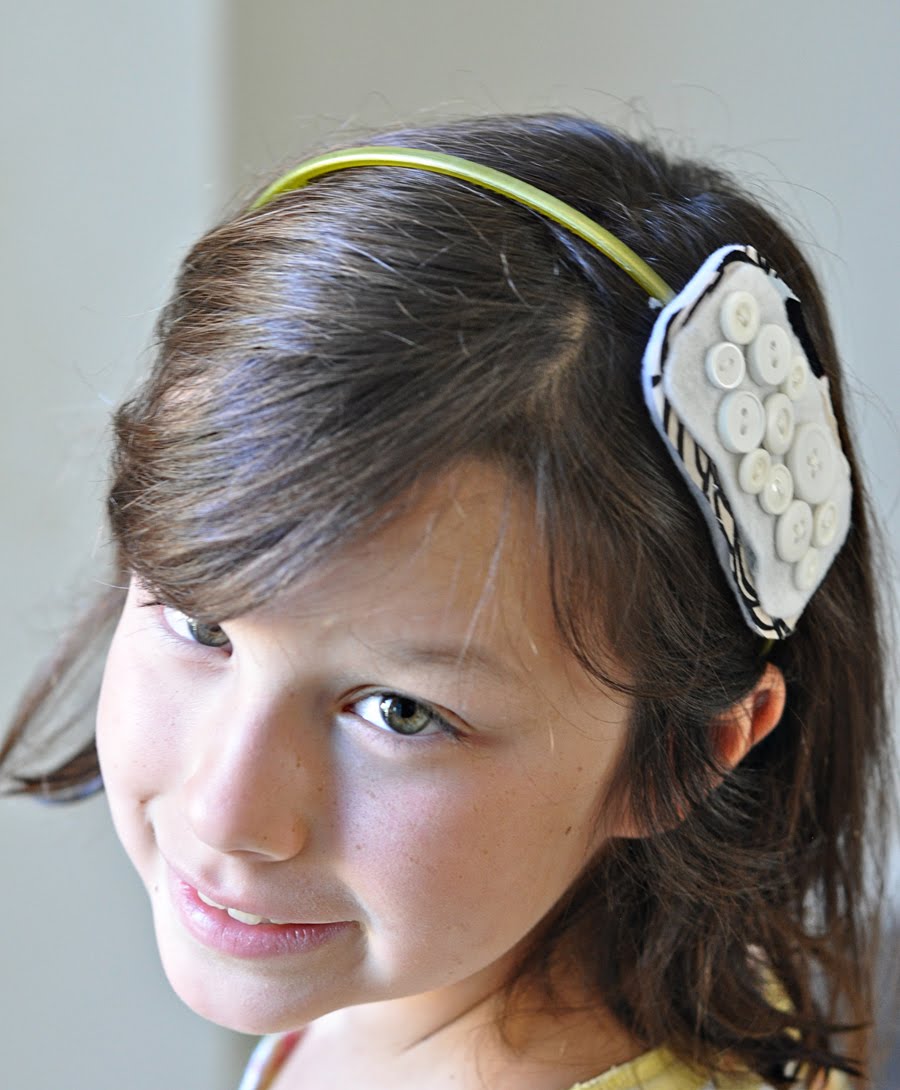
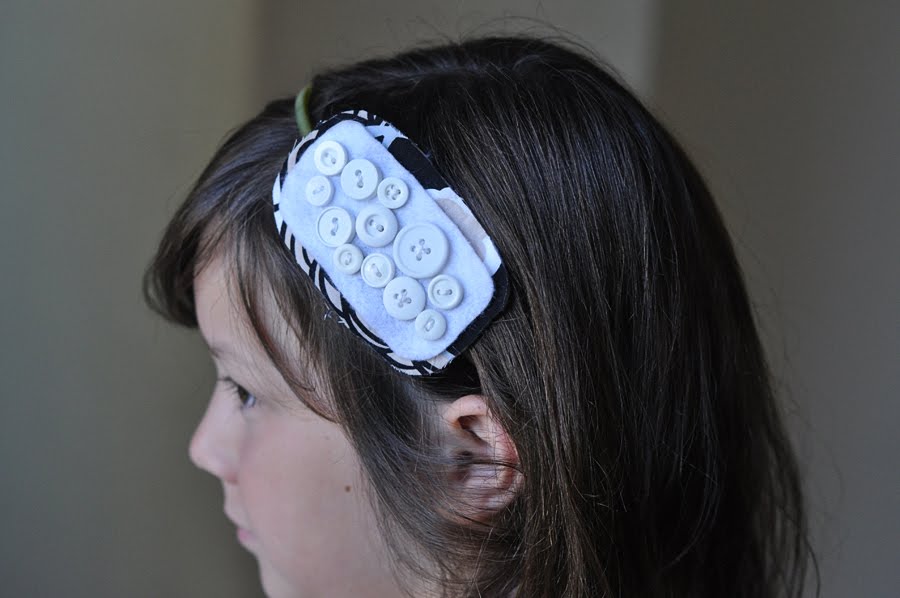
Doesn’t she just look thrilled to be having her pic taken?

Thanks again to Jen for letting me guest post today.

Stop by and say hi over at 30days!

post signature
 Thanks Mique for sharing such a fun, cute idea with us! Here’s a button for you 🙂 If you haven’t been over to Mique’s blog — 30 Days — get over there and check it out! It is fantastic. She just had a Funner in the Summer series that had tons of great ideas. Plus, she has wonderful projects and ideas all the time, like:
 http://3.bp.blogspot.com/_bZNGMOswGCE/TDSzelQCQ7I/AAAAAAAAMV0/IgOx29VTLbg/s1600/funnerinsummerbanner.jpg
http://3.bp.blogspot.com/_bZNGMOswGCE/TA_Z2d3s73I/AAAAAAAAMIc/uJdz2UWss-E/s1600/teacheridea.jpg
 {Teacher Gift Card Appreciation Idea}
http://2.bp.blogspot.com/_bZNGMOswGCE/S_VLs25zl1I/AAAAAAAAL78/ZbMMXZwA-sY/s1600/3.jpg
 {Summer School Chart}
http://2.bp.blogspot.com/_bZNGMOswGCE/S-becLPNY0I/AAAAAAAAL0g/xihdKONBnls/s1600/germanpancakes.jpg
 {Yummy Recipes}
PLUS — she features great projects and has really fun giveaways too! 

You will love 30 Days!!!

Have a Wonderful Wednesday!!
XOXO

Posted By: Jen · In: crafts, fashion, sewing projects

Come Vote for Your Favorite Project!
Guest Project — Make a Charming Fruit Tray

You’ll Also Love

DIY Gingerbread Christmas Wreath
make a dog playhouse out of a box. all the instructionsMake an Adorable DIY Dog Playhouse Out of a Box!
Good Witch Tea Party Ideas{Good} Witch Tea Party!! [and free Halloween Printables]

Comments

  1. Yycien says

    August 17, 2010 at 7:13 AM

    I used to search hair accessories over the net and I'm glad I found this tutorial. Anyway, this headband is absolutely beautiful. I'm going to make this and wear it out. Thanks for a great tutorial! Detailed steps and photos will help me a lot. 🙂

  2. Yycien says

    August 17, 2010 at 7:11 AM

    I used to search hair accessories over the net and I'm glad I found this tutorial. Anyway, this headband is absolutely beautiful. I'm going to make this and wear it out. Thanks for a great tutorial! Detailed steps and photos will help me a lot. 🙂

  3. Jessica @ Barefoot by the Sea says

    July 22, 2010 at 8:01 PM

    I LOVE these ideas! Oh, so CRAFTY!

  4. MiMi says

    July 21, 2010 at 11:54 PM

    Very cute! I may have to make one for my niece!

  5. Connie W says

    July 21, 2010 at 10:37 PM

    Very cute! I have a ton of felt and buttons!

  6. jennykate77 says

    July 21, 2010 at 10:09 PM

    CUTE no-sew headband…that's my kind of craft! I can use a hot glue gun!! 🙂 That dish looks delish. Going to follow the link to find out what it is!

    ♥

  7. Jessica says

    July 21, 2010 at 7:19 PM

    Hi Jen! My name is Jessica and I wanted to let you know that I tried out your Subway art and LOVE how it turned out! I gave you a shout out and posted a picture of how it turned out on my blog (www.gardenpatchadventures.com). Thanks for the great idea!

  8. Trinette Hayslip says

    July 21, 2010 at 4:16 PM

    Maybe I am being fecicious, but the project does include sewing 😉

  9. Nancy says

    July 21, 2010 at 3:26 PM

    Too cute Mique! So fun and quick.

  10. jodi french paper arts says

    July 21, 2010 at 3:05 PM

    what a charming idea!

  11. ShadowCase says

    July 21, 2010 at 2:45 PM

    Thanks for showing Mique off–I just love her stuff! Really love the summer activity chart–gonna make it today with the kiddos!

  12. amycornwell says

    July 21, 2010 at 2:32 PM

    very cute! And I love the teacher appreciation idea. Very cool!

Hi! I'm Jen Hadfield. I'm a mom of 5 restoring an 1891 home in the heart of Salt Lake City. I love being creative and sharing simple ideas to make your life easier and more beautiful!

Receive the Latest Crafts, DIY, Recipes and More in your INBOX!

Follow us on Pinterest! It's awesome!

Top Posts & Pages

Spruce up Your Outdoor Space with a DIY Recirculating Fountain! (tutorial)
A New Deck in Under 30 Minutes!
How to Make a T-Shirt Quilt!
12 Must-Have Items to Pack on an Alaskan Cruise!
DIY Secret: How to Print on Post-It Notes (and Free Printable Template)
Copycat Panera Spinach and Artichoke Egg Soufflés - SO good!


Popular Posts

  • Spruce up Your Outdoor Space with a DIY Recirculating Fountain! (tutorial)
    Spruce up Your Outdoor Space with a DIY Recirculating Fountain! (tutorial)
  • A New Deck in Under 30 Minutes!
    A New Deck in Under 30 Minutes!
  • How to Make a T-Shirt Quilt!
    How to Make a T-Shirt Quilt!
  • 12 Must-Have Items to Pack on an Alaskan Cruise!
    12 Must-Have Items to Pack on an Alaskan Cruise!
  • DIY Secret: How to Print on Post-It Notes (and Free Printable Template)
    DIY Secret: How to Print on Post-It Notes (and Free Printable Template)
  • Copycat Panera Spinach and Artichoke Egg Soufflés - SO good!
    Copycat Panera Spinach and Artichoke Egg Soufflés - SO good!
  • How to Change a Recessed Can Light into a Pendant Light with No Remodeling!
    How to Change a Recessed Can Light into a Pendant Light with No Remodeling!

As seen in


Amazon Affiliate

Tatertots & Jello is a participant in the Amazon Services LLC Associates Program, an affiliate advertising program designed to provide a means for sites to earn advertising fees by advertising and linking to amazon.com.
  • About Me
  • Advertising
  • Get Featured

Copyright © 2025 Tatertots and Jello · Privacy
This site is a place for positive discussion and ideas. Negative talk, comments that disparage others, and similar are not welcome and may be removed.