Tatertots and Jello

COLORFUL HAPPY HOME -- Daily DIY, Decor, Craft and Recipe Tutorial

  • My Home
    • 1905 Cottage
    • Daybreak House
  • DIY
    • DIY Projects and Ideas
    • Organizing
    • Tutorials
    • Printables
  • Decor
    • Spring Projects
    • Summer Projects
    • Fall Projects
  • Crafts
    • Kids Crafts
    • Painting Projects
    • Paper Projects
    • Sewing
    • Wreaths
  • Holidays
    • Valentines Day
    • Easter
    • Halloween
    • Thanksgiving
    • Christmas
    • HAPPY Holidays Series!
  • Recipes

Explore

  • my home
  • diy
  • decor
  • crafts
  • holiday
  • printables
  • recipes

Connect

Home » decorating » Guest Project: Mod ‘Filing Cabinet’

decorating, diy, guest tutorials · May 21, 2010

Guest Project: Mod ‘Filing Cabinet’

Tatertots & Jello is a participant in the Amazon Services LLC Associates Program, an affiliate advertising program designed to provide a means for sites to earn advertising fees by advertising and linking to amazon.com.


PotHolesandPantyhose
Hello all you Tatertots and Jello readers! I’m Rebekah from Potholes & Pantyhose and I am excited to be guest blogging here today. At Potholes & Pantyhose, I blog about touring with my musician hubby, my home life-which usually involves some type of remodeling project, my photography, and any Arts and Crap that I happen to make. I try to maintain a somewhat normal life. However, normalcy keeps escaping me.

Today, I have a quick and simple little project that will turn your functional filing cabinet into a modern conversational piece. I was tired of the clunky metal object mocking me from the rest of my very ‘cool’ office. I was inspired by something similar in Ready Made magazine and just had to try it on my own, of course putting my own little spin on it.

What you will need:
Filing Cabinet-I picked mine up from craigslist for $15
Contact Paper-I chose a wood grain birch (found at Lowe’s)
2’ or 4’ level
Exacto Knife/Scissors
Pencil

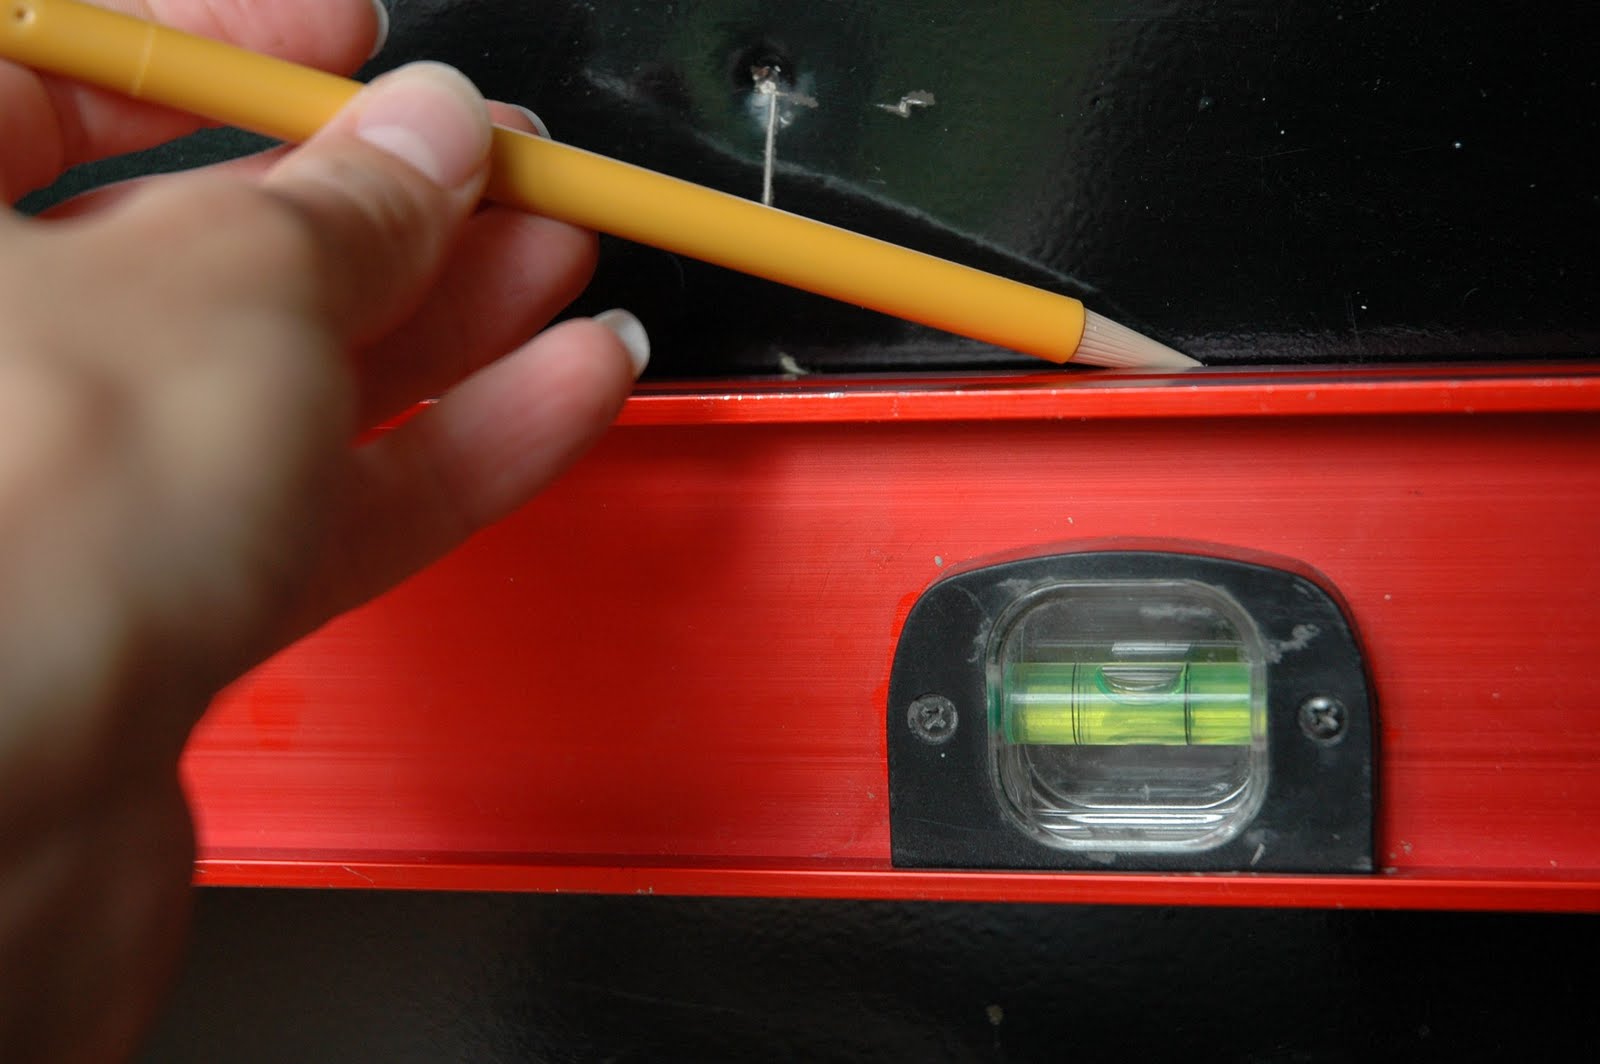
Using your level, draw a straight line across the middle of your filing cabinet. This will be the end point for your contact paper. I chose to put the line about a third of the way down of the filing cabinet, instead of a predictable half-way mark, just to make things interesting. I don’t like to be predictable…
(Picture #4)

Using your level, draw lines at 3”, 2” and 1” of thickness onto the contact paper to make the stripes. The angle you choose to have your contact paper at on the filing cabinet and the depth of your cabinet will dictate how long your strips need to be. Cut your differing width of stripes from the contact paper, overcompensating for the length.

I temporarily taped all of my stripes to the side of the filing cabinet, and adjusted them until I liked the look of them, before permanently adhering them to the cabinet. I have learned to do this the hard way. Let’s just say it is very difficult to remove contact paper from anything. Next, I drew little ‘tick’ marks onto the filing cabinet, notating where each stripe went, so I would remember in what order to adhere them to the cabinet.

Using a level, draw a line across the bottom of your taped contact paper stripes that coincides with the line you had originally drawn on the actual filing cabinet. This will
make the bottom angle on your stripes. Remove your stripes and cut the tips off with your exacto knife or a pair of scissors.

Peel off the backing from the contact paper and begin placing your stripes onto the filing cabinet, following your earlier notations. Smooth out the bubbles as you go.

Use your exacto knife to cut the top of your stripe off, leaving about an 1/8” to wrap around to the other side.

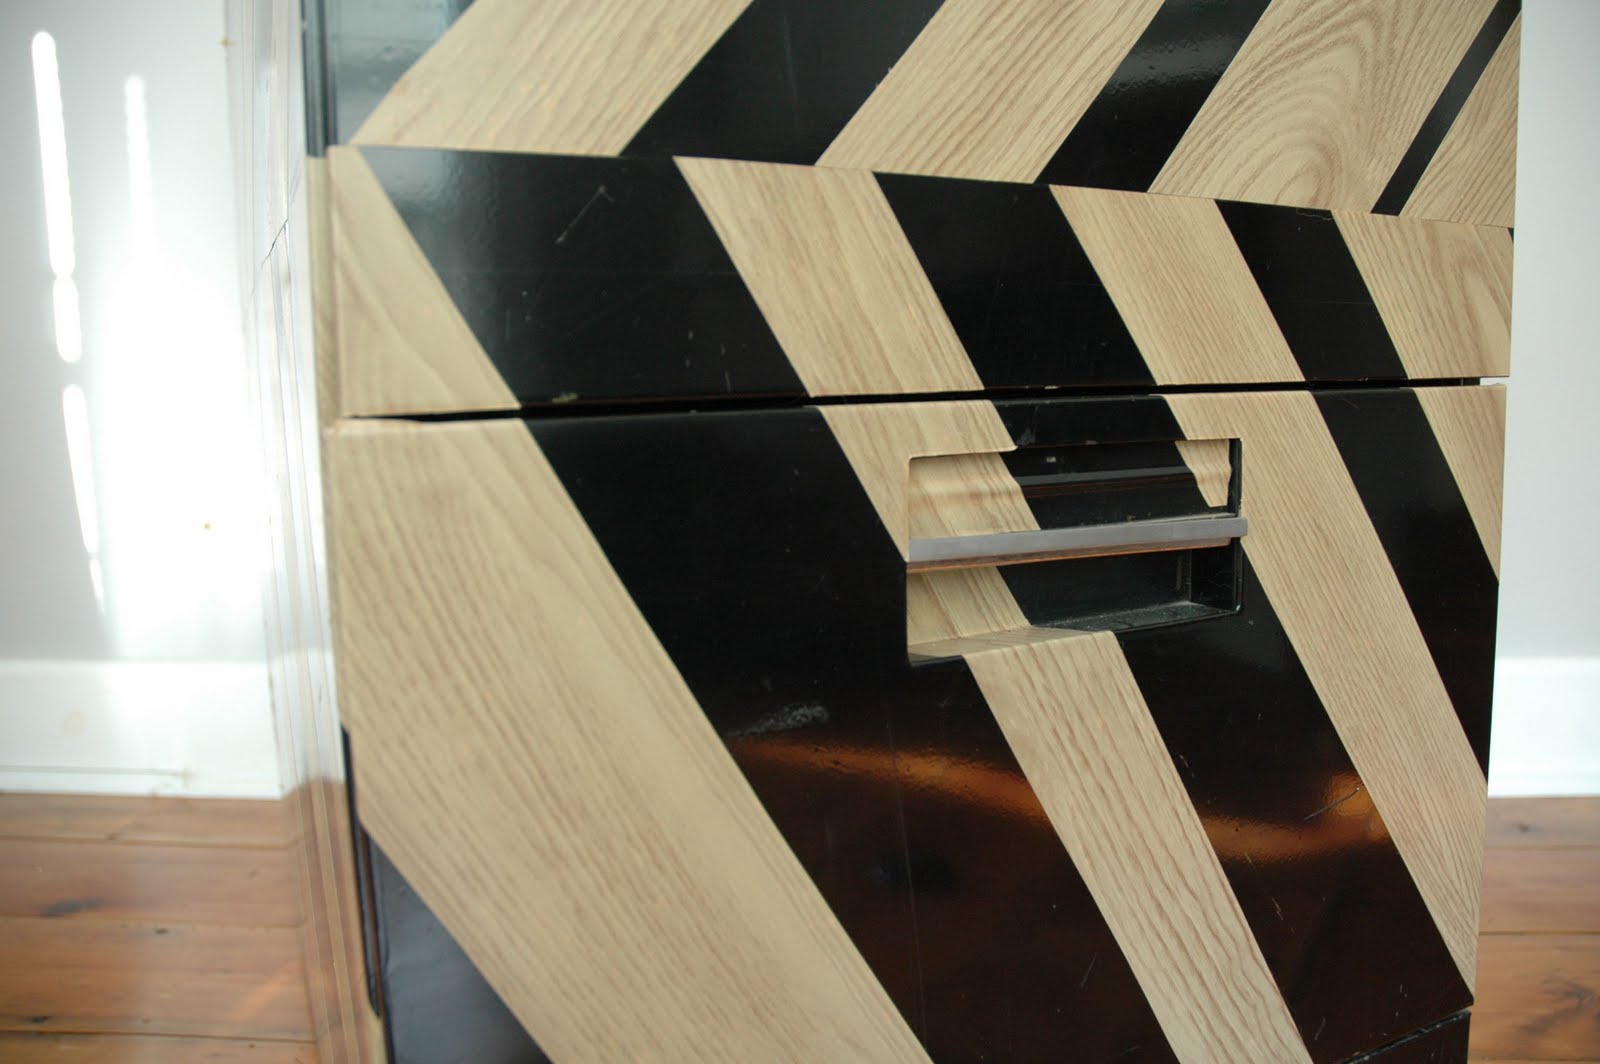
Repeat this process around the entire filing cabinet. If you have recessed pulls like I did, cut your stripes extra long in order to tuck the contact paper up and around your pulls. When placing the stripes on the drawers, cut them extra long in order to wrap around the edges of each drawer.

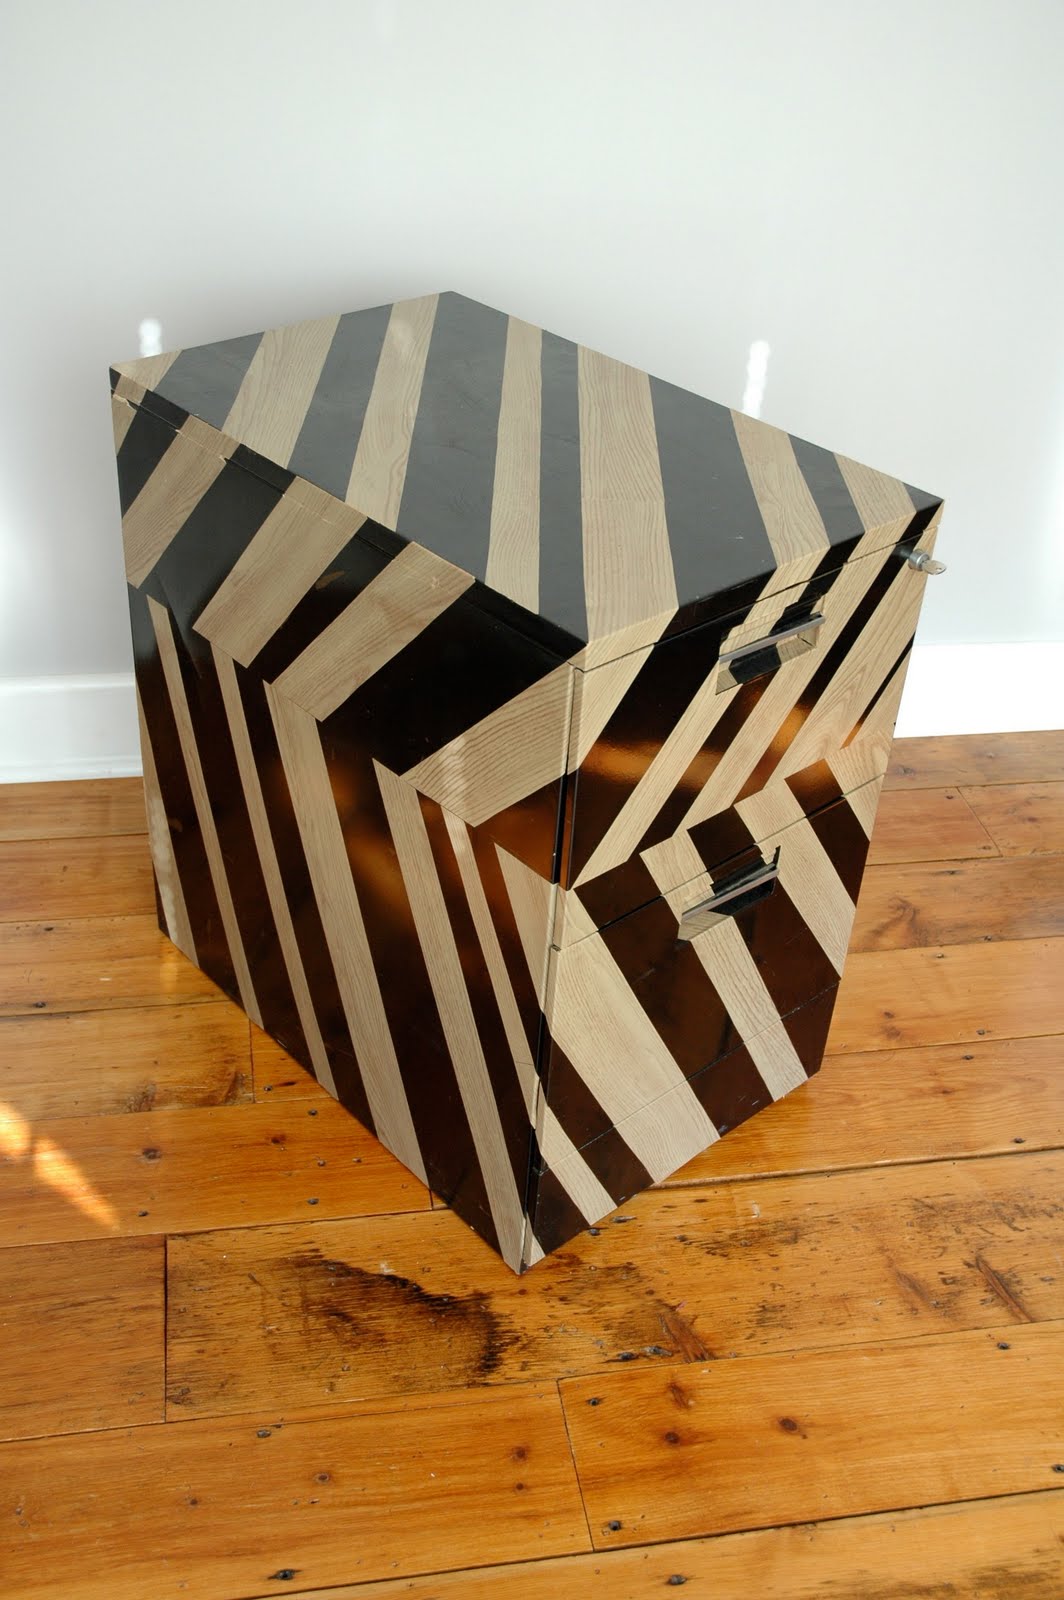
Now you have a ‘very cool’ filing cabinet! No more mocking us, Mr. Clunky Filing Cabinet!
Come and visit me, Rebekah, at Potholes & Pantyhose to see more of my Arts & Crap projects!
Thanks Tatertots & Jello for having me today!

Thanks Rebekah! I love your blog and your wonderful projects! Here’s a button for sharing your great idea with us!
Check out Potholes & Pantyhose for more great projects!

And come back tonight and link up to the Weekend Wrap Up Party — 

it starts at 10 PM.
 Happy Friday!
XOXO


Posted By: Jen · In: decorating, diy, guest tutorials

Guest Project — Striped Bias-Cut Ruffle Dress Tutorial
Who was crowned the DIY Club winner this month?

You’ll Also Love

17 St. Patrick’s Day Dessert Recipes!
DIY Halloween Bat Mantel Ideas
make a dog playhouse out of a box. all the instructionsMake an Adorable DIY Dog Playhouse Out of a Box!

Comments

  1. sagaworld says

    February 3, 2012 at 12:35 AM

    Dubai is single of the nearly everyone sought-after shopping destination across the humankind. One of the essence of erstwhile empires of Mughal and Safavid dynasties. Saga World Online is the complete online shopping experience in Dubai as it showcases an array of Handcrafted & Hand-woven items. Moreover, single can explore and good buy Jewels, Watches & Accessories online. A lofty Arts and Crafts shopping in Dubai was in no way so stress-free.

  2. Lauren says

    July 18, 2010 at 12:40 AM

    I love how you transformed that filing cabinet! I covered my filing cabinet in woodgrain contact paper as well ( http://31diy.blogspot.com/ ), but I didn't create a cool pattern like you did. 🙂

  3. Amanda@Imperfectly Beautiful says

    May 22, 2010 at 3:53 AM

    That is freakin fantastic…LOVE it!

    ~Amanda

  4. The Blonde Duck says

    May 21, 2010 at 9:58 PM

    How neat!

  5. Melissa Miller says

    May 21, 2010 at 6:17 PM

    That is just the coolest! Thank you for sharing and guest posting.

    Blessings, ~Melissa 🙂

  6. Em @ Bunch of Scrap says

    May 21, 2010 at 6:10 PM

    That is so awesome! I would have NEVER thought of that!

  7. Shiloh and Bob Willey says

    May 21, 2010 at 5:43 PM

    Love Your Blog! You've Been awarded- Go check it out!
    shilohsjunktofunk.blogspot.com

  8. Life in Rehab says

    May 21, 2010 at 4:43 PM

    Wooooohooooo, Rebekah, that looks cool! And congrats on the guest blog! You already know I love your stuff.

  9. Amanda @ Serenity Now says

    May 21, 2010 at 4:39 PM

    Neat guest post. Love the dressed up filing cabinet. They can be so ugly, but this is cool!

  10. Fleur de Bee says

    May 21, 2010 at 4:25 PM

    EEK! I LOVE this!! Fab idea! Making my wheels turn here! What a FUN guest bogger too!

    xo Molly

  11. Nancy says

    May 21, 2010 at 4:25 PM

    What a great idea. I may have to make one of these for my home office!

  12. Room to Inspire says

    May 21, 2010 at 3:15 PM

    What a fun project – I will have to bookmark this idea just in case we ever drag our monster out of the closet!

    Chelsea

  13. Kelli @ RTSM says

    May 21, 2010 at 2:33 PM

    That a very cool filing cabinet! If mine wasn't hidden away in closet, I might think about doing something like that to it!

  14. Ruth says

    May 21, 2010 at 1:33 PM

    That definitely makes the boring filing cabinet into a very fun piece.

    Ruth

  15. Jules says

    May 21, 2010 at 12:16 PM

    Very cool. I actually thought it was painted that way in the first picture.

Hi! I'm Jen Hadfield. I'm a mom of 5 restoring an 1891 home in the heart of Salt Lake City. I love being creative and sharing simple ideas to make your life easier and more beautiful!

Receive the Latest Crafts, DIY, Recipes and More in your INBOX!

Follow us on Pinterest! It's awesome!

Top Posts & Pages

Copycat Panera Spinach and Artichoke Egg Soufflés - SO good!
Spruce up Your Outdoor Space with a DIY Recirculating Fountain! (tutorial)
12 Must-Have Items to Pack on an Alaskan Cruise!
A New Deck in Under 30 Minutes!
DIY Fountains to Make Your Yard Amazing!
How to Change a Recessed Can Light into a Pendant Light with No Remodeling!


Popular Posts

  • Copycat Panera Spinach and Artichoke Egg Soufflés - SO good!
    Copycat Panera Spinach and Artichoke Egg Soufflés - SO good!
  • Spruce up Your Outdoor Space with a DIY Recirculating Fountain! (tutorial)
    Spruce up Your Outdoor Space with a DIY Recirculating Fountain! (tutorial)
  • 12 Must-Have Items to Pack on an Alaskan Cruise!
    12 Must-Have Items to Pack on an Alaskan Cruise!
  • A New Deck in Under 30 Minutes!
    A New Deck in Under 30 Minutes!
  • DIY Fountains to Make Your Yard Amazing!
    DIY Fountains to Make Your Yard Amazing!
  • How to Change a Recessed Can Light into a Pendant Light with No Remodeling!
    How to Change a Recessed Can Light into a Pendant Light with No Remodeling!
  • DIY Secret: How to Print on Post-It Notes (and Free Printable Template)
    DIY Secret: How to Print on Post-It Notes (and Free Printable Template)

As seen in


Amazon Affiliate

Tatertots & Jello is a participant in the Amazon Services LLC Associates Program, an affiliate advertising program designed to provide a means for sites to earn advertising fees by advertising and linking to amazon.com.
  • About Me
  • Advertising
  • Get Featured

Copyright © 2025 Tatertots and Jello · Privacy
This site is a place for positive discussion and ideas. Negative talk, comments that disparage others, and similar are not welcome and may be removed.