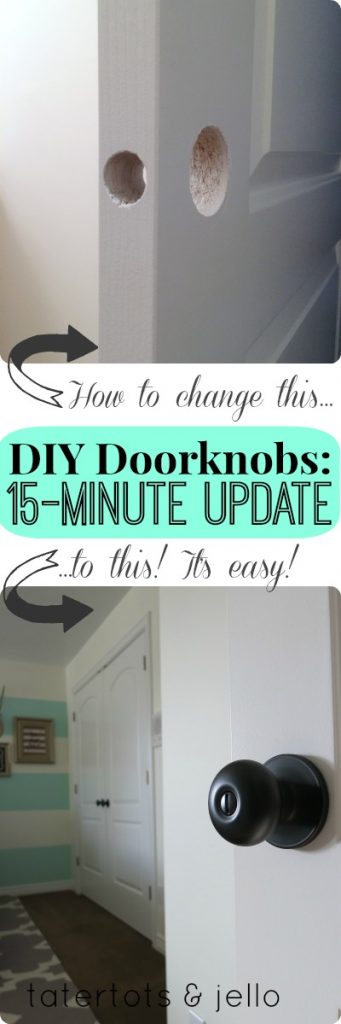
Here’s the deal: the doorknobs most builders put on houses aren’t very impressive. They’re made to be installed quickly, and they’re fine for that, but they might not last as long as you’d like them to, or, if you’re like me, the doorknobs installed in 1997 in my house just aren’t right for my house anymore.
Today I’ll show you how I updated the doorknobs in the Guest Room Redo — and how you can do it, too. There’s one challenge you’ll have to tackle, but I’ll show you how to do it quickly and easily.
You will need:
- A Phillips (that’s the one with the plus-shaped head) screwdriver, preferably a fairly long one
- Your new doorknob
- A utility knife
- A pencil
- Chisels and a hammer (if you don’t have chisels you can pick up an inexpensive set for about $10 like this one)
Here’s how to do it — and you can do it in less than 15 minutes!
Remove the old doorknob (2 minutes)
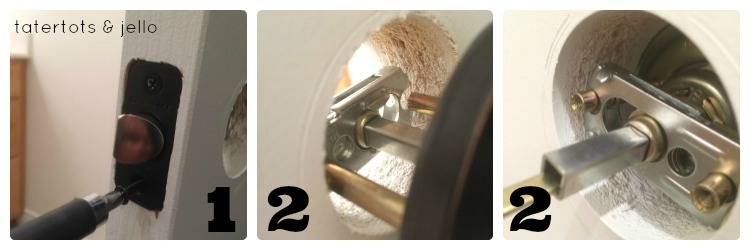
If you haven’t removed the existing doorknob and striker plate, do so now. Use the long Phillips screwdriver to remove the two screws on the side of the doorknob that’s inside the room. As you take it apart, see how the doorknob fits together — easy!
Also remove the striker plate — that’s the part in the doorframe with one curved edge.
You won’t need these again, so you can send them to a metal recycling facility or discard them.
Prep the door for the new knob (10 minutes)
This is the tricky part. My doors, as do most doors, came with only a circular hole drilled for the latch mechanism. But most new knob sets you buy today have a square plate around the circular hole.
For builders, this circular hole is great — it saves time because they can just slip the latch mechanism in the hole and they’re done. But the nicer knobs with the square plates look much nicer — and require that we do some work to get the door ready.
So, we’re going to make a rectangular hole around the circular one so that the rectangular plate sits flush with the edge of the door. It’s not super hard, and once you’ve done one you’ll have the hang of it. Here’s what to do:
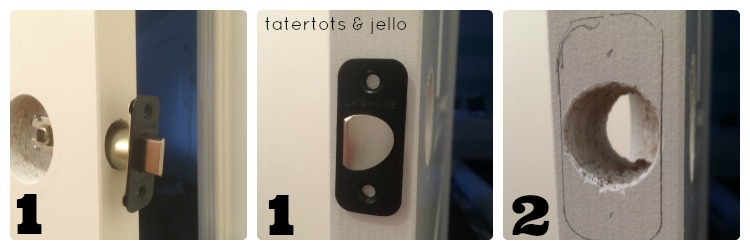
1. Slip the latch mechanism in the hole, making sure it’s square.
2. Use your pencil to draw an outline around the outside of the rectangular plate
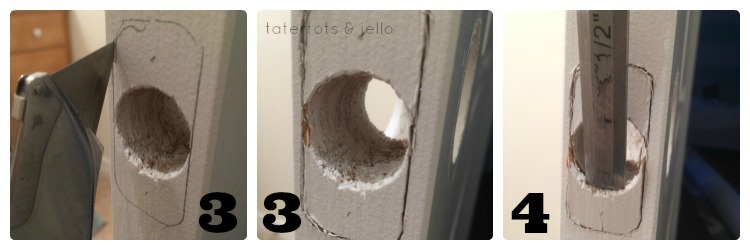
3. Use your utility knife to cut as deeply as you can — probably about 1/8 to 1/4 of an inch — along that pencil outline
4. Using (probably) your smallest chisel, start chipping out the wood. Be careful not to go too deeply. I find it easiest to start chipping inside the circular hole since it’s already open. Note how a big chunk comes out with the first tap because you’ve already cut around the sides (see the picture on the left, below).
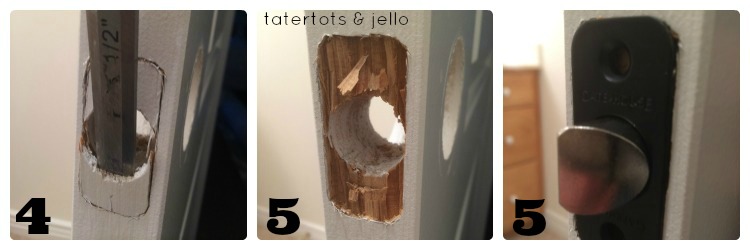
5. Using your chisels and utility knife, chip away the wood as evenly as possible. Insert the latch mechanism as often as you need to in order to see if you’ve got the depth right and the hole even. (See the picture on the right above — I still have more chiseling to do!)
6. (Bonus step if you’re more meticulous than I am: you can paint the edges of the inside of the hole with paint to match your door to mask the places where you did not do the door perfectly. But no-one is going to inspect this, so don’t worry about it.)
You may also want to grab some cleaner or a cleanup wipe and clean up the doorframe around the old knob.
Install the new knob and striker plate
Installing a new doorknob is simple. You’re going to reverse the process of taking the old one out:
1. Put the new latch mechanism in. Make sure the shorter part of the latch points towards the doorframe. In my picture, the doorframe’s on the right. Use the screws that came with the new knob to attach the latch using the rectangular plate.
2. Slide the front of the doorknob in , aligning the two side tubes and the center tube.
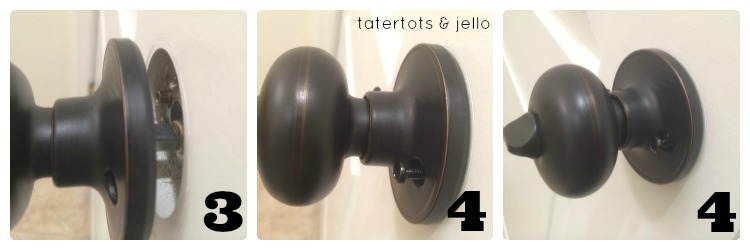
3. Holding the front of the doorknob in place with one hand, slide the back of the doorknob on, aligning it with the front. Note that the center piece will have a rectangular or flat piece that slides into the lock, so you may need to wiggle or turn the lock to get it aligned correctly
4. Screw the doorknob in place from the back using the long screws.
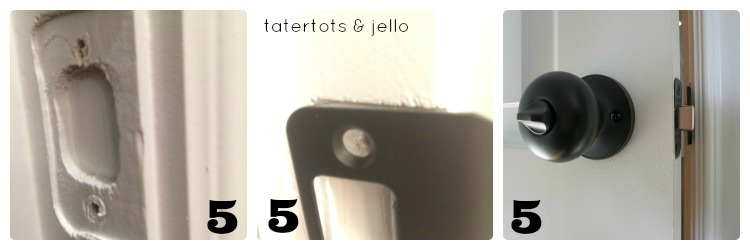
5. If you’re installing a new door, you’d have to spend some time meticulously aligning the strike plate. You probably won’t have to try that hard here, but here’s the tip for making sure the location of the old strike plate works for the new one: use some masking tape on the top and the bottom of the strike plate to hold it in place on the doorframe. If it works perfectly, great! If not, adjust it until it’s right. Then, screw the strike plate in place. (This trick will save you some pain if you accidentally screw the strike plate in the wrong place.)
Note: it’s possible that the new striker plate is bigger than the old one — like mine was (see middle picture above). Just use your utility knife to gently chip away a slightly bigger hole for it.
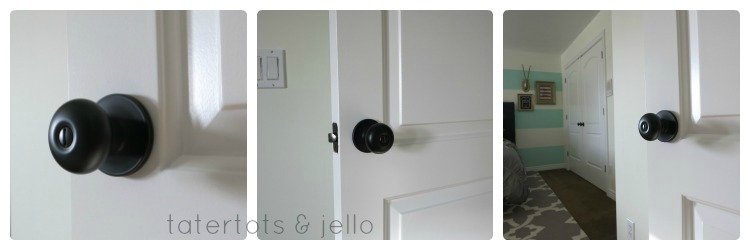
There you go! 15 minutes to an updated doorknob!
And if you want to replace your closet doorknobs to match, they’re even easier: they’re called “dummy” knobs, and they’re just attached with two screws to the front of the closet door. Just unscrew the old ones and screw on the new ones. Simple!
That’s how I updated the knobs in the new guest room — I’m slowly working my way through the whole house!
Have you replaced doorknobs? What’s your favorite DIY trick to make it easier?
xoxo

PS: I’ve linked up this post to these fabulous blogs this week!


Awesome tutorial! I’ve changed out several door knobs in our old house, and you’re right – it’s pretty easy! My tip would be to visit your local (or nearby) Habitat for Humanity ReStore to shop for door hardware. I purchased new, in the package door knob sets for pennies on the dollar at our ReStore (I’m talking less than $5 for name brand goods!) You can also find loose parts, like strike plates, for about a quarter. 🙂
What about spray painting them? I’ve wanted to try but don’t know if it would work…. has anyone spray painted their door knobs?
http://www.dragonfliesandthistles.blogspot.com/2014/02/dollar-store-glass-planters.html
I am thinking of trying the hinges someday! Also check out the comments on Facebook about this post — at least one person has tried painting (with a brush) her doorknobs successfully!
https://www.facebook.com/TatertotsandJello/photos/a.608100622572282.1073741825.111515425564140/623646474351030/?type=1&stream_ref=10
I have three doors in my house leading to the outside. They all need replacing and now I know how. Thanks so much.
The change looks gorgeous and modern, I love it! However I would have to change all of the hinges also, Resulting in much more than a fifteen minute project.
Because the rest of the project was so involved we decided not to swap out the hinges … yet. We may just paint them instead of buying new ones – then we wouldn’t have to do as much work!
Either way it still looks great! I only mention my desire for changing the hinges also, only because in the house we recently purchased there are several doors that have mismatched hardware. so mismatched that on a couple of the doors one side of the door knob is silver while the other side is gold. It drives me nuts! I would love to change them all out, but am not ready for the project yet. I may look into painting them like some of the FB comments mentioned.
It used to be pretty common to see that on bathroom doors…silver inside the bathroom, I guess to match chrome fixtures, and gold on the other side to match the rest of the door hardware throughout the house. It drove me nuts, too, so I systematically worked my way through our last house switching them all out. I’d read that spraying knobs is a temporary fix but the paint tends to fail after a while. Spraying hinges works well as they don’t come in contact with oils from hands as much as knobs.
Where did you get the door knob? Is the finish antique bronze? Love how it looks!
We didn’t go for anything fancy – -these are from Lowe’s and were about $11: http://www.lowes.com/pd_279811-51800-TFX710_4294654475__?productId=3142297
I bow to your patience. That whole chiseling thing would send me into a twitching heap! 🙂
I remember when we first moved into our house and it was so stressful since I had never installed doorknobs and that was my job! This would have been soooo nice to have! Awesome post!