
Land of Nod-inspired Dresser Knock-Off Makeover
Hand-me Downs. Gotta love them. For awhile that is. My in-laws graciously donated a media cabinet to us when we moved into our home. But after four years I was finally ready to find something that was more our style.
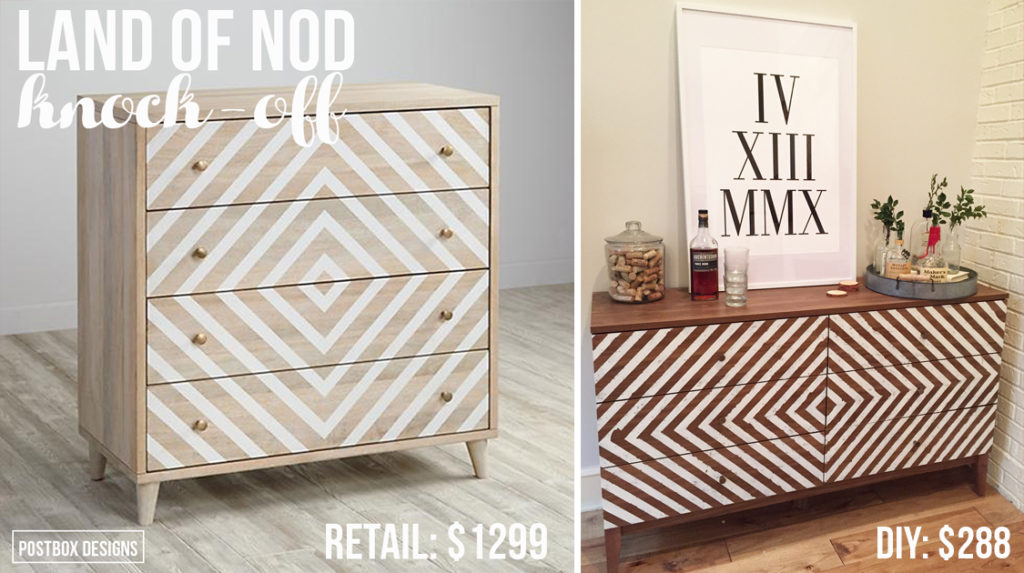
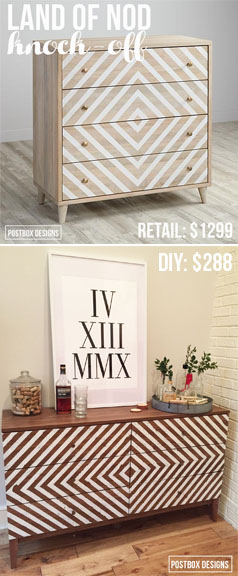
So I started the crazy process of trying to find a new piece of furniture that matched my style AND my budget. Afters hours upon hours of scouring Pinterest, I was no closer to finding something. Then I started thinking outside the box, looking for “buffets” and “dressers”. I saw this dresser from Land of Nod and was in love. It is so fun yet neutral, grown-up yet playful. However I wasn’t ready to drop $1300 for it, and it was too tall for a media cabinet. But now I had my inspiration! So I went on a hunt. I figured I could replicate a similar look for a lot less. In fact I spent a total of just $287 for my knock-off version.
This is the piece I found to start off: the Target Threshold “Millsboro” Walnut Dresser. The original price is $349.99 but I got it on sale for $266 (and I’ve seen it on sale for even less since then), plus even scored free shipping! I needed a longer, shorter piece since I was using it for a media cabinet.
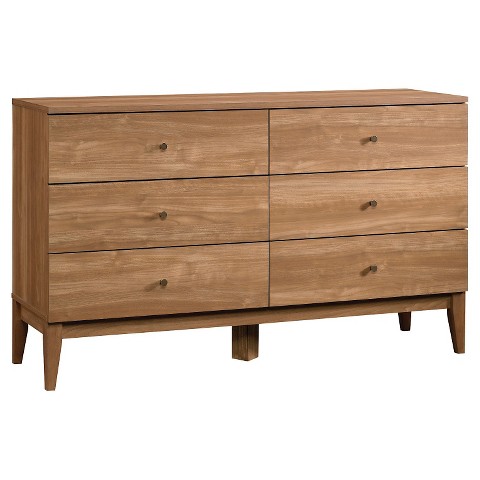
But if you are wanting the taller look (more similar to the Land of Nod version), they have that version as well: Target “Porter” Mid-Century Dresser for $379.99.
So I had my piece…now what? Here is everything I used in this DIY:
Target Dresser: $266
Frog Painter’s Tape: $8
White Latex Paint (free-I used what I already owned)
Varathane RustOleum Clear Polyurethane Sealer : $14
Exacto Knife
Small Craft Paint Brush
STEP 1: I chose to paint my drawers before assembling the dresser. Be sure to lay them out in the correct order, my drawers had to be aligned in a certain way due to the hardware. Then I pushed all six drawers together so they were touching. If you already own a piece that is assembled, I would try to tackle it intact. Just remove the hardware and start from there!

STEP 2: You want to spend a bit of time composing your layout. I found the center of the dresser and marked it with a pencil mark. Using that center point, I drew both a vertical and horizontal line across all of the drawers. These were my “guidelines” to make sure my pattern didn’t get too wonky!
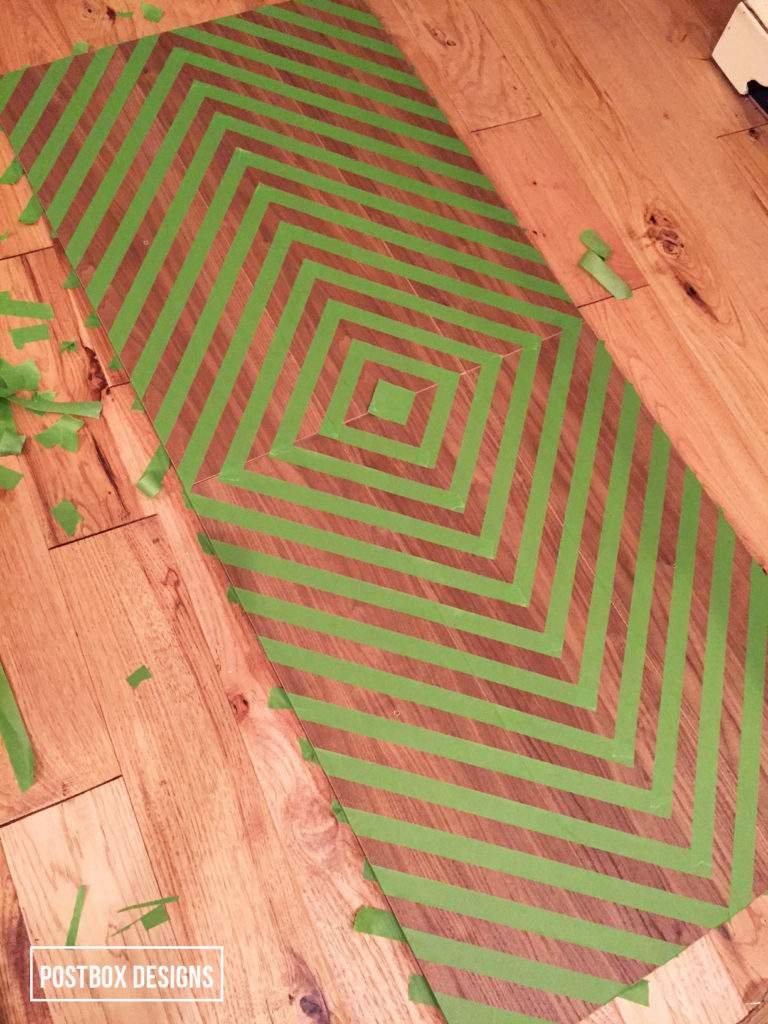
STEP 3: To start the design, I created the center “diamond” out of painters tape and secured it to the middle of the dresser. As you go, be sure to firmly press down on all sides of the tape.
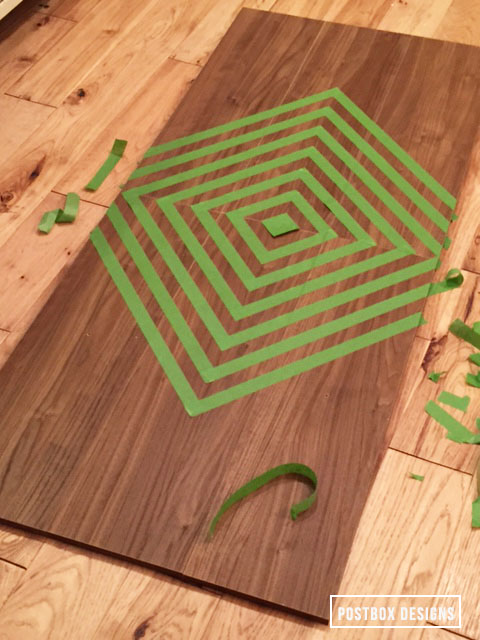
STEP 4: Start your pattern from the center and work your way out. To make it easy I created my stripes the same width as my painter’s tape. My tape was just under an inch wide. I will be honest…I’m more of an “eyeball it and go” type of girl! So I just approximated the width in between the stripes as I laid them out. But if you are more of a perfectionist (you know who you are!), you can use a tape measure and measure out the width of each stripe.
Everywhere that I added the painter’s tape, these stripes would end up being the wood color. Every stripe in between that was left open, I will paint over, creating the white stripes.
STEP 5: Keep working your way out in the diamond pattern. I used the vertical gap between the two columns of drawers as my visual, making sure the top and bottom of each diamond aligned.
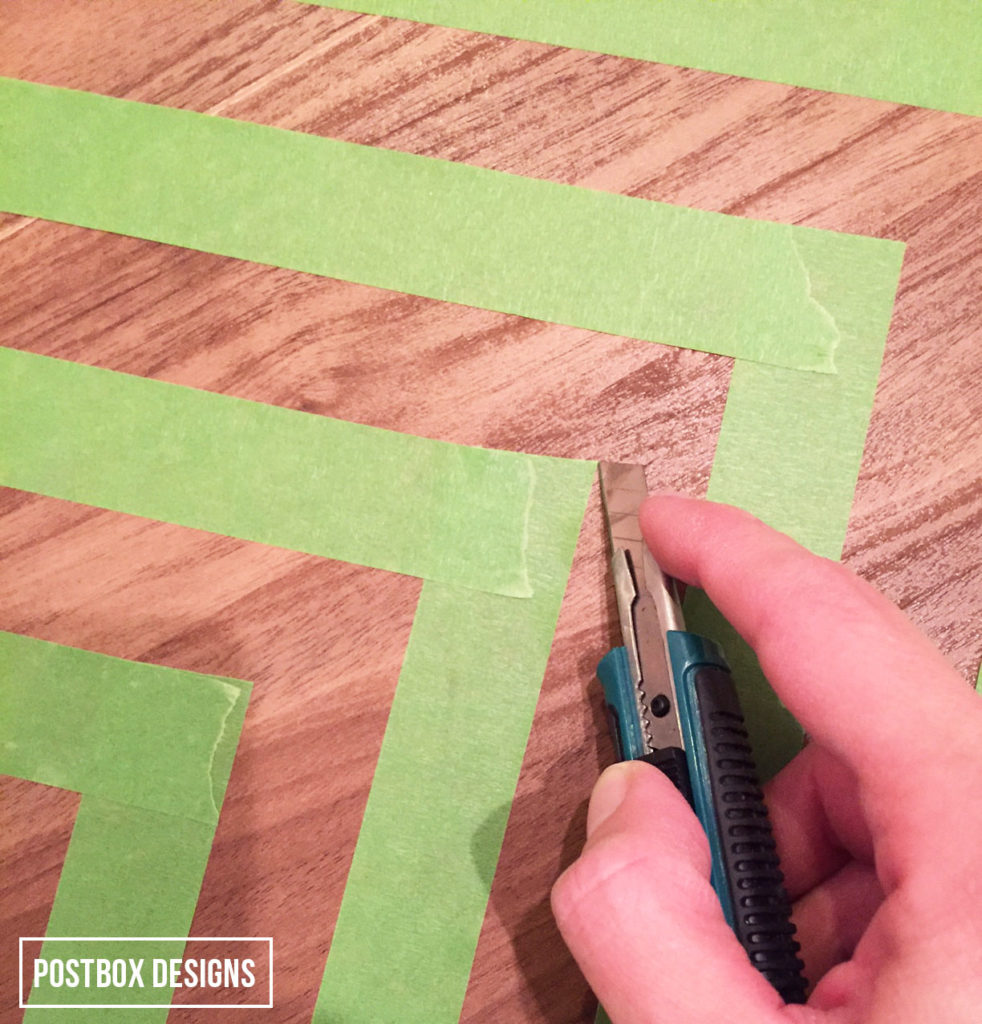
STEP 6: Trim the ends. As you continue to lay out your tape in the diamond pattern, use a small Exacto knife to carefully (so as not to scratch the wood) cut out where the tape overlays so you have nice clean corners.
Land of Nod-inspired Dresser Knock-Off Makeover
JUST A REMINDER: I’ll be 100% clear…I AM NO PERFECTIONIST! So I just went with the flow of it and eyeballed it a lot of the time. If you are a perfectionist, it might take you a bit longer than me, but painters tape is very forgiving. Just peel off and start over. Every now and then take a step back and glance the whole thing. When you are close up with a dizzying pattern like this, sometimes you get lost in the detail of it. Step back to make sure it is all lining up in the “big picture” view.
Here are my six dresser drawers fully taped out. As you can see, the tape is holding all six drawers together, treating it like one giant work of art, not six individual ones. I would recommend NOT trying to move it once you start taping!
Land of Nod-inspired Dresser Knock-Off Makeover
STEP 7: Go over all of your tape with a credit card to full press down all of the edges. If you have gaps, the paint could bleed under the tape.
STEP 8: For the paint, I used a white interior latex paint that I had leftover from a project. You don’t need much paint at all. If you are buying new, you can probably get away with purchasing a sample sized pot of paint. I used a small craft brush and painted over all of the exposed wood. It is better to do a couple of light layers instead of doing one thick layer.
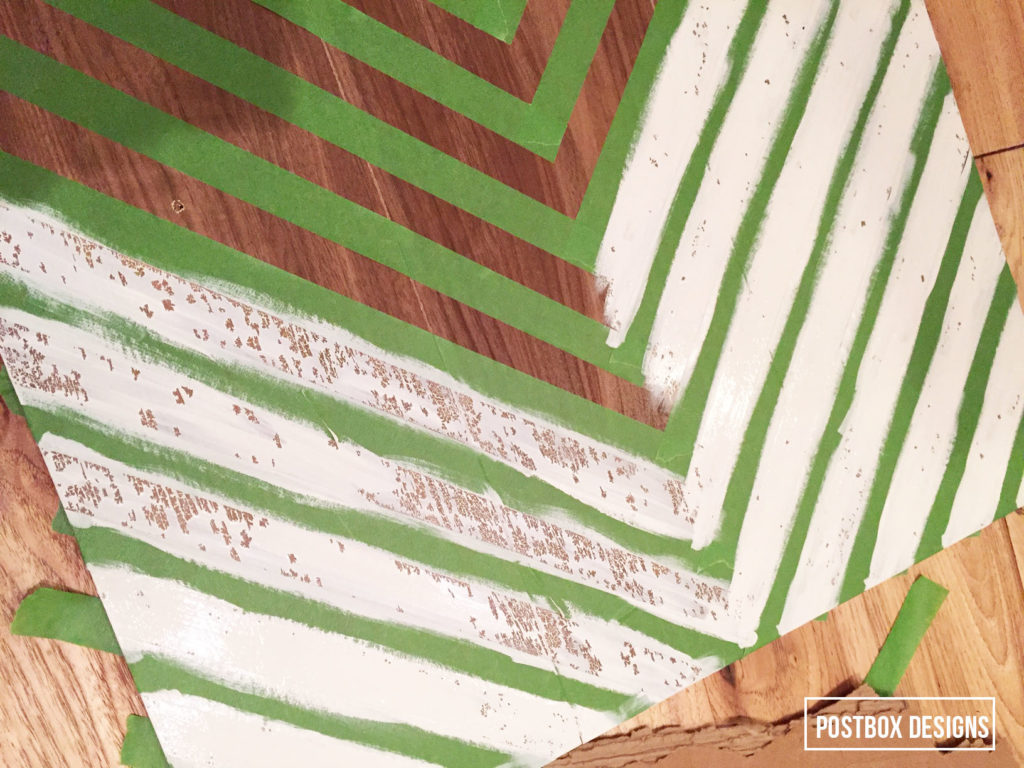
Now, I’ll share my “oopsie” moment with y’all. The Target dresser that I selected ended up not being real wood, but a melamine wood grain. Due to this, the paint actually didn’t go on smoothly at all! Instead the paint beaded up. Oops. So-if you are choosing your own piece, obviously a REAL wood piece will work much better and the paint will go on much more smoothly. But I wanted to make lemonade out of lemons so I slightly changed my plan. Sometimes you just have to go with the flow! So instead I went for a more rustic, distressed look. Hang with me and I’ll show you.
Here you can see how the paint is beading up. On the left is showing one coat of paint, on the right is showing what it looks after two coats of paint:
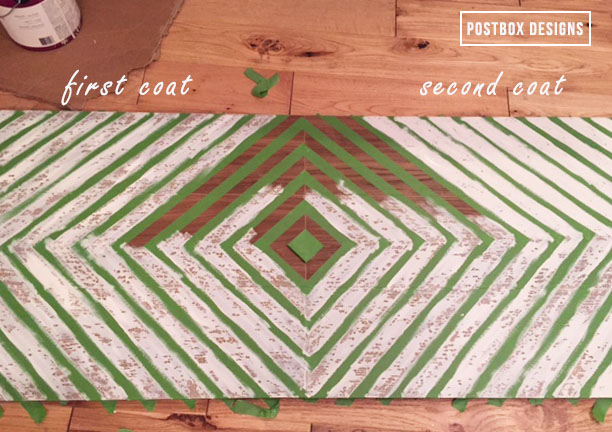
STEP #9: After the first layer dried, I painted on a second coat. At this point (because of my melamine surface), the white paint coat wasn’t perfect as you can see in the photo. So instead of trying to go for perfect white stripes, I decided to embrace the rustic, “distressed” look 🙂 And here is my beautiful diamond shape pattern! On this photo, it shows what the dresser looks like after both one and two coats of paint:
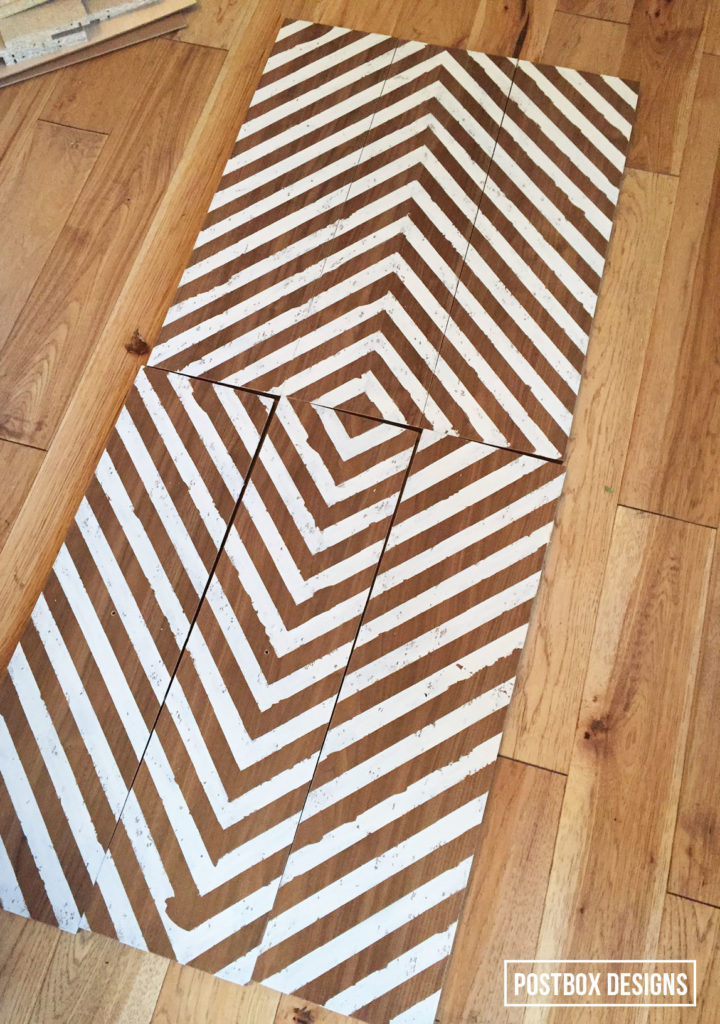
STEP #10: After the paint is fully dried, it is time to peel off the painter’s tape…slowly!
Land of Nod-inspired Dresser Knock-Off Makeover
At this point, if you are painting a real wood piece, you are done! But because of my shiny surface, my paint needed an extra layer of protection (the paint can be scratched off). I used a 3″ paintbrush and added two coats of clear polyureathane sealer. I let each coat dry in between. I used the “gloss” version so it has a slight sheen to it. But you could also purchase the “matte” version if you didn’t want a shiny finish.
STEP #11: I put together the rest of the dresser (with help from the hubby!) and installed my gold hardware. This is the hardware that came with my dresser (which is a pretty great match to the Land of Nod version), but feel free to change it out with whatever suits your style. Here it is completed:

Land of Nod-inspired Dresser Knock-Off Makeover
I love the size of this dresser because it can be used for SO many things. I’m using it here as a bar, but it would work as a media cabinet, a buffet, an office credenza, or use as an actual dresser!

I turned this into a bar as I’m hosting a couple of parties this season, but when I’m done, I’m going to use it as a media cabinet under our wall mounted TV. All of the drawers are perfect for storing components or DVDs.

Land of Nod-inspired Dresser Knock-Off Makeover
For the winter season I stocked it with some bar supplies, and this tray is full of old bourbon and whisky bottles with a bit of holly (plucked from my backyard!) for a free decoration! The coasters are cut down from a tree from my childhood home. And the Roman Numeral print I made for under $20 using an engineering print and an Ikea frame-the numerals are the year we bought are home in.

Land of Nod-inspired Dresser Knock-Off Makeover
The whole process took about six hours (not including assembling the dresser) and cost me $288. That is a price I can live with…and have money leftover for some really cute throw pillows for this room!
Land of Nod-inspired Dresser Knock-Off Makeover
If you want to see more of my projects and get oodles of free design tips we can hang out on Facebook or Pinterest. Or my fav (where I share sneak peeks into my own home!) over on Instagram. If you want to find out more about my E-Design services, drop me a line at [email protected] and I would love to chat with ya!
Cheers,
Kristin
Wow Kristin!! What a beautiful transformation!!
Kristin has a wonderful business, Winter Warm Room, where she does custom interior design work and sends it straight to you. Be sure to check it out!

And Kristin has a beautiful blog with all kinds of design inspiration, tips and projects. Here are a couple of my favorites:

Have a Beautiful Day!
xoxo


Thanks so much for sharing my tutorial Jen! Now I’m going to scour the rest of your site with all of this eye candy! 🙂