

I am sure you have all seen the Ali Edward’s Awesome Butterfly Art.
Genius, pure genius.

I had one of those nights the other night where all I did was dream about projects.
Craaaazy!
And when I woke up I wanted to make a project similar to this but with a Halloween theme.
So I headed off to Michael’s to see what kind of frames I could find.
And it was my lucky day — all of their frames were on sale!
I wanted to make this project for as little money as possible.
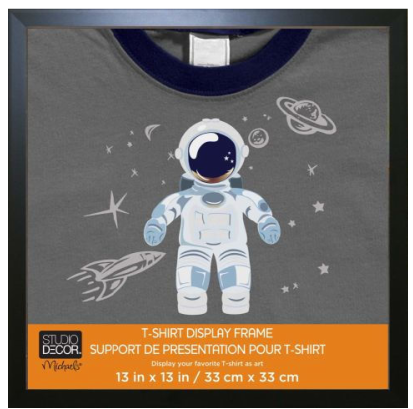
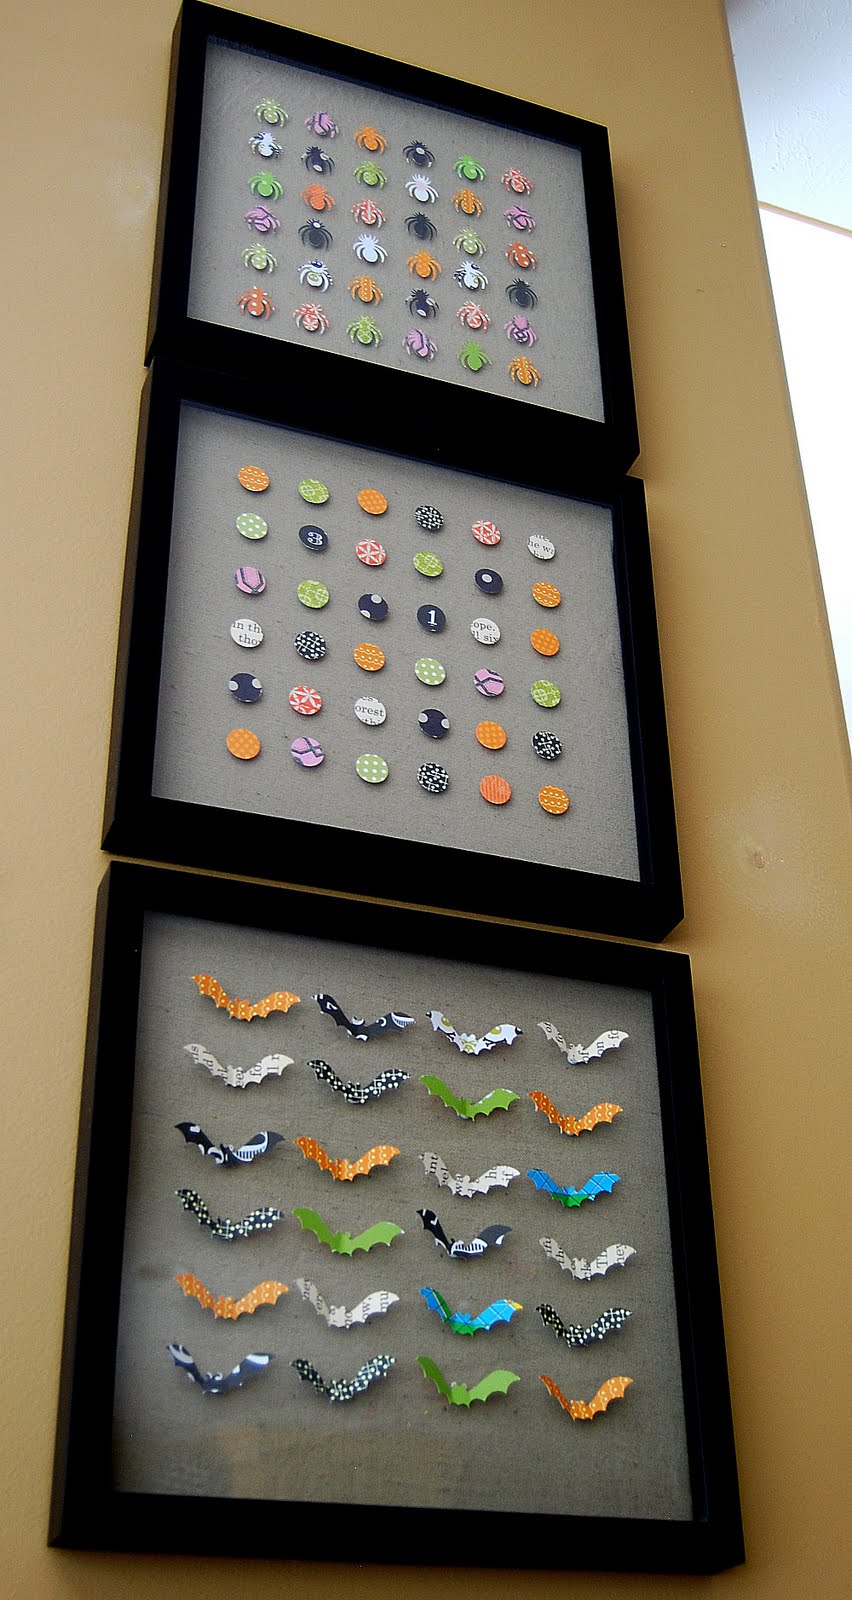
I spied these t-shirt frames for $3.99 — I grabbed three.
I loved that they were deep for 3-D art.
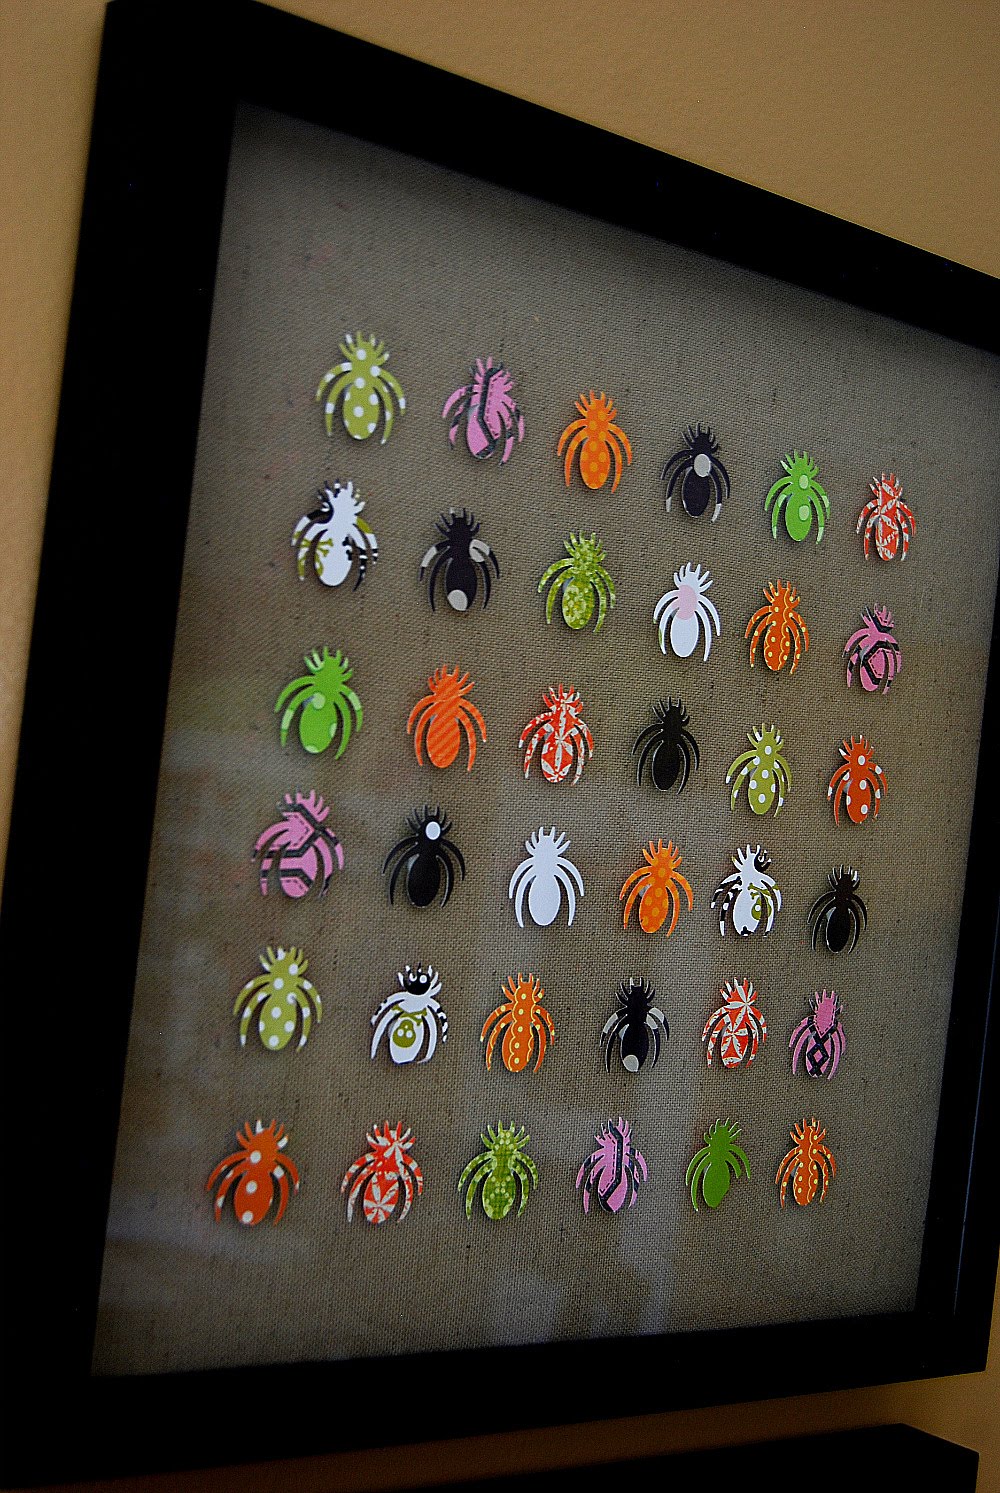
I also grabbed this fun Martha Stewart Spider Punch:
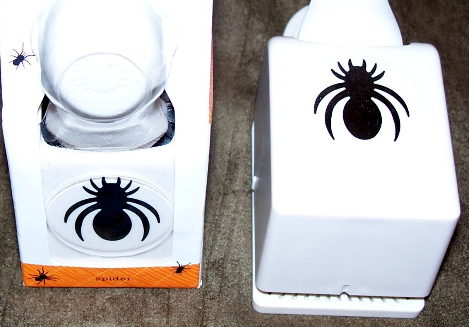
It was on sale too – I was on a roll! I already had paper — so I headed home to start working.

I decided that I want to use the frames over in case I want to make some different versions of the specimen art — maybe Christmas or a version that I can keep out all year. So I decided to make some removeable frames that I can take out and replace with different ones. I cut some thin plywood from my garage into 12 inch x 12 inch squares.I covered them with fabric from an old bedskirt that I have in my fabric pile. I wrapped it around the frame and secured it using my trusty Gorilla Glue Tape. This stuff is great for securing fabric.

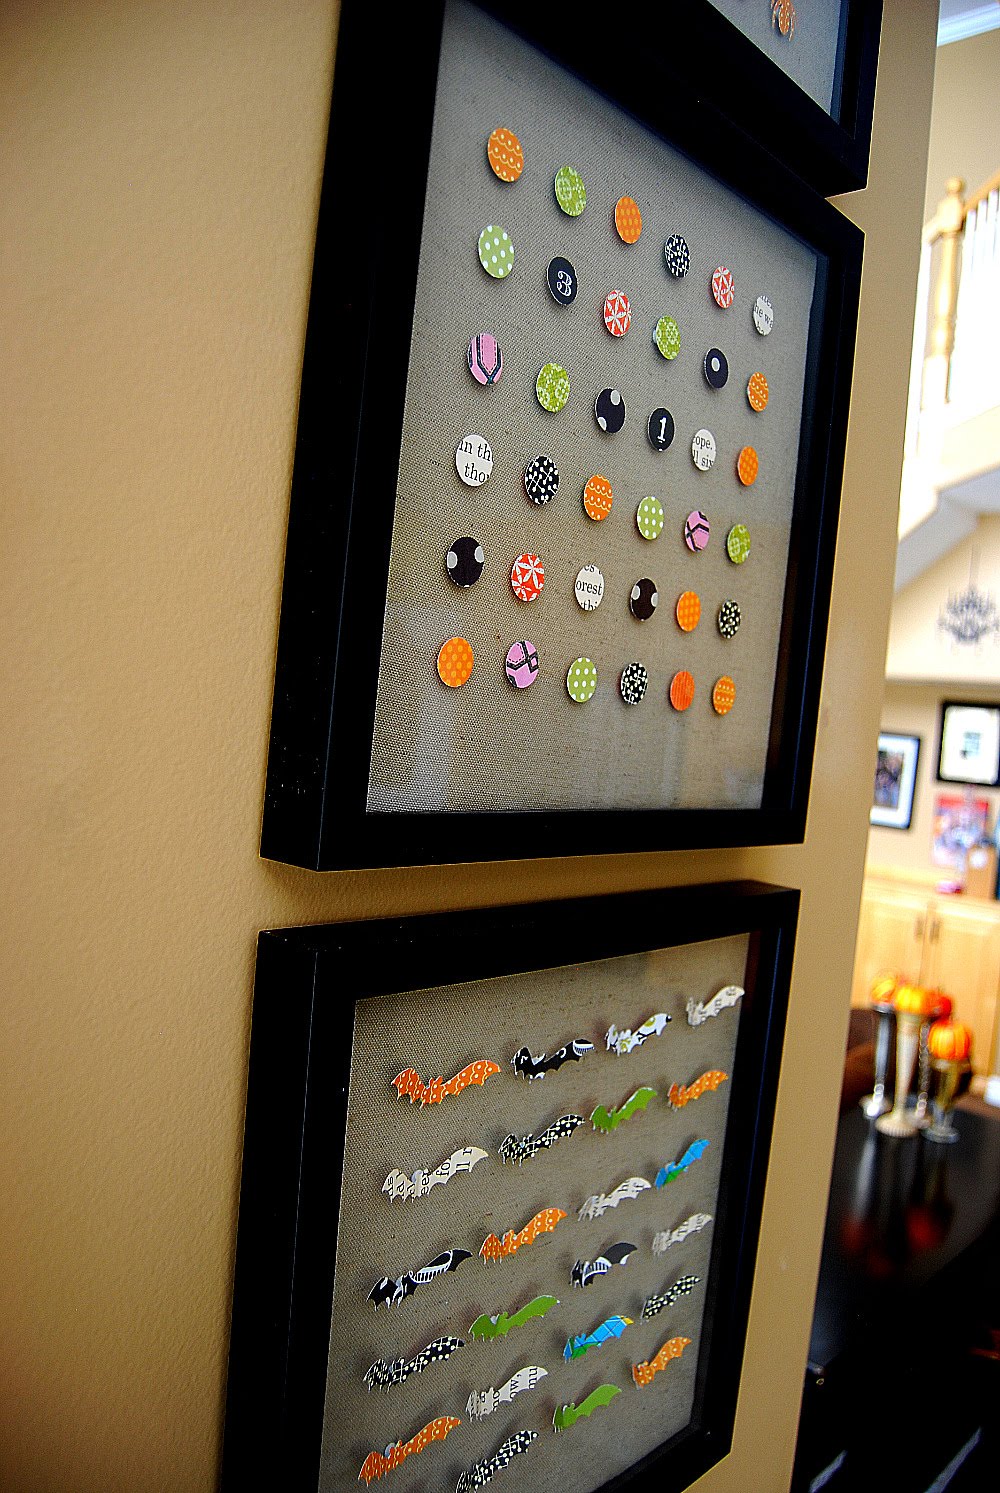
Once I had those done, I punched out my spiders. I used 6 different papers in Halloween colors.
I bought 3 frames because I think everything looks best in groups of three – don’t you??
So I needed to come up with two other types of “specimens”.
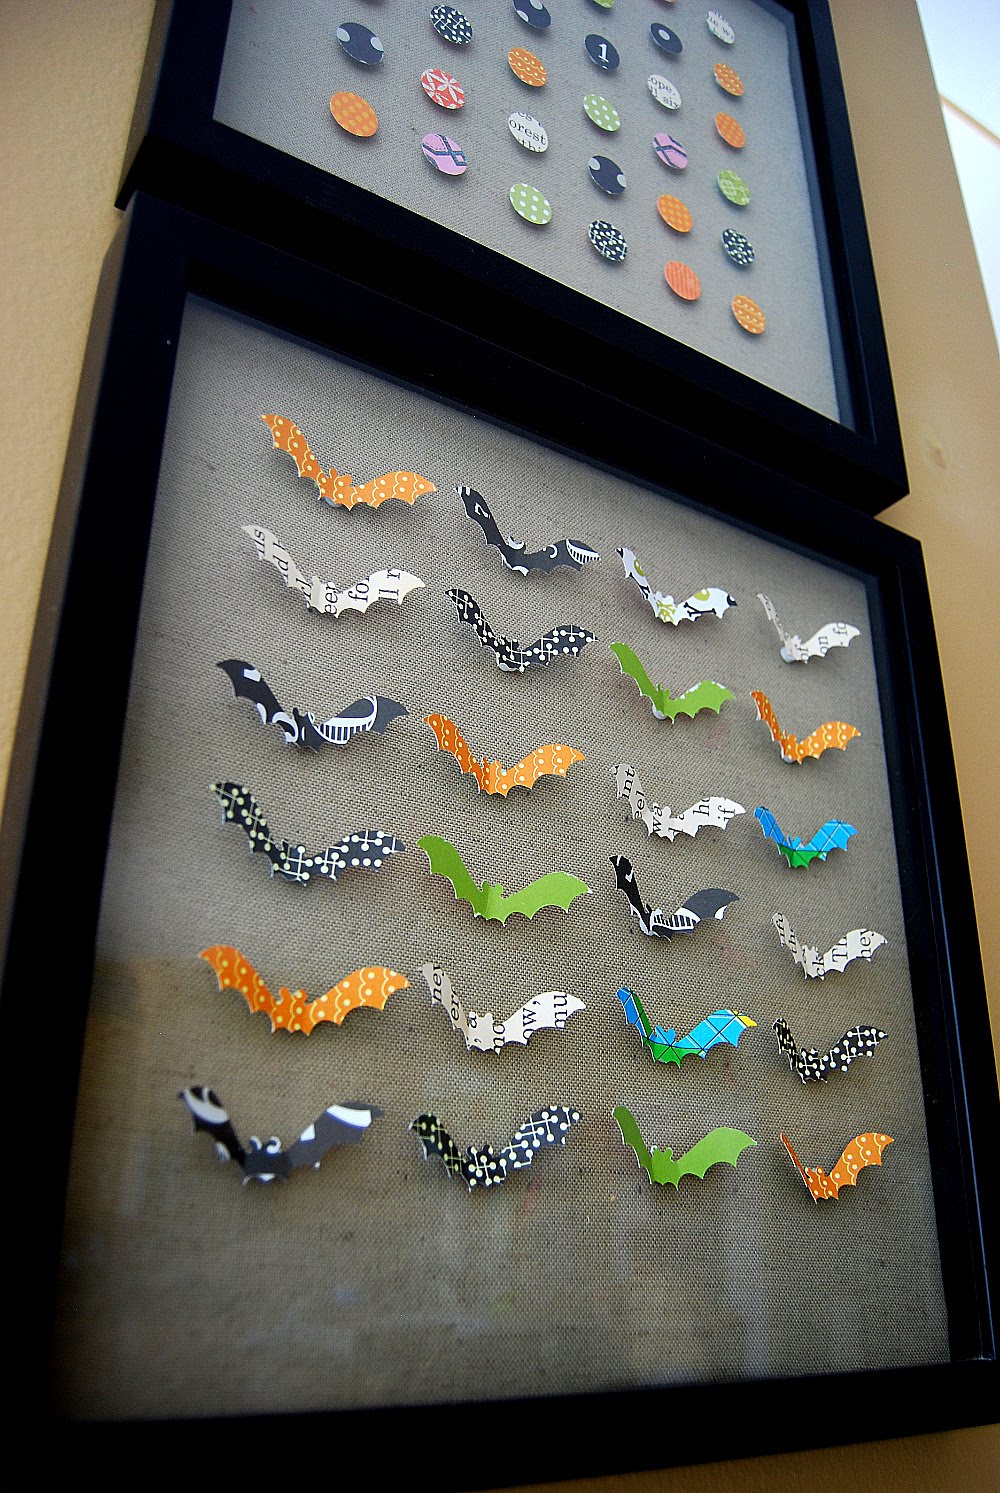
I knew I wanted to use a bat shape.
That was what brought me to this project — the way the bat mimics the butterfly in the original idea.
There is a really cute bat punch that Martha Stewart makes — it looks like this:

But since I was being cheap, and since I have a really cool Silhouette machine, I decided to try to use my Silhouette to make the bats. I found out something really nifty about the Silhouette! You can take any image online that you like and transfer it to the Silhouette and then the Silhouette software will copy the outline of that image — and… You don’t have to pay anything to do that.
It’s free!!!!
Cool! So I did that and cut the bats out using my Silhouette.

Then for the third shape, I used a small circle punch using the Halloween papers.

Once I had my “specimens” cut out, I made a grid on my computer. Since it was on my computer I could only make a 8.5 by 8.5 grid that was square. Of course, I could have printed off 2 copies and taped them together, but I thought a smaller grid inside the frames with blank space on the sides would be cool.
So – here is the printable square 8.5 x 8.5 Grid, and here is the printable 8.5 x 11 Grid that you can copy off twice and then paste together if you have a larger board.

I printed the grid off and then poked a pen through the center of each of the x’s. Then I centered the paper in the middle of my square fabric back and poked my pencil through each hole, marking where the specimen went.

Once those were marked, I stacked TWO dimensional adhesive circles together and placed them on each of the pencil marks.

Then I put the “specimen” on top of each of the dimensional stickers.
Now the grid will work if you have something that’s square. Each grid on my printable is 1.5 inches across. My bats were longer so I had to space them out 3 inches across by 1.5 inches in height. It took a little arranging.
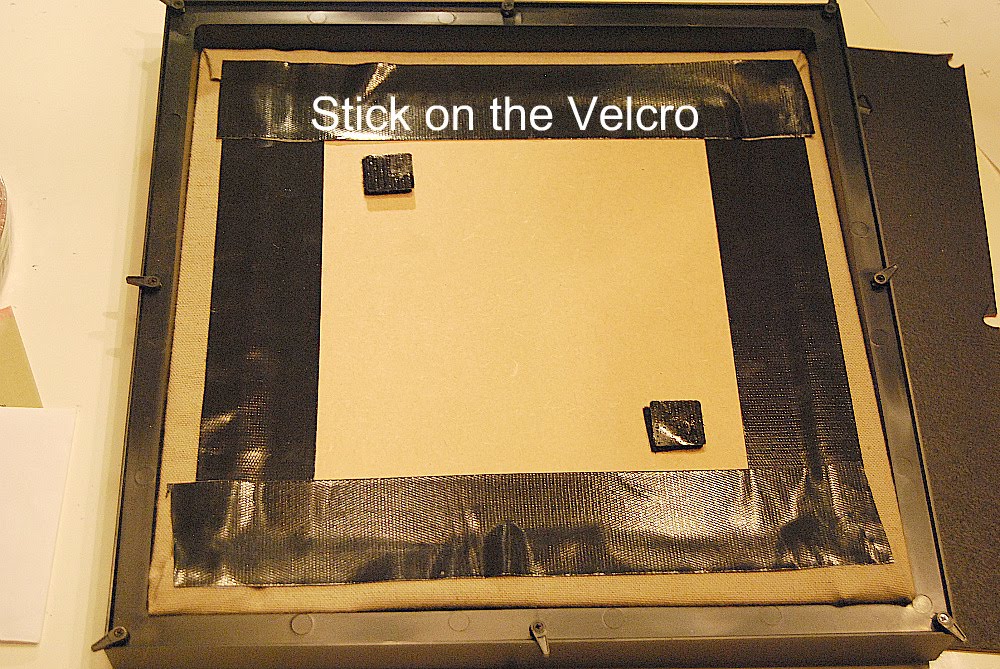

Now, I attached the specimen board to the back of the frame. I used sticky Velcro squares. I put two squares on the back of each of the frames. Then put the back of the Velcro on top of the front so the sticky side of the Velcro was sticking up. Then I put the back of the frame on top and turned it upside down so the plywood would connect with the back of the frame. I had to do it this way so I could get the center of the plywood centered in the middle. Then I took the back off and pressed down on the Velcro with my hands to be sure it was on tightly.
This way I can remove the plywood inserts and make new ones in the future.
Now it was time to hang the “specimen” art!
My favorite part!!!
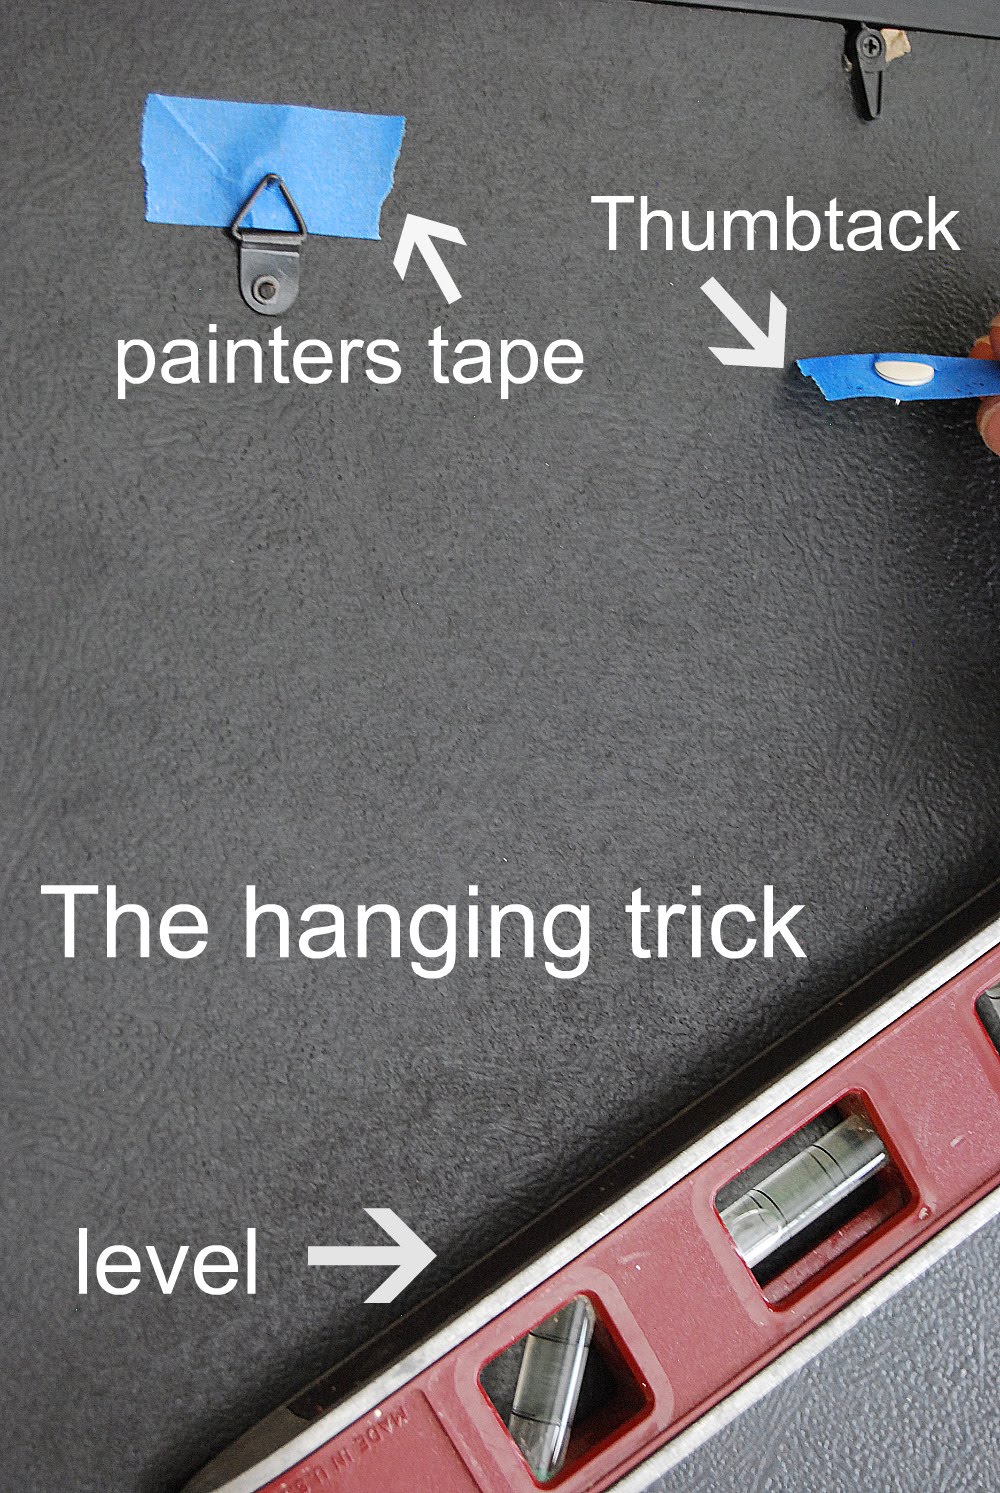
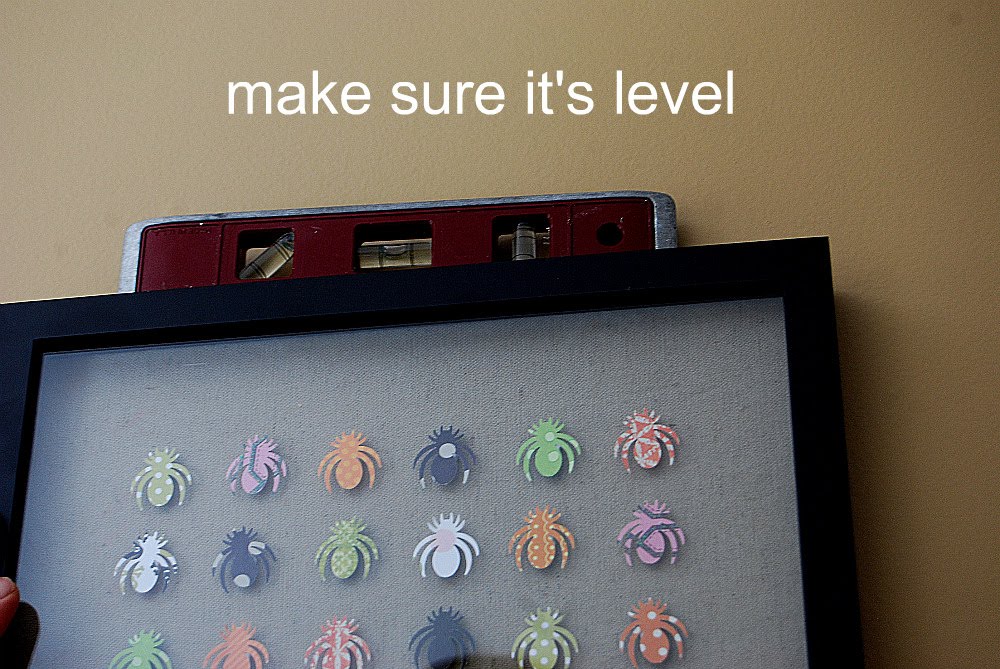
Here’s a tip for hanging things the easy way! Take a piece of Painter tape, put a thumbtack through the center, then put it underneath the hanger part of the frame. Stand where you want the frame to go on the wall. Put your level on top and make sure it is where you want it to be in the wall.
The thumbtacks should be pointing toward the wall.
Press against the frame and the pointy part of the thumbtacks will make holes in the wall where you can hang your nails. It works so great!!!!
The end 🙂
Have a {Creepy} Day!
XOXO


Thanks for the great idea! I made a few myself! It was such a fun project, I think I'll do again for other holidays. You can find it in this post on my blog: http://kendallandkeith.blogspot.com/2010/10/halloween-party-decor.html
Thanks again!
Oh I love the bats! I had the pumpkin stamp, so tried one of my own! Thanks for the inspiration! 🙂
http://inspiredbyonline.blogspot.com/2010/10/slight-detour.html
Thanks for sharing such a great idea. I'm posting my (near exact) replica of what you did on my blog (http://ohthehubanity.blogspot.com) tomorrow. Thanks again!
simply spooky chic
I love it!
This is so neat, Jen! I'm having a Halloween linky party and would love it if you stopped by!
New to your blog-found you from The Sky is Pink. I had to bookmark your blog and will be headed to Michael's in the very near future!
That is wonderful! I hope you do end up making a Christmas one too. I would love to see it! Thanks for sharing :3
I love this project and had to make these too. I absolutely LOVE your blog and am in awe of your creativity. I totally scraplifted this, but gave you full credit for the inspiration and linked back to you. You can see my post here –
http://cherylswindow.blogspot.com/2010/10/halloween-wall-decor.html
Thank you for sharing.
My favorite is the bat! I have a bat punch somewhere. It's a cheapy, tho, but it will do.
And thank you, thank you for showing that hanging trick! When I first saw it I was like, those tacks won't hold that! LOL (Duh!) I'm such a ditz! LOL
I'm gonna do one of these! Hmmm…Now where did I put that punch?…..
This is sooooo cute!! Thanks so much for sharing this tutorial :).
I saw this and knew instantly I needed to make one. Thanks for the wonderful idea!! Quick question, do you have a certain program to do the grid on your computer? My cutouts are quite a bit larger and I couldn't figure it out. Seriously, thanks so much again!!
PS LOVE the interchangeable idea for holidays/seasons. Genius!!
oh my gosh, that's fantastic! i LOVE love love those bats!
I love Ali's butterfly art, but this is SUPER CUTE! I want to do one for every holiday! 🙂
Corinna
So cute – they have those frames on sale at Michaels this week – not quite the deal you got, but close @ 40% off.
Thankfully I'd seen your tutorial first, so I knew exactly what to do with them!
Creepy and so cool! Super-chic Halloween decor!
Jen, that is SO cool!!! 🙂 I think the bats are my favorite. How cool that you've figured out some Silhouette tricks too. Thank you SO much for linking up with me. 🙂
Hi Jen, I love this display of creepy specimens. I featured it on my blog with the link back to TTJ. Thanks for your great creations. You inspire so many, including me. Karie @
http://karieschiccreations.blogspot.com/
I have been in love with Ali's butterflies for some time and this is such a fun take on them. I am adding this to my list of crafts for when I get a Silhouette of my own. Thanks for sharing the tutorial.
LOVE this … you are just too talented! I would fail miserably at this ambitious project. LOL Thanks for sharing your creativity! Becca
Such a cute idea. It can be applied to so many holidays too!
Oh I must try this idea. Thanks for the great tutorial !
OH MY GOODNESS…. THIS IS SO FLIPPEN CUTE! in love in love in love! Hugs, Jen
I absolutely adore this idea! I'm going to try to do it with my boys this weekend. I hope you don't mind me sharing this idea on my blog – linking to you, of course!
I am not going to lie…I think this may be my favorite Halloween craft this year!!!
I have one of the butterfly posts up in my bathroom and I am totally thinking I need to make this now too!
LOVE it!
That is seriously adorable! I love the circle one the most…so simple and cute!
This is seriously cute! What a great idea.
Taylor
SPOOKY. love it.
I was so excited to make one for myself with the bats that I skipped tonight's workout and instead worked on this. Thanks for the handy tips! You can see mine here:
http://sourkrautkrafts.blogspot.com/2010/09/bat-shadowbow-collage.html
The pictures are nowhere near as good as yours because my house is shrouded in perpetual darkness. And it was nighttime by the time I finished. But you'll get the idea.
How cool Jen! I love it and I have a big bat punch I got last year so I could even do this myself! I really appreciate the tip for how to get the lined up so nicely. I've seen that Ali Edwards project and always wondered that!
It looks great! I love the idea of specimen decor for Halloween or any time really. Have you seen the butterfly specimen decor on Martha Stewart?
jen… i absolutely LOVE this project!!! so fun! i have to have atleast the one with the bats!! i love when i see new ideas i love!!! makes me so excited to try them!!!
jen@eighteen25
I think I might just love the tip for hanging the art as much, if not more than the art itself.
(And I lo9ve that a lot….)
Jen, what a GREAT project!!! These are so fun, perfect for Halloween.
I tend to literally dream up projects too. I think it happens more in the "between sleep and awake" period as opposed to during the dream, but still!
These are high on the list of cutest projects ever! I love these…so clever.
love you love this project. You mind sending me the bat file? I would love to do this!
Oh.My.Gosh. I love these. Seriously. I love them! Question for you, is this space now dedicated for these frames that you'll change out seasonally? I always try to use existing nails, but that doesn't always work out all that great 🙂
p.s. So sorry about my creepy typing skills!
Ummmm………I so adore this! What a fab idea! I was thinking of doing one like that with pumpkins, but I love the bug one because my own brother is an entomologist and has grossed me out his whole life with his bugs. I'm thinking I should do something like this for his wife, it might be a way for her to accept his bugginess 😉 anf for me of course!!
I hope you don't mind if I link to you on a fuuture blog post. Your tutorial really is fab!
Thanks so much! I love ewverything about your blog!
Em @
athriftyfind.blogspot.com
I think this is sooooo cute!!! love it
Jaw dropping awesome Halloween decor! I'm so in love with those bats!
These are gorgeous–umm…spooky–umm…GENIUS! LOVE it!
So cute! I sooooooo want all of the Martha Stewart punches. They are so pricey though, ouch!
I love your glittered pumpkins on the mantle from the candy corn garland post, precious!
Great job on the specimens.
Holy cute project Batman! lol
How beautiful and thank you for the grid. My bats would be flying all over the place!
These look absolutely fabulous! What a great idea!
awesome grouping! i did something similar by stamping pumpkins and cutting them out. i just posted on my blog today!
http://creativecents.blogspot.com/2010/09/pumpkin-art.html
I adore this idea! It'd be so easy to make a set for every season and reuse the same frames. 🙂
That's almost exactly what I had in mind when I first saw the butterfly one! Our house is decorated for Halloween year-round so this will be perfect! Only problem is you've made me jealous with your Michael's prices since that exact same frame is $1 more at mine. I guess I get to pay extra for the privilege of living and shopping in wonderful New Jersey. Yuck!
Looks really cute!
I love the bats – that is such a cool project. I would consider leaving that up even after halloween (not much of a halloween fan, myself). Such a funny take on the otherwise already rather ubiquitous butterfly pics!
Martha, Ali, & Jen = some of my favorite inspirational peeps!
i adore those bats. only YOU would make them so colorful. what a great tack tip too.
thanks once again for linking up to the FALL FESTIVAL. i am thrilled to have YOU & your spooktacular creations.
kellie
This is amazing. Like totally awesome. (how 80's did that sound?) I am going to have to try this.
Thanks for the idea. And the thumb tack idea- holy cow, my husband and my walls will thank you for that little gem!
ameroonie designs
Jen, this is such a great idea! You are THE craft lady, for sure! 🙂 Thank you for sharing this! That is also such a cute little "bat" punch out! I am going to Michaels this week, and now you have me thinking… 🙂
Also, I am having another giveaway at Beautiful Nest and Nest to Keep, if you'd like to check them out!
I hope you are doing well, and having a fun week! 🙂
Blessings,
Jenni
You are unbelievable! This is so awesome that I'm going to have to copy cat you again. Darn you for having the most amazing ideas ever!
Hi Jen! Sorry I haven't been by in a while- I just announced why on my blog… Love this project! So spooky-cute!
Are you freakin' kidding me, woman? I am dying over these. I love the 3 idea. You're right…3 is better. The paper choices are perfect. The bats are divine. The spiders turned out amazing too…..and YOU KNOW I love the dots. (Circles and I, we understand each other.) I am still constantly amazed by you….WAY TO GO!
I love this idea! I have to say I am really enjoying your blog, however, I find it a little difficult to read with this background 🙂
My favorite Halloween project so far!
So adorable and I'm loving the thumbtack tip! Thanks for sharing that!
I love this! I think I just might make some! Thanks Jen!
Super cute!
That is so cute! I love the way it came out, and that it was made with punches is fantastic!
Love Love Love this!!! Thanks for the tip about hanging too 🙂
Love it!!!!
And I am sooooo going to use your thumbtack trick!
How creative! I'm going to save this post. You can bet I'll be adapting it somehow! Thanks for the inspiration!
I LOVE dreaming about projects!!! So cute!
Cute idea! Love the bats.
Would love to see a photo of the tape/tack setup for the hanging tip. I'm having a hard time picturing it but it sounds like a great idea!
Oh geez thank you so much for the hanging trick, gonna try that one for sure! Love the art work, especially the bats. Super cool. Thank you so much Jen for featuring my pantry on weekend wrap up. I get so many sweet visitors I just love it, makes my day. I am trying tweeting..thought I would get with times, so I am following you now via twitter. We will see how that goes! Don't know a thing about using it.
I love everything about this post! I will be making those and using that great idea to get the nail were it should be when hanging things!
Thanks!
Super duper darling! I love that you dream of projects 🙂
That is such a great hanging idea! I love it! I will DEFINITELY use that tip in the future to avoid all those unnecessary holes in my walls.
I made a similar butterfly art piece a few years ago:
http://ourhumbleabowed.wordpress.com/our-etsy-shop/
I made a similar butterfly art piece a few years ago:
http://ourhumbleabowed.wordpress.com/our-etsy-shop/
Oh I love this! Like really LOVE this! I think I will copy you – because it's just so darn fun…..
In a word, adorable! I love that it is interchangeable, too!
That is so awesome! I love the stuff you think of!
I love this idea! And the hanging tip? I now know how I'm going to be hanging things LOL
I love your blog. It's so much fun and gets my crafting juices flowing! I need more space and money!
I'm going to enlist the help of my boyfriend this weekend and make the Halloween subway art! Yay!
So cute! I love the bats, they are adorable!
I LOVE this project! those spiders are fabulous!
Jen, you are a GENIUS!!!! This is so awesome I can't even believe it! Definitely HAVE to make one! Thanks for sharing! You're awesome!
What a genius idea about the tack and painters tape!
This is such a cute idea!!! Love it.
Brillant!! I love it! I'm going to feature this on my blog later in the week if you want to look for it. (Probably not till this weekend)
sassysanctuary.blogspot.com
P.S. I totally dream about projects too! haha
Very scary chic, luv it =)
What a creative and fantastic idea! The possibilities are endless!
What a creative and fantastic idea! The possibilities are endless!
oh.my.goodness. That is just the smartest thing! You are right, the possibilities are endless! Thanks so much for sharing! Jules
what a super neat idea! i would love to do this for ALL seasons and ALL holidays! i'm going to have to get some materials on my next trip to hobby lobby or "hob lob" as i call it.
What a fantastic idea! Love it.