

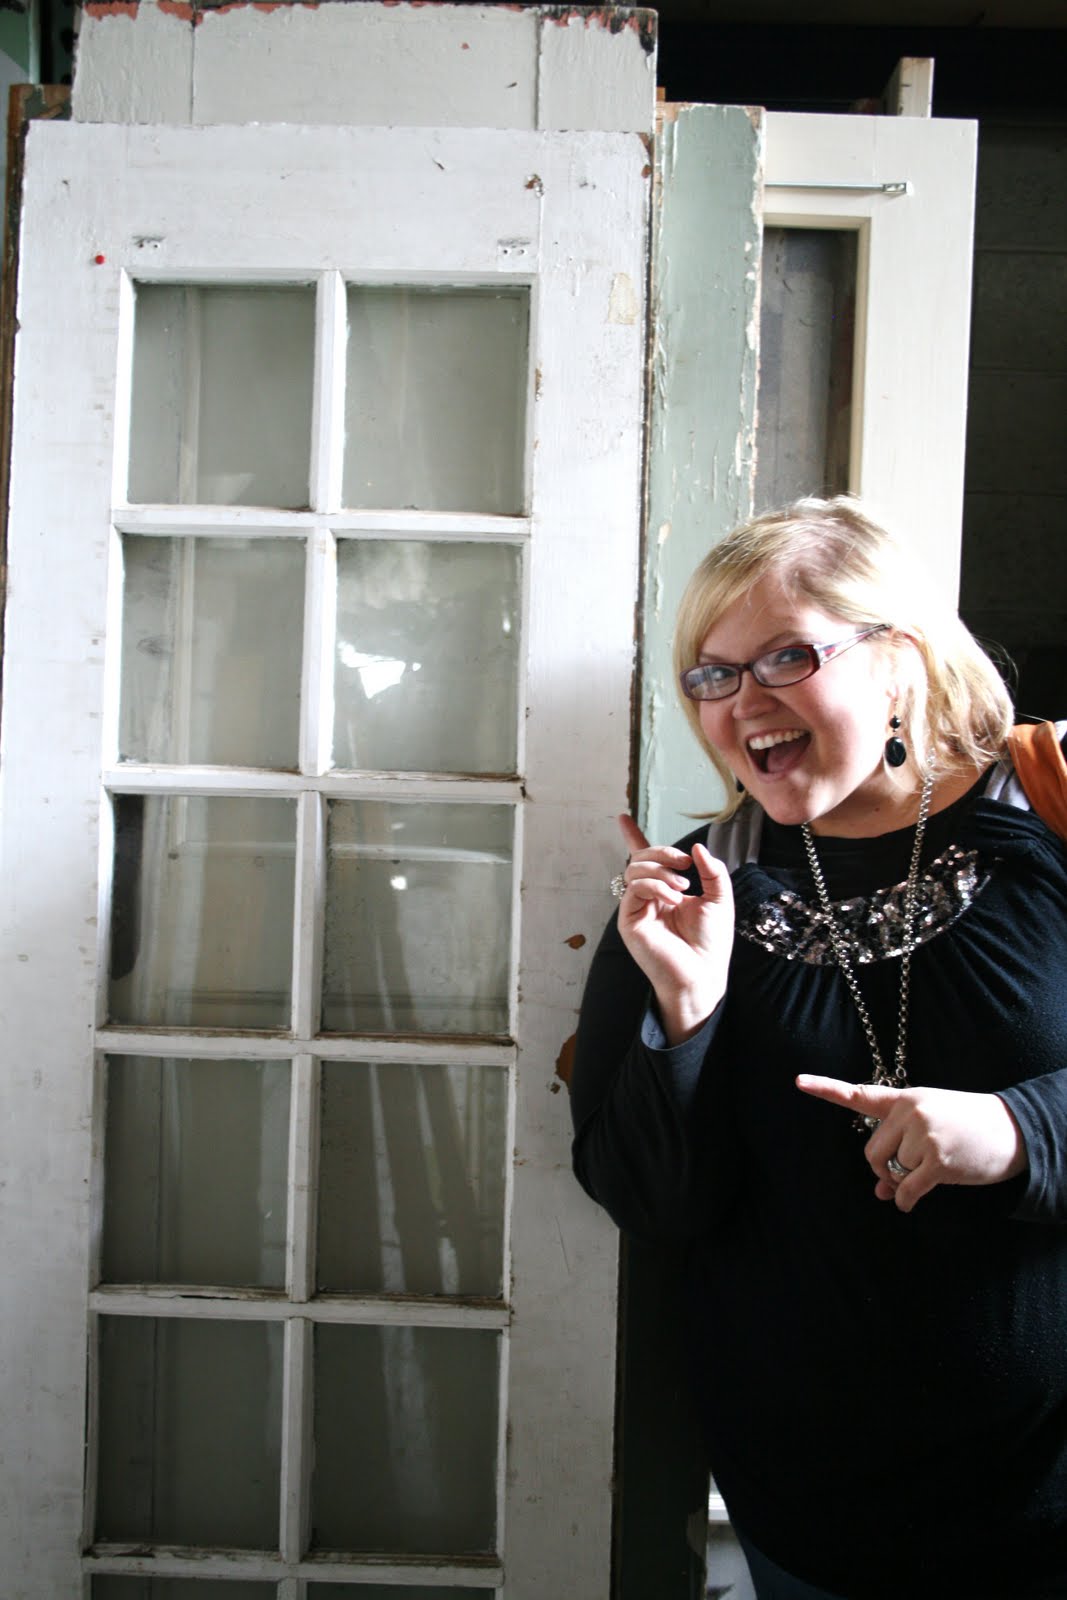
Have you seen those cute headboard benches? I have been wanting to make one for awhile now. The other day I went to lunch with a couple blogging friends — Tausha from Sassy Style and Shelley from House of Smiths.

{I stole this off of Shelley’s blog }
So much fun! Afterward we hit a cute thrift store and then the salvage yard!

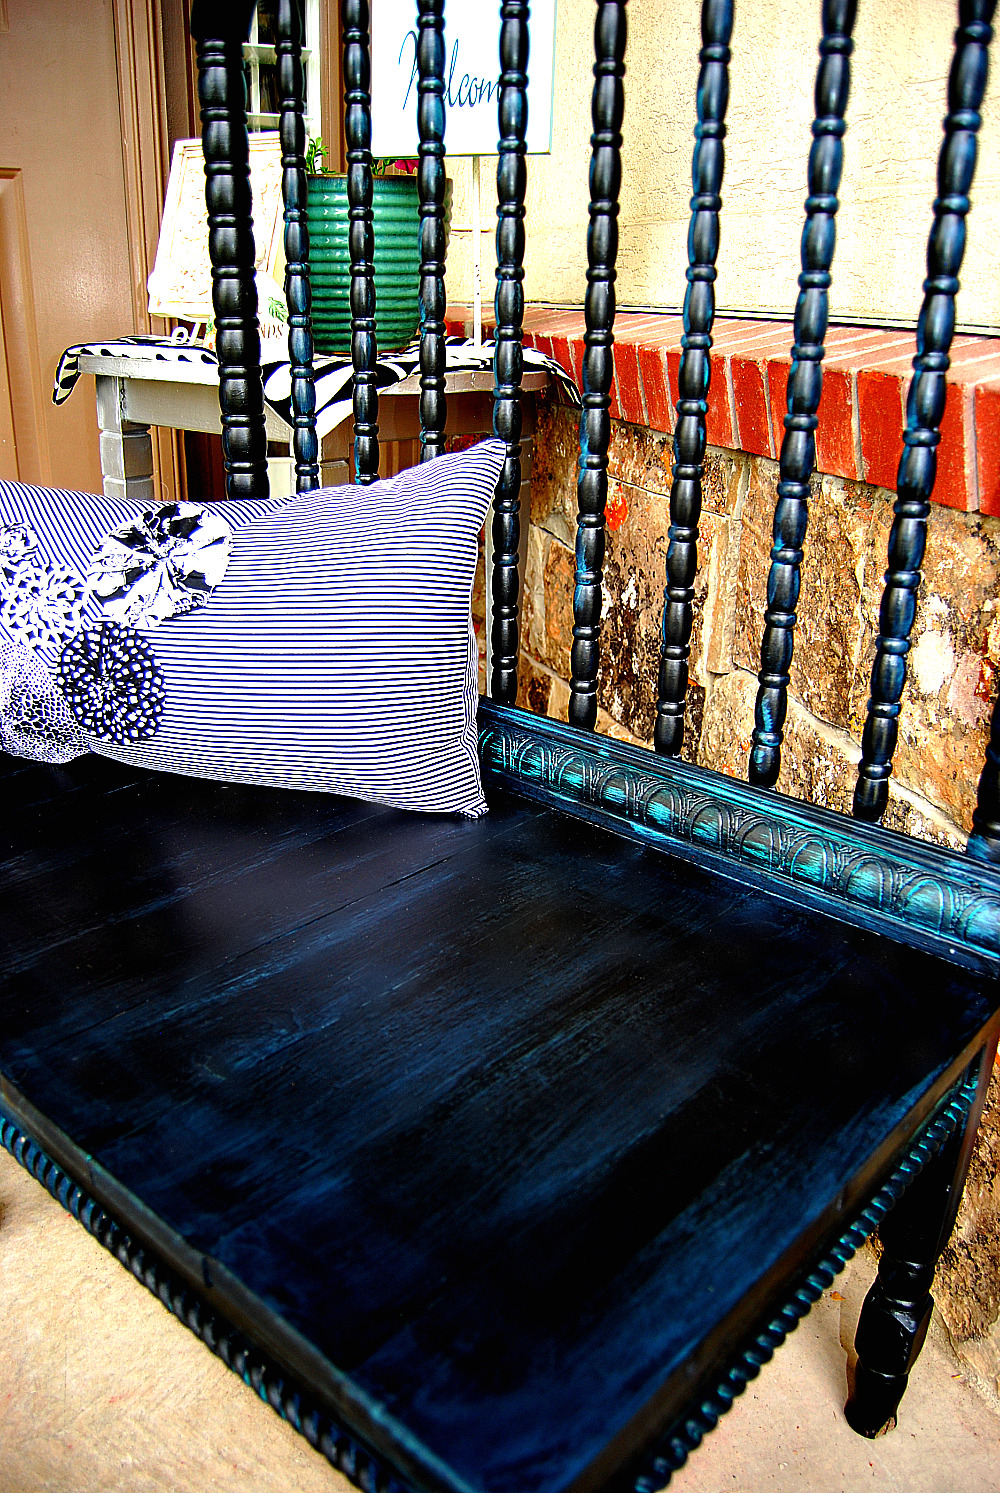
Sitting right in front was this antique crib front. I thought it would make a great oversized chair to go on my porch!
This is what I did to make my new oversized chair/bench:

1. I started off with my peeling, dirty old crib front. I washed it down and sanded the whole thing.
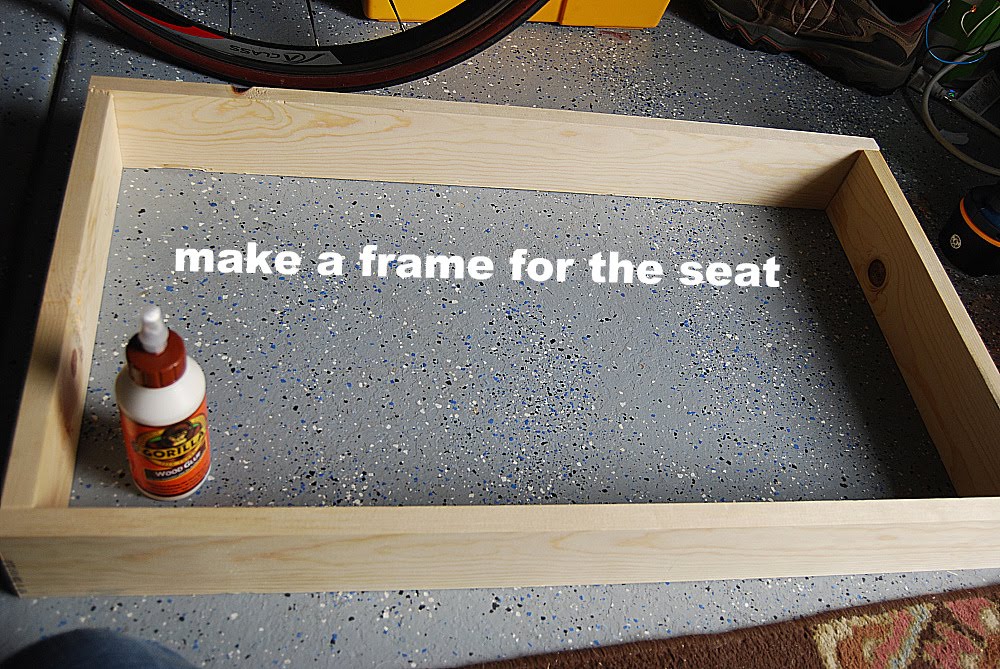
2. Then I measured the width of the crib — 30 inches. I cut two long boards from Home Depot to that length. I decided to make the width of the bench 18 inches so it’s pretty deep. You can make a bench anywhere from 16 to 20 inches — depending on how you want it to look. Then I cut the two sideboards 17 inches in length (you’ll see why in a minute).

I added some Gorilla Glue Wood Glue to the edges that touched and then screwed them together.

3. Then I cut the boards for the top of the seat. I cut them 18 inches in length so that there would be a 1-inch hang over on the front of the seat. I also used wood glue on the underside of the boards before I hammered them onto the frame.

4. For the legs of the bench, I bought two sturdy chair legs from Home Depot. They have an end that has a screw on it. Then I bought some metal leg attachers — the leg screws right into the metal piece. I added an extra block of wood underneath to add more stability. Then I screwed that attachment into the bottom of the seat at the front two corners. The other legs of the bench are the back of the crib. I also used Gorilla Wood Glue between the boards.

5. I found some cute moulding to put on the back of the bench to add a little more interest. And I bought some rope moulding for the bottom of the seat apron. Then I attached the seat to the crib using L-brackets I also found at Home Depot.
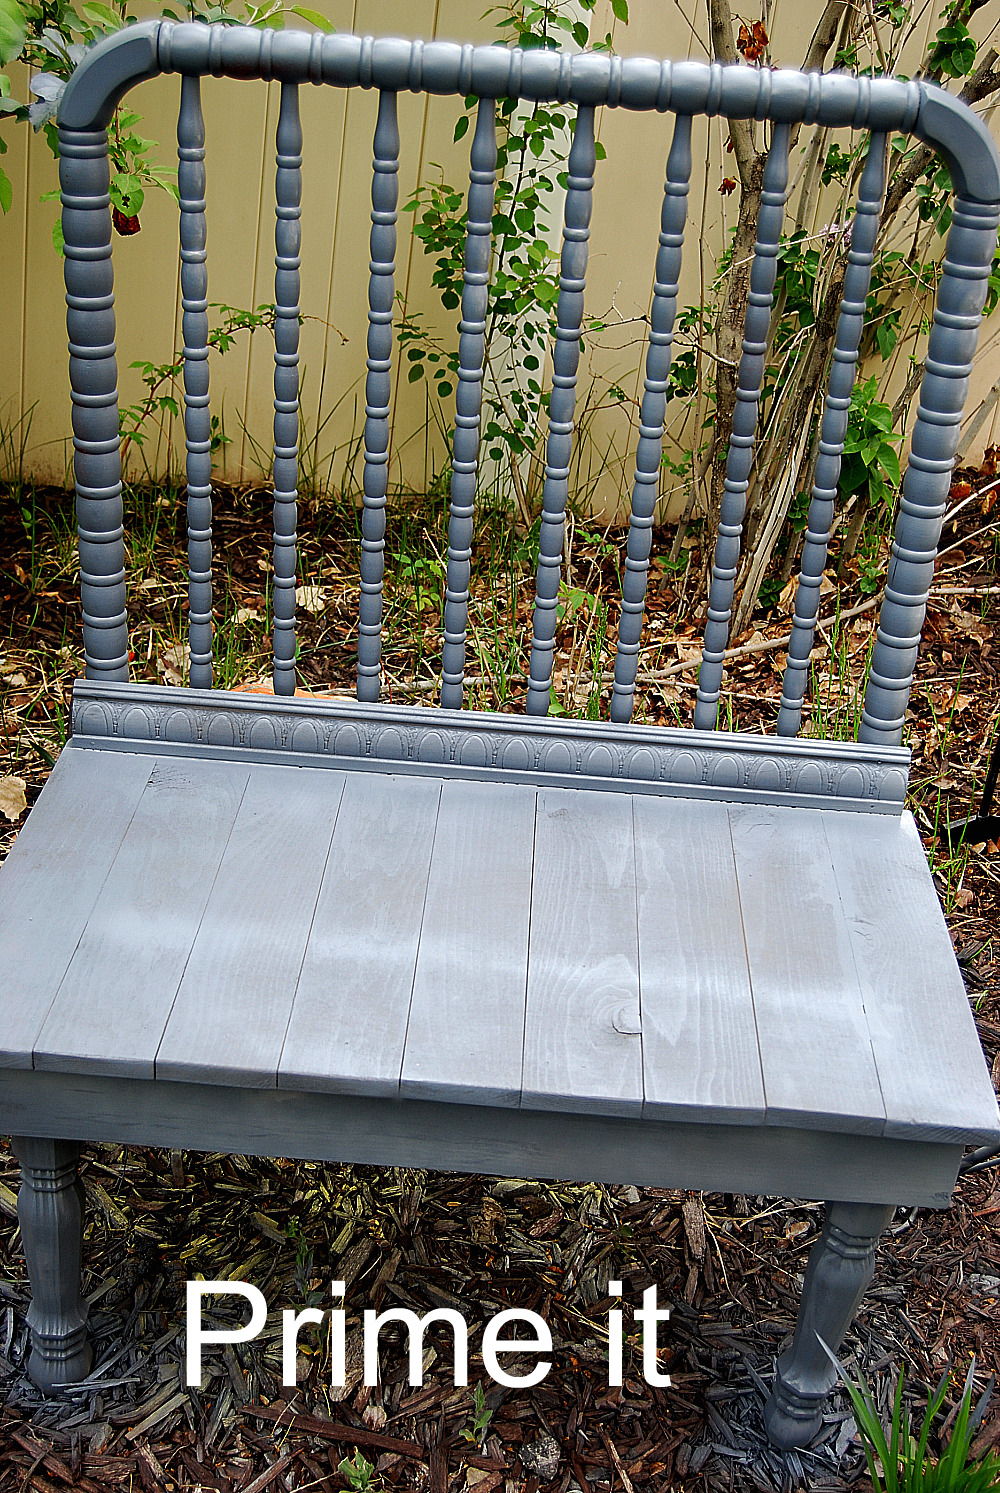
6. Then I primed the bench using spray-on wood primer.
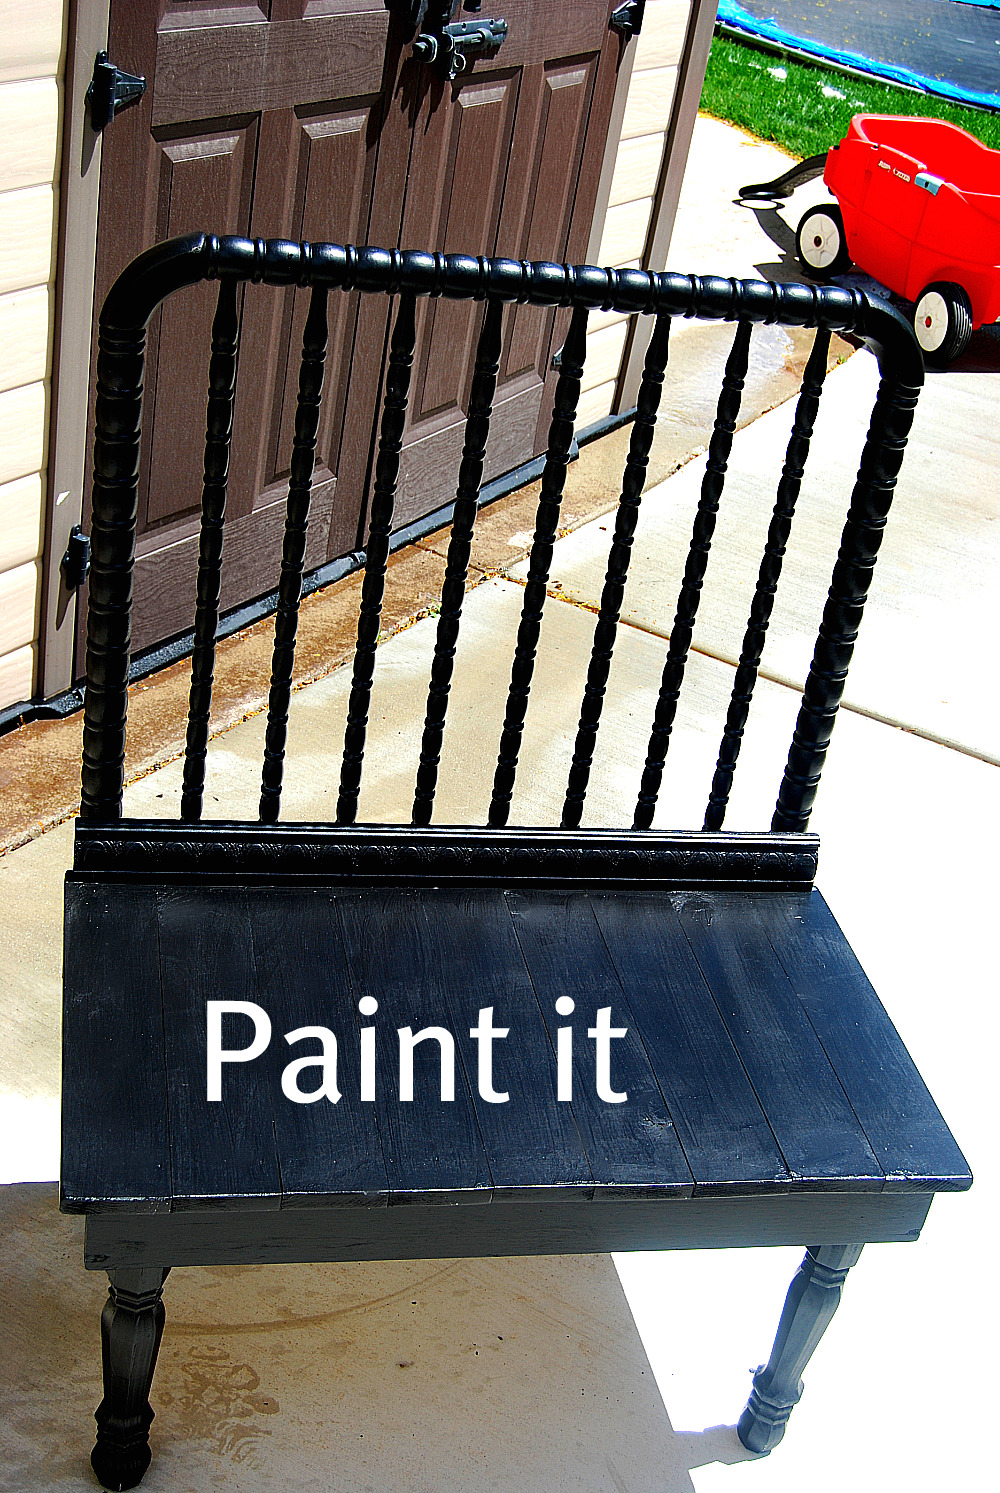
7. After the primer had dried overnight, I was ready to paint! DecoArt sent me some patio paint to try. It can be used on concrete, wood or metal and is great for things that are going to be exposed to the elements. I used the “Wrought Iron Black” color. To apply it I used a big bristle brush that could get in all the nooks and crannies. I put two coats on the bench and let it dry.

8. Then to accent the wood details on the moulding, I decided to use a glaze over the top. I took some “Dark Eucalyptus Green” DecoArt Patio Paint — which is really more of a pretty teal color. I put about 2 ounces in a plastic cup and mixed it with water-based glaze from Home Depot. Then I brush that combination on the bench and iped it back off with a rag.

My assistant helped me with this stage — she did a great job!

I think I’m going to look for another old crib and make a matching one for the other side of the porch!

It was my first big foray into the world of power tools.

XOXO


www.tatertotsandjello.com


Did you just paint the seat and back molding with the teal color . What is the proportion of paint to glaze .
How exactly did you attach the seat frame to the crib piece? My crib is exactly like this one.
Love this! thanks for sharing..
::singsong voice:: AWESOME!!!!
I have a crib just like that sitting out in my garage waiting for Sunday night to set out in the trash. Not any more after this post!
It's a family crib – my husband's step-mom bought it for her first daughter (28 yrs ago), used it 8 years later for the second daughter, and then 4 years ago her oldest's baby slept in it. Last winter my baby slept in it – and it's done for now as it is a safety hazard.
But I totally can see a set of 1 long bench and two short benches made from it 🙂
What a fantastic idea! Very clever, and it turned out lovely!
I can't wait until my baby grows out of his! It'll make a nice, useful keepsake. Thank you!
i love this idea. i was just looking at a crib that my dad (who passed away) & husband made for my daughter, & both of my sweet kiddos slept in… wondering what i should do with it. huh… maybe this is it. each of them can have one. we shall see.
I love how this turned out. Fabulous!
Thanks for the detailed tutorial. I have wanted to try this…but couldn't really wrap my head about what steps would be necessary. Thanks!!
Really Great Job! So, creative, I love it!
xoxo,
KareyEllen
KareyEllenDesigns.blogspot.com
CUTE Jen! I just picked up an old iron bed…for free…to make a bench out of. We had an auction at our school and the shop teachers made all sorts of cool items. Love it.
Adorable! You have such great ideas!
It looks fabulous, you did a great job!!
Love it! You always have the neatest ideas.
Oooooh, this rates a "ME LIKEY!" *LOL* You did a great job & one of these days maybe I'll bump into ya down there at George's!
Thanks for sharing.
♥hugs♥
I love this so much! My daughter is just about finished with her crib and I've thought about doing something like this to keep the crib in our home somehow, but repurposed.
Great job, and you made it look so easy and do-able!! Thanks for the great idea!
That is so cool! I know my family has a few spare parts of cribs here and there. Wonder if I could talk them into letting me use one for a similar project! Thanks for sharing!
I am not sure which is more adorable: the bench or your assistant…
This is so darn cute I can't stand it. I can actually do this.
How amazing is this!!!
I want to go right now and make one!!!
=)
I love it!! Were you able to paint the entire bench with one bottle? I wonder how it holds up against the elements?
I like it!! My youngest and last will be out of her crib pretty soon and it's the same style as what you used in your bench! I think I just might be making one of those myself! 🙂
This looks fantastic! You did a great job!!!
Such a beautiful and resourceful idea!
All I can say is WOW! you have a real gift of turning trash into a one of a kind treasure! Keep up the good work!
Jen, question, Which Gorilla glue did you use? Regular or wood glue? I ask because my recent foray with gorilla wood glue went really really poorly, it wouldn't stick to anything! I had to take my entire project apart and reuse Elmers wood glue instead.
Thanks!
~Kelli @ Smidgens
Amazing transformation! I love it!
Wow Jen, I am seriously impressed!!! That's beautiful!! xxoo
So GREAT! LOVE THIS!!! Thanks for the inspiration!! I love a good reason to make something new again!!! LOVE LOVE LOVE
I love this crib-to-bench idea! I think I will be keeping an out out now for an old crib headboard!
What a great bench. I can't wait to see the other re-do's you have planned!
That is awesome, Jen! I love what you did! I also love the turquoise on it too!
Jen what a terrific idea for a bench! It turned out beautiful. Love it painted black. Your sweet assistant is sure a pretty girl. *Smiles*
Thanks for your kind words on my finger injury. I *almost* got stitches for the first time in my life. Who knew plastic pots could be so dangerous huh? Yikes! I'm sorry about yours as well. It really is hard to function with a cut finger. I'm still waiting for this wound to close up. Sigh.
Blessings to you this week.
~Melissa 🙂
OH-MY-GOSH! This is AMAZING!
SO SO SO much better than I imagined it could be!
NICE WORK, GIRL!
You have some SERIOUS skills…
But we all knew that ! 🙂
Let's do it again (shopping)… This time, on the SOUTH SIDE!
Yay…I can't wait!
Shelley
Im so glad you did this tutorial! I mentioned doing one of these to the hubs for our please remove your shoes policy in our house and this tutorial is perfect to help us do it!
Aren't power tools so much fun? I can finally use everything in my Uncle's shop without his supervision(he finally trusts me)! The bench is gorgeous! I love the colors!
Welcome to the big girl world of power tools. You go girl! Love the turq glaze. Yum!
Jen, This is amazing! I am just in love with this! {Go Jen with the powertools!} Adorable! The finishing technique is gorgeous – the aqua glaze simply beautiful. I have to say I am a little jealous of your shopping trip with two other fabulous bloggers – that is really cool! Fantastic Job!!!
I love the recycling crafters!!! What an amazing idea!!! ~Shelley
I LOVE it!! I think that may need to be on my summer project list 🙂 I've been having a hard time w/ getting rid of our crib so this would be an awesome way to preserve the memory!!
Thanks Jen! 🙂
xoxo
Adorable! I absolutely love it!
Love this! You make it look so easy! It's all the details that make it so special – the molding and the glaze add a professional touch. Great job!
So awesome! I love it! I might have to do this when my baby out grows her crib!
Eeeeek!!! Love the molding!! Fantastic job. The teal glaze was also a stroke of genius! 🙂
Beautiful, Jen. I'm so glad you posted this! I've been wanting to make a bench but I'm having a hard time finding a twin headboard to use…so maybe I'll use a crib instead. GREAT idea!
So fun…I love Shelley (even though I have never MET her in person I love our emails and comments back and forth) 😉 LOL
Your crib bench is too cute!! I love how it turned out! YOU ARE SO CREATIVE!
Oh that's lovely! Although in don't know that I'm ready to chop up my crib yet – maybe in a few (or 30!) years 🙂 it looks so great though!
LOVE THIS, Jen!!!
Maybe I should just take apart my son's old crib and do this…
I am impressed with your power tool usage-that is something I haven't tried yet, but you have me inspired!!!
That's fantabulous!
What a great way to keep your crib if you are sentimental like me. 🙂
Okay, your assistant is just the cutest thing ever! 🙂 LOVE the bench, Jen!! Looks like you, Shelley, and Tausha had a blast. I got to meet Richella from Imparting Grace last month, and it was so cool to put a face with the blog. 🙂 Bloggy meet 'n greets are the best. 🙂
WOW! This turned out absolutely fabulous!! What a fun find… I will be on the hunt also 🙂 Love the pillow, too!!
LOVE LOVE LOVE IT JEN! I have seen a few.. yours is just so darling. I love the glaze touch too. WAY TO GO! what a darling assistant too. How fun to meet for lunch, to bad we can't HUGS, LUVS~ Jenn
So cute! I love the black and the glaze. I'm working on a changing table redo for a friend, but it is just plain white.
Great job, I think I am going hunting for a crib now!
wow it looks so good!
Fantastic bench!