Tatertots and Jello

COLORFUL HAPPY HOME -- Daily DIY, Decor, Craft and Recipe Tutorial

  • My Home
    • 1905 Cottage
    • Daybreak House
  • DIY
    • DIY Projects and Ideas
    • Organizing
    • Tutorials
    • Printables
  • Decor
    • Spring Projects
    • Summer Projects
    • Fall Projects
  • Crafts
    • Kids Crafts
    • Painting Projects
    • Paper Projects
    • Sewing
    • Wreaths
  • Holidays
    • Valentines Day
    • Easter
    • Halloween
    • Thanksgiving
    • Christmas
    • HAPPY Holidays Series!
  • Recipes

Explore

  • my home
  • diy
  • decor
  • crafts
  • holiday
  • printables
  • recipes

Connect

Home » crafts » Guest Project — Make a Gorgeous Yarn Ball Holiday Wreath!

crafts, guest tutorials, holiday · November 5, 2010

Guest Project — Make a Gorgeous Yarn Ball Holiday Wreath!

Tatertots & Jello is a participant in the Amazon Services LLC Associates Program, an affiliate advertising program designed to provide a means for sites to earn advertising fees by advertising and linking to amazon.com.

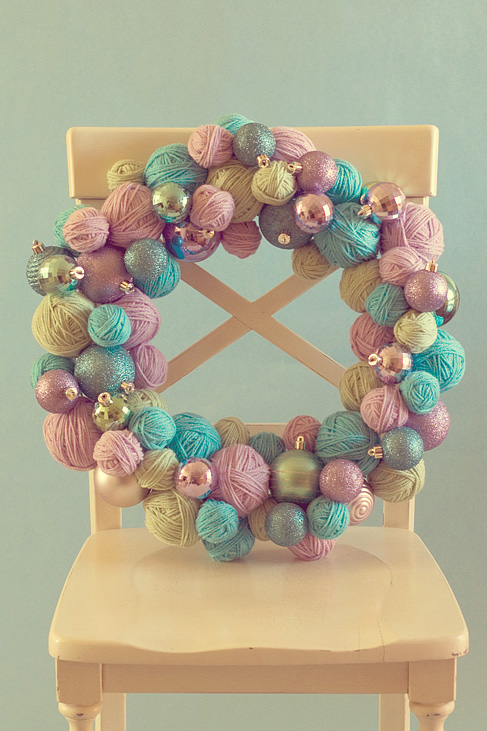
I have loved making these yarn ball & ornament wreaths…they make awesome gifts!  Here’s the tutorial if you’d think you’d like to have one in your home or to give away.  They’re super easy…

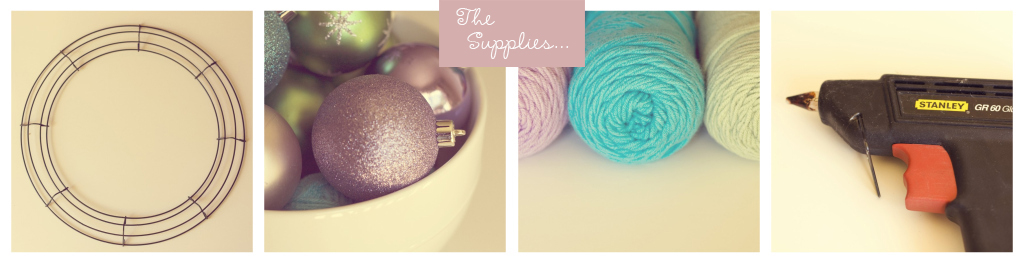
Here’s what you need:
{all supplies were found at a craft store, Wal-Mart, and Target}
Wire Wreath Form {I used a 18in. form}
Ornaments
Yarn
Glue Gun
Styrofoam Balls
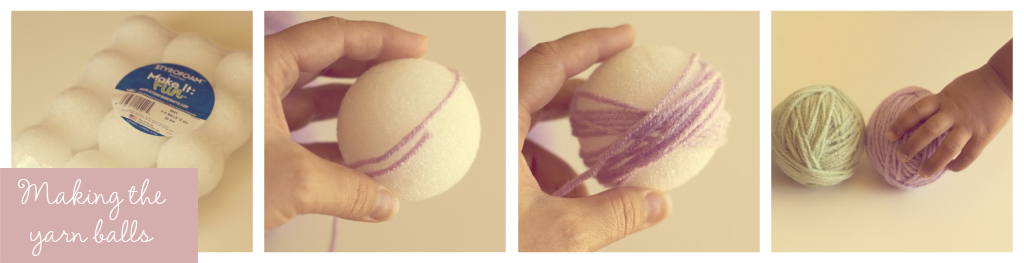
To make the yarn balls:
I used a variety of sizes of styrofoam balls.
The sizes I used are: 2 1/2 inch, 2 inch, 1 1/2 inch
Wrap the yarn around the styrofoam ball in various and alternating directions {just like making a real yarn ball} until all of the white sytrofoam is covered.  When you’re finished just tuck the end of the sting underneath the yarn to secure it.
Making the wreath:
There are a couple of  ways to do this.. you can evenly space out your large yarn balls onto your wreath form and glue them one at a time.  And then you can glue your smaller yarn balls and ornaments around your large yarn balls.  I have done this on a few of my wreaths.
Or you can build the wreath one section at a time building upon each section as you go.  I found that this leaves less ‘wholes’ and hides the wreath wire form from view.  This method works better for me and I like the way it looks.  I added the larger yarn balls and ornaments around the base of the wreath form and then I filled the ‘holes’ with smaller yarn balls and smaller ornaments.  Securing each by gluing them to one another and to the wreath form.  While gluing the pieces together you’ll want to hold them for 15-20 seconds to make sure they are secure before moving on.  I also made sure that I alternated the colors.
I found that holding the wreath upright or hanging it on my door let me have a good look at it and find the places where I needed extra pieces added.
I adore this wreath Kristi!! 
So beautiful!
And, speaking of beautiful — take a look at Kristi’s blog
life through the lens!
http://3.bp.blogspot.com/_iO21zLwWVVE/S8OMt2FWPxI/AAAAAAAAB60/J5XBjA20kLY/s1600/tutorial+1+with+text.jpg
http://4.bp.blogspot.com/_iO21zLwWVVE/S8PEWFYSK3I/AAAAAAAAB8s/E4NglLapVp8/s1600/tutorial+final.jpg
{Flower Headband Tutorial}
[magnet+3.jpg]
{Magnet Tutorial}
She also posts a Photography Prompt each week that you can join in:
http://3.bp.blogspot.com/_iO21zLwWVVE/TMI9pq1ZdPI/AAAAAAAACRA/31RGFBOJysk/s1600/photography+prompt+week+17.jpg
And Kristi has an amazing etsy shop: 


2011 Fine Art Calendar 5 x 7
i love you 8 x 10 fine art photograph
LOVE fine art postcard set
Be sure to check out life through the lens — you will be glad you did!!
xoxo
PS — It’s Friday!! I’m excited for the WWU Party! Come link up YOUR ideas so I can feature YOU! The party starts at 6 pm {MST}. Be there or be square!
PPS — And coming up next week — I am showcasing some wonderful handmade shops for the Holidays with a WEEK OF GIVEAWAYS! Don’t miss it!!


This post brought to you by

Posted By: Jen · In: crafts, guest tutorials, holiday

Guest Project — Throw a Fabulous Bumble Bee Party!
Great Ideas — {Thanksgiving} printables!

You’ll Also Love

DIY Gingerbread Christmas Wreath
make a dog playhouse out of a box. all the instructionsMake an Adorable DIY Dog Playhouse Out of a Box!
Good Witch Tea Party Ideas{Good} Witch Tea Party!! [and free Halloween Printables]

Comments

  1. Michaela says

    November 8, 2010 at 7:12 PM

    I love this post! She's wonderful. That wreath is great and boy are the flower headbands adorable. Going to her Etsy shop now!

  2. Black and White {Side by Side} says

    November 8, 2010 at 3:14 PM

    That wreath is AMAZING! I'm going over to check out her blog now!

  3. Cupcake Carrie says

    November 6, 2010 at 3:28 AM

    i love all the bloom bags!

  4. Vivienne says

    November 6, 2010 at 2:17 AM

    That is ADORABLE!!!!!!!!!!!!!!!!!!!

  5. Mama K says

    November 6, 2010 at 12:29 AM

    Wow!! That is beautiful!! I will probably try one, but I don't know if it will turn out as great as that one! I'm sure it takes some practice to get it perfectly shaped! Thanks for the tutorial!

  6. Selena says

    November 5, 2010 at 11:15 PM

    Thank you for sharing your creative spirit. My mother is a knitter and I plan to make her a wreath to bring home at Thanksgiving… it will be a nice start to her Christmas decorating! I am excited and know she will love it!

    Thanks again!

  7. thepeasanthousewife says

    November 5, 2010 at 11:03 PM

    And I just destashed all my acryllic yarn (to make room for the awesomely delicious wool, alpaca and silk yarn).

    To go buy more yarn or not… hmmm.

  8. { L } says

    November 5, 2010 at 9:57 PM

    Ok WOW! I have found a new true blog TREASURE!! I am excited about every single thing you posted of hers. LOVE her style. Thank you, thank you for showing me this. I'm happy to see she has an etsy store too lol. 😉

  9. Jenni says

    November 5, 2010 at 9:51 PM

    Oh, I love this yarn wreath! What an incredible idea! She is so talented! 🙂

    Also, I wanted to let you know that we are having a giveaway over at Beautiful Nest, if you would like a chance to win! 🙂

    I hope you have a wonderful weekend!

  10. Ray* says

    November 5, 2010 at 9:19 PM

    What a Gorgeous project!!!!! This is so pretty!

  11. Jenn Erickson says

    November 5, 2010 at 7:54 PM

    Those soft pastels positively make the piece! It's so lovely!

  12. jennykate77 says

    November 5, 2010 at 7:44 PM

    Oooo, so pretty and pastel-y! 🙂 I love it! I need to go read that headband tutorial!! I want one!!!

    Hope you're having a fab Friday, Jen!♥

  13. Kelli @ RTSM says

    November 5, 2010 at 7:36 PM

    I love, love, love the non traditional Christmas colors in her wreath! I use a lot of icy blues in my Christmas decor, and this would be a great addition!

  14. The Blonde Duck says

    November 5, 2010 at 7:23 PM

    Adorable!

  15. Kari @ Ucreate says

    November 5, 2010 at 7:17 PM

    SO, SO, GORGEOUS!! The project and the photo are incredible!

  16. MiMi says

    November 5, 2010 at 5:08 PM

    And now I know what to do with all of my leftover yarn!!!

  17. April says

    November 5, 2010 at 4:39 PM

    WOW! I will definitely be trying my hand at one of those wreaths for Christmas. Thanks so much, Jen!

  18. shel says

    November 5, 2010 at 4:34 PM

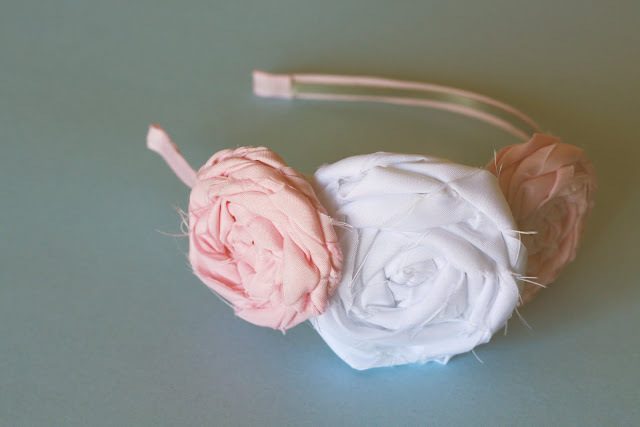
    I'm trying my hand at fabric flowers and will need to try to make my 2nd grader a beautiful headband similiar to this one! thanks for the tutorial, too 🙂

  19. Jeanna says

    November 5, 2010 at 4:27 PM

    This is so beautiful. Love it and I'm heading to the store to get supplies to make the yarn wreath today. Jeanna

    Dramaqueenseams.blogspot.com

  20. Beverly @ FlamingoToes.com says

    November 5, 2010 at 4:22 PM

    That is a fantastic wreath!! I love the colors.

  21. Lei says

    November 5, 2010 at 4:02 PM

    Gorgeous wreath, and I love her color pallette, it's so yummy! (Makes me think of jordan almonds;)

  22. Sharon says

    November 5, 2010 at 3:53 PM

    Beautiful! I love the soft colors in the wreath (and the other photos, too). What a lovely use for STYROFOAM brand foam. Thank you for featuring this! Sharon

  23. Mandy says

    November 5, 2010 at 3:31 PM

    Just recently found your blog, looking forward to reading it more! I think I'm going to have to make this charming wreath!

  24. Jingle says

    November 5, 2010 at 2:13 PM

    I love that wreath AND I love that headband AND…well, I just love this post!

  25. Tammy @ tinselshop.com says

    November 5, 2010 at 2:13 PM

    Jen,

    I ADORE this wreath, the colors are gorgeous! I might have to give this one a try.

    Best wishes,
    Tammy

  26. Becca says

    November 5, 2010 at 2:06 PM

    I love the look of this and am totally going to try it.

  27. The Wife In Her New Life says

    November 5, 2010 at 2:02 PM

    the wreath is beautiful! great tutorials and ideas =)

  28. Dixie Mom says

    November 5, 2010 at 1:47 PM

    Beautiful! I wonder what a small cluster of yarn balls would look like on a headband. Too much?

  29. Michele {The Scrap Shoppe} says

    November 5, 2010 at 1:19 PM

    This is absolutely beautiful!! And I'm in love with the colors.

  30. hiyaluv says

    November 5, 2010 at 12:31 PM

    i am {so} in love with this wreath! Thanks so much for sharing! I was looking for the perfect holiday wreath and I think this is what I will make:)
    gina

  31. Sarah AJ says

    November 5, 2010 at 12:18 PM

    I was just looking for yarn ball wreath tutes yesterday! Love this one.

  32. PartyMom says

    November 5, 2010 at 12:08 PM

    I love the different take on an ornament wreath…I think I know someone who might enjoy this! Thanks for the tutorial!

  33. Simply LKJ says

    November 5, 2010 at 10:57 AM

    That is gorgeous!!

  34. Lisa says

    November 5, 2010 at 10:38 AM

    This is so beautiful! Thanks for the tutorial…. I'm going to try it for my SIL — she'd LOVE it.

Hi! I'm Jen Hadfield. I'm a mom of 5 restoring an 1891 home in the heart of Salt Lake City. I love being creative and sharing simple ideas to make your life easier and more beautiful!

Receive the Latest Crafts, DIY, Recipes and More in your INBOX!

Follow us on Pinterest! It's awesome!

Top Posts & Pages

Spruce up Your Outdoor Space with a DIY Recirculating Fountain! (tutorial)
A New Deck in Under 30 Minutes!
DIY Secret: How to Print on Post-It Notes (and Free Printable Template)
Copycat Panera Spinach and Artichoke Egg Soufflés - SO good!
12 Must-Have Items to Pack on an Alaskan Cruise!
How to Change a Recessed Can Light into a Pendant Light with No Remodeling!


Popular Posts

  • Spruce up Your Outdoor Space with a DIY Recirculating Fountain! (tutorial)
    Spruce up Your Outdoor Space with a DIY Recirculating Fountain! (tutorial)
  • A New Deck in Under 30 Minutes!
    A New Deck in Under 30 Minutes!
  • DIY Secret: How to Print on Post-It Notes (and Free Printable Template)
    DIY Secret: How to Print on Post-It Notes (and Free Printable Template)
  • Copycat Panera Spinach and Artichoke Egg Soufflés - SO good!
    Copycat Panera Spinach and Artichoke Egg Soufflés - SO good!
  • 12 Must-Have Items to Pack on an Alaskan Cruise!
    12 Must-Have Items to Pack on an Alaskan Cruise!
  • How to Change a Recessed Can Light into a Pendant Light with No Remodeling!
    How to Change a Recessed Can Light into a Pendant Light with No Remodeling!
  • Mother's Day Cup Holder Gift Basket
    Mother's Day Cup Holder Gift Basket

As seen in


Amazon Affiliate

Tatertots & Jello is a participant in the Amazon Services LLC Associates Program, an affiliate advertising program designed to provide a means for sites to earn advertising fees by advertising and linking to amazon.com.
  • About Me
  • Advertising
  • Get Featured

Copyright © 2025 Tatertots and Jello · Privacy
This site is a place for positive discussion and ideas. Negative talk, comments that disparage others, and similar are not welcome and may be removed.