Greetings, Tatertots & Jello readers! I’m a huge fan of Jen and her incredibly creative project ideas, so I’m thrilled to be a guest here today to share a project with you as part of her series on Dinner Dilemmas.
“What’s for Dinner?” If these three little words strike terror in your heart, why not find a fun way to answer that question for yourself and your family? Today I’m going to show you how to turn junk mail magnets into a cute set of meal planning magnets.
I designed this project to be simple and affordable. I’ve even provided a free printable PDF for you. As an added bonus, you’ll keep all of those junk mail magnets out of the landfill!
Materials:
- Junk mail magnets (the best are those awful giant magnets from personal injury lawyers that are always glued to the back cover of the phone book, but any flat magnets will do: pizza delivery, dentists’ offices, credit card solicitations, etc.)
- Wide packing tape (I used the glossy kind)
- Scissors
- Decorative paper (I used 6 x 6 scrapbook paper)
- Double-sided tape (optional–not pictured)
- Computer and printer
Instructions:
1. Start by flipping through your recipe file and listing your favorite “old standby” recipes. This tutorial will teach you how to make 35 magnets, but you can make as few as you’d like; you can always add more later.
2. Open Microsoft Word and create a table that is 5 squares wide by 7 squares high (my “squares” were each 1.25″ x 1.5″). Type the name of one meal in each of the squares. Keep it simple–just name the main dish. You might also want to make several magnets that say “Left-Overs”, “Dinner Out”, “Take Out” and/or “New Recipe”. I used a 22 point French Script MT font, and I centered the meal names in the squares.

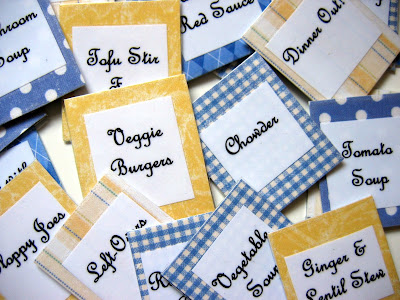
4. Using scissors, cut a magnet to roughly 1.5″(w) by 1.75″(h). Cut a piece of scrapbook paper to the same dimensions. If you really want to annoy your friends & family with your fastidiousness, you can color code your magnets. I used yellow for meals that are protein-based, and blue for “carby” meals such as pasta dinners; that way, I can tell at a glance if my week is balanced (I’m a vegetarian, so I need to be mindful about protein).
5. Using double-sided tape–or very good fine motor skills–to keep the layers in place, layer the magnet, scrapbook paper, and meal name.
6. “Laminate” the whole thing with packing tape. To do this, cut the tape a little bit longer than the magnet, cut off all four corners of the tape, and fold toward the back (see below). This step can be time-consuming, but it’s mindless enough that it’s a good while-you’re-watching-a-movie project.
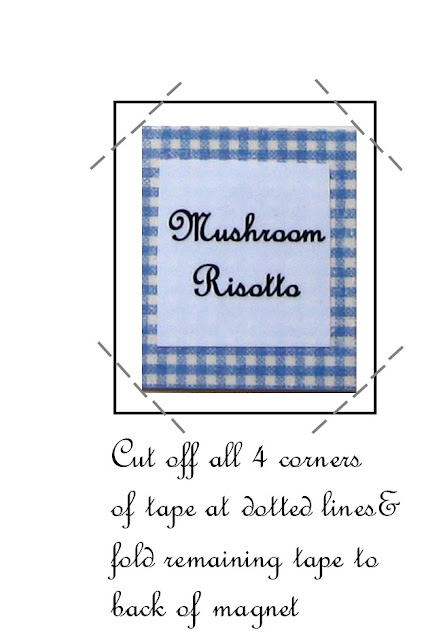
7. If you’d like to use my days of the week and the “What’s For Dinner” header, you can download a free PDF from my website here. To “laminate” shapes with rounded edges using packing tape, use “V” shaped notches to navigate the curves.
8. Arrange the current week’s magnets on the front of your fridge–keep other meal magnets on the side of the fridge for planning future weeks’ meals. Some of my readers with stainless steel refrigerators have written to say that they used a cookie sheet to display their magnets. To further streamline your meal planning, you can make your own customized, pre-printed grocery list with the instructions that I provided here.







Hi,
I am one half of a mompreneur team that created an affordable magnetic menu planner. I would be interested in knowing how your home made version is holding up. We had originally used the printable magnetic sheets in our first prototype and found that after being used for awhile, the thin magnets did not hold up and would start to fall off our planner. We upgraded to a heavier gauge magnet and they work beautifully. We have been selling our planners since 2010 and would love to spread the word about an alternative for the less crafty people out there! Our website is sticktoitplanner.com
Happy Planning!
Love your blog, and this is a great idea. Thanks to you both for the inspiration! I can see getting the kids involved in this project as well…nice summer time activity.
This is incredibly smart and awesome! I love it!
This is such a great idea! For me, the dry erase and memo boards don't work because I have TOO many recipes to the point where I'm overwhelmed by choices. Being able to see everything at once will make a huge difference for us!
One question…I don't get phone books or junk mail so I don't have a stash of magnets. Do you think they'd sell those at my craft store?
This is so inventive! I want to try your ginger and lentil soup. Love your blog.
I LOVE this post! I don't know why I haven't thought of this before. I will be putting this idea to good use! Also hope you don't mind but I love your blog and gave it a shout out this week on my blog. Along with a link to this post. Thanks 🙂
This is such a cute idea!
What a cute idea!
Great idea!! I really like this. I'm going to have to put this on my "to do" list. 🙂 Thanks so much for the inspiration!
Blessings,
Sarah
What a great idea!!! I need to come up with more recipes for dinner. Any suggestions on that?
Such a cute idea! This actually makes meal planning seem FUN!
Oh my! How wonderfully easy and inspiring! I am new to blogging and absolutely LOVE yours and I will check out Amy's too. thanks, thanks so much!
Stephanie Watson
Keeping Connections
Totally AWESOME!
sheesh, haven't been inspired to say that in while.
love them.
Awesome! I love it, I love it, I love it!
I just write it on a memo board. This way is so much better, thanks for sharing !
I love this idea. I'm never organized enough to know what I'm eating ahead of time so perhaps some cute magnets would help! Thanks for sharing Amy!
What a fantastic idea! I love it when something practical is cute as well 🙂
~ Emily N. from "too Blessed to Stress"
I love this idea! Thanks for sharing.
Fabulous idea! I'm thinking I need to do this on for sure. I've been using a dry erase marker on the side of the fridge………ya, it gets erased, a lot, and then I have to try and remember what was there. So, thanks for the great idea!
Wow, this is such a great idea! Thanks so much, I'll be linking. Off to check out Amy's blog!
Great Idea! I love it. Will have to do this soon.
Great Idea! Thanks so much for sharing Amy 🙂
{Brittany}
I love this idea!! I am about to make the transition from working to being a stay-at-home mom and will have much more kitchen duty! This will help out a lot! 🙂 Thanks!
Thanks for the opportunity to guest post! I hope that you have a great visit with your sister 🙂
Amy
PS- My post on my blog today highlights some of my favorite projects from your blog.